


Your cart is currently empty!
In Progress » Hardboiled AFS in under 12 Days
01.12.09 » Source, Concepts & Initial Building
So I heard about a MaK contest coming up whose
deadline is the 12th of January. When did I find out? I think
it was December 28th or so. Oops! I thought for a few days
that it was too bad since that would be fun to participate
in. Finally on the morning of the 31st I decided to put off
the ScopeDog and try to build something cool in 12 days for
the contest.
I decided to build up an awesome Hardboiled
AFS conversion on a waterfall base with a large oak tree.
Things were going smoothly until 5-days in when I was informed
that the conversion kit I was using wasn’t “official”
and would anger the Japanese. I had no idea when I purchased
a few of them that it was considered “bad” so to
the Japanese MaK community you have my apologies. While I
still could enter the kit in the contest, the fallout would
had been more of a mess than I wished on some friends of mine.
Instead I decided to make this build purely for personal sport
and see if I still could finish this in 12 days.
When you read below you’ll see that as usual
I made something that should had been easy and quick into
something way complex. Below is the build on a near day-by-day
account.
12.31.08 » Day One: AFS and Base Planning
I started by building my Wave AFS + Francesco’s
Hard Boiled AFS conversion. Talk about shake and bake. I spent
40 minutes getting the kit to a stopping point where I needed
to soak/clean the resin and let seams cure. Then later that
night I cleaned the seams and resin. (no pics)
I also started the base for it which will be
a summer waterfall scene on an unfinished hexagonal jewelry
box. For the water I’ll be using the castin’ craft clear resin
as I’m familiar with it and it’s drawbacks, gloss gel medium,
fishing line, clear plastic, and plastic wrap. Yeah… lots
of stuff! The plastic wrap will be to seal the waterfall holes/gaps
off from the pool so that when I pour the pool I don’t lose
all the resin below and make a mess. The clear plastic and
fishing line are coupled with the clear gloss medium to make
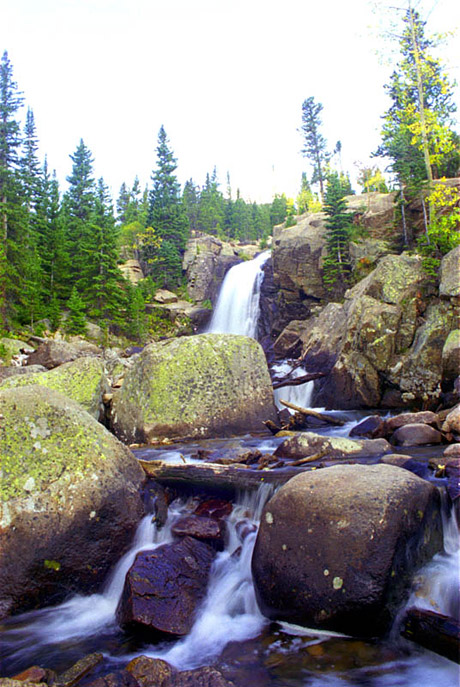
the splashes and drips and even the falls. Here’s my reference
pic:
01.01.09 » Day Two: Materials and Base Sculpting
Today I have the AFS wired into a pose and have
started the joint sleeves by forming a thin core of Ave’s
Apoxie Sculpt over the wires to hold their place and create
some bulk for the later folds and such. (no pics yet)
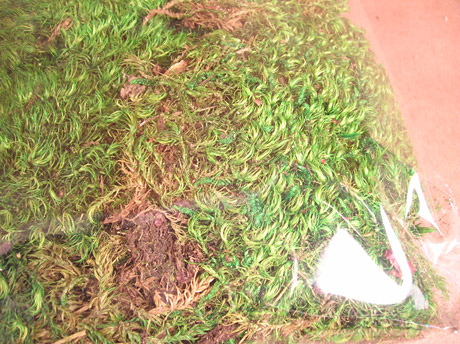
I also picked up some “Super Moss”
Preserved Mood Moss (MOOD MOSS!? WTF?!) at Michael’s today
as it looks like small sprigs of it will make for some nice
randomly placed weeds along with my usual moss stuff.

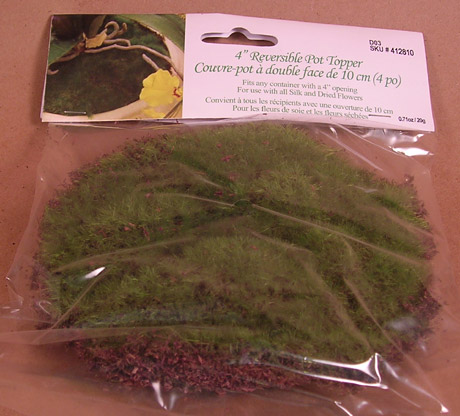
I also purchased something called a “clay
pot topper” which I swear looked like Silflor over a
compressed moss backing. At $1.99 for a 5″ disk I think
I’ll use them often. The reverse side looks like great leaf
litter.

Here’s the pics so far of the base. You can
see that I’ve cut some of the hexagonal box away to facilitate
the 3 levels of the waterfall and the rocks. The middle tier
will contain a small pool which has been dammed by a random
log based on my reference pic. This gives me a great way to
realistically add more water so that I can have the AFS interacting
with it. The AFS will be stepping out of that pool and onto
the level next to the tree. One foot will be by the tree while
the other will be lifting out of the water. right now I’m
not sure if the foot will be submerged but there will be splash
effects and many drips coming from the lifting foot.
The rocks were glued onto the base after I added
some odd rock in the base for filler. Smaller rocks and sand
was used to fill in the gaps and then just river-rock was
used over that to hide the sand.


I also made a to do list for EVERYTHING that
needs done for this build. Looks like a lot but I think I
can bang all this out in the 12 Days of MaKsmas! Lists help
me see where I’m at and schedule events to make the process
quicker.
Hardboiled AFS
- Cut and Sand AFS Parts
- Clean Resin
- Clean-up seams
- Wire AFS into pose
- Joint Covers Legs
- Joint Covers Arms
- Texture
- Primer
- Paint
- Additional Camo
- ID Bands
- Mig Filter
- Paint Chips
- Gloss Coat
- Decals
- Satin Coat
- Discoloration
- Wash
- Flat Coat
- Pre-Dusting
- Pigment General Dusting
- Specific Pigment Effects
- Rust spring cables
- Build All
- Water/Wet Effects
Base
- Stain Wood Base with thinned India
Ink - Clearcoat Wood Base
- Make Tree
- Paint Tree
- Paint Celluclay
- Paint Dark Dirt
- Paint Dirt with pigments
- Apply Gloss Gel as Sealant to water
pools - Add sticks and leaves in water
floor - Mount AFS if necessary
- Seal waterfall gaps with plastic
- Make Upper Waterfall
- Pour Main Pool
- Make Lower Waterfalls
- Pour Lower Pool if necessary, otherwise
use gloss gel - Make ripples in pools with gloss
gel - Apply a few leaves floating in
upper pool - Apply Leaf litter
- Apply Foliage, grass, plants, and
fallen whole leaves - Make Leaves
- Add Leaves to tree
- Add Moss and Lichen to rocks
- Add bird poop (deer poop too?)
I also created an animation showing my painting
and weathering process for the camo scheme I decided upon.

01.02.09 » Day Three: Base Staining
And Falls Part 1
I stained the base with water-thinned india
ink then sealed it with this Matt Varnish:


The upper waterfall has been started using the
gloss ge and stretched clear sprue.


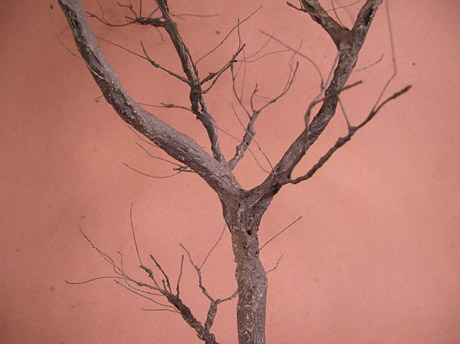
After Maschinen Krueger saw this and mentioned
my “twig” which I was going to base the tree on,
I did some thinking and root searching. Having come up with
not a whole lot I decided to try something out I’ve been wanting
to try for a few years now. Making
trees out of wire based on an article at ArmoramA.
So far I have the tree trunk and branches done
and textured. Based on the article, I did the wire wrapping
then I covered the larger branches and trunk with a cloth-like
but untextured medical tape. Then I coated, filled and sealed
everything, even the thinnest wires with the Liquitex Stucco
Texture Gel. On the thinnest wire twigs it makes them look
like they have small bud-like bumps and on the larger with
some vertical scribing with a needle while wet it looks like
bark. Really looking forward to priming it.For the smallest
twigs I used really thin bead-wire glued to the smallest twigs
with CA Gel.
Looks great though and like a real scale tree.
(birch at the moment since it’s all white, but tomorrow it’ll
be a young oak tree) Thanks for the constructive criticism
BK… always helpful to have another set of eyes.


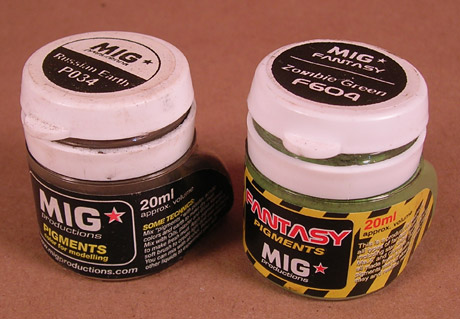
OH and that Zombie Green Mig Pigment is great
for moss effects! I also used thinned black/brown acrylics
and FFA to make the wet and darkened rock effects.
Then before today was over I got a lot of the
tree painting done. I sprayed it with dark gray primer then
hand painted it in thinned black apple barrel acrylic.. like
a thicker wash. When dry I airbrushed it with a medium brown-gray
mix AKA tree color. Then I gave it a few washes of black and
black-brown. Finally I drybrushed it with a tan-gray mix of
cheapie acrylics. I’ll refine the color and such later but
this is good enough to now set into the base.

01.03.09 » Day Four: Hardboiled AFS
Okay… been a productive day even though I
think I’ve spent less than 2 hours total on the paint not
including the drying times. Yesterday I managed to finish
the joint covers, pose and the texture. Even did a Hardboiled
Diaper like BK did on his.

I primed the kit about 9am this morning. Then
about 11-12am I did the paint and camo, even the octopus.
Really easy as you’re just hand-painting quick and random
small “c” shapes with a brush. I used Deck Tan for
the base and JGSDF Olive Drab for the camo.


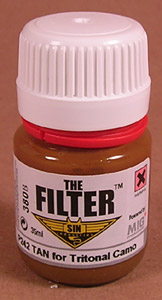
Then after a few TAN filters (4 hours drying
time total) I masked off the ID stripes and used a sponge
with liquid mask to pre-chip them like I did with the Slave
1. And that’s it so far. I’m going to let it rest a bit then
later I’ll airbrush on some FFA for decals and sealing.

01.04.09 » Day Five: Working Hard
No progress to report, but working hard! Check
out how I do groundwork
here on my blog.
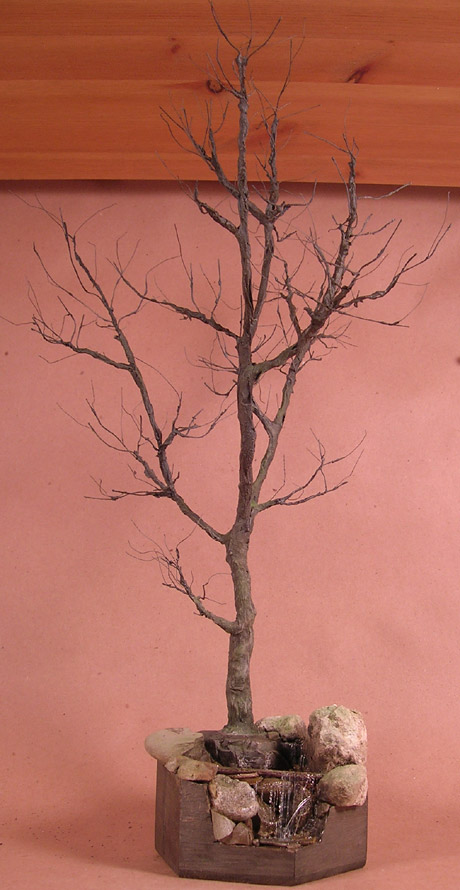
01.05.09 » Day Six: Mounted Tree, New Leaf Method, And Falls Part 2
No pics of the suit right now but it’s coming
along quickly and very nicely so far. The tree is ready for
leaves having finished a bunch of washes and drybrushes to
get that perfect tree color. Having some “twigs”
helps for reference. The waterfall in the front is shaping
up nicely as well. I’ve been using lots of stretched clear
sprue and stretched clear sheet to make the individual drips
and such. Dotting them with the clear gel makes for that realistic
rippled/drippy water falling look. You can see some un-touched
sprue ready to form a side waterfall that’ll shoot out from
between some rocks. I need to tame-down and attach the bottoms
then add the clear gel to do the drips and ripples. The main
fall is layered with sprue drips behind a sheet which has
more sprue drips and vertical gel streaks.
Not sure what to do though as far as color.
I’ll use very little cotton at the bases to help portray froth
but I’m debating on drybrushing the falls with gloss white
acrylic or not. Lots of the falls pics I’ve seen are taken
with a time lapse so they look white but those without look
a lot like what I have now which is perfectly clear drips.
Decisions decisions…

I figured out how to get green or autumn or
any colored leaves all year round. I really wanted to do a
green-leaved oak tree, not a yellow-leaved maple from the
yellow pre-punched leaves I already had. Plus my maple punch
is kinda small for 1/20 scale. Perfect for 1/35 however! So
I was thinking last night that maybe I could go to Michael’s
and use some sort of tinted parchment paper. No luck, but
I found some very thin, strong translucent green paper in
the scrapbook section. I also picked up a bottle of Folk Art
paint that was a very leafy color. The paper is awesome as
the light will still shine through the painted leaves a little
making it more realistic.

To start out I pinned the paper on the four
corners of a piece of plywood. I then sponged on random colors
of the 3 darker green tones UNTHINNED. This makes the paper
curls so the pins are important. The paper will also not be
flat but that’s not important either. After that first sponging
dries I used the green color I purchased and sponged that
all over the top. Kinda like Lin.K’s paint technique and gives
you some good tonal variations and a perfect texture.
Once that dried I turned the paper over and
sponged the back with a lighter sage green tone since the
undersides of leaves are lighter. Two other pluses to this
leaf method… No decay and no crispy breaking dry leaves!
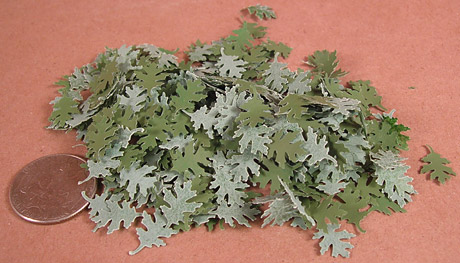
I used my oak leaf punch and pinched out many
many leaves. In the final image, that’s all the leaves from
one 8.5″ x 11″ sheet.Might be enough or I might
need more.

Before putting them on the tree I’ll use a
razor blade to push a crease down the center for the main
vein.
Michael’s had lots of translucent colors so
I’ll be doing this again for an Autumn scene for my Gans.
The also works for any leaves I think. I’ll be buying a heart-shaped
punch at some point to do those large leafy jungle leaves.
Just scissor-round the point.
Leaves so far. Been attaching them with small
dabs of CA gel and accelerator. BKs method of matte medium
wasn’t working for me as it doesn’t dry quick enough… at
least not mine. I also used those Brita filter balls which
are a greenish color as young acorns and glued clumps of them
on many of the small branches under leaves.

Marvy is the brand of punch I use for the oak
(fiskars is the small maple) and it looks like Marvy
has a larger maple too!
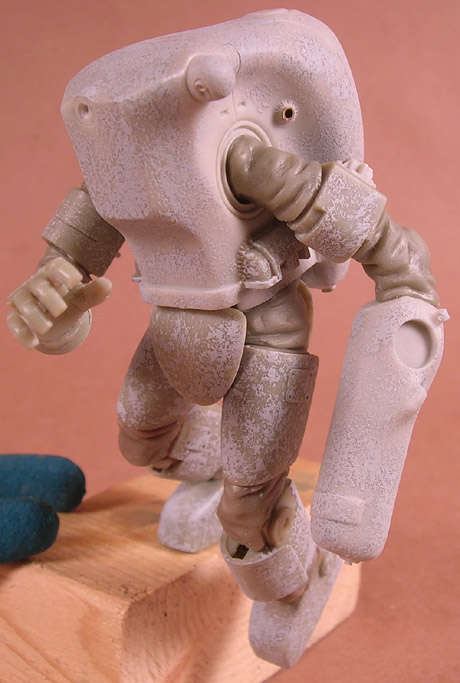
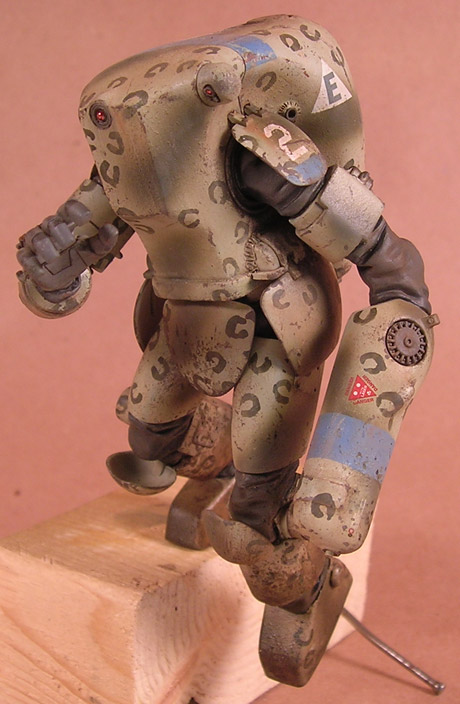
Here’s the AFS as it is now (compare to the
last pic) with the weathering and washes and discoloration.
All that’s left is flat-coat and pigment effects. I think
everything is more blended in now between the tones. The chips
were done with a small brush then some sponge for the finer
scratches like on the side-eye.

01.06.09 » Day Seven: Finished AFS and Gel Sealing for Water Pools
HB AFS is done except for the spring hoses.
Wanna “blacken-it” them still. Also need to add
“drips” but will add them when I mount it.

Fuel stains! The blueish plasma burn mixed with
some grimey black, future and water work great for them.


On the first day of MaKmas my true love gave
to me: an AFS with a oak treeeeeee!
Yeah, that was awful… Here’s the HB AFS mounted
on the base.


01.07.09 » Day Eight: Water Water Everywhere
I wasn’t going to, but I guess I’ll explain
how I did the water as a mini-tutorial. Mostly because looking
back at my Hovertruck dio
there was precious little info for me to recall reading it.
Everything I read I had already remembered on my own. This
way I can document it as I have more spectacular watery builds
planned!
The first are the materials I used for the water.
Castin’ Craft Clear Resin, The Catalyst for the resin, Flat
Earth, Gloss Black and Clear Green Tamiya Acrylic Paint. In
a small cup I mixed 1 oz. of resin, 6 drops of the catalyst,
and one drop each of the paint. Stir slowly and deliberately
as to not froth up bubbles in the mix.

Next is the main water pool before the pour.
You can see that I did many thin coats of the clear acrylic
gel in order to seal the rocks. Otherwise bubbles will come
up or resin will leak out. I used clear plastic under the
tree branch dam to keep the resin in. It’s basically invisible
now. Apply the gel very thinly and try not to make it more
than 1-2mm for each application. It goes on white and dries
clear, but if it’s too thick you’ll get frosted patches.

I only did one pour as it was sufficient for
the small depth and area to be poured. I wasn’t going to but
the resin was pouring nice and the color was perfect. Keep
dabbing the resin after about 5-10 minutes until it firms
up and the ripples keep their shape. When it gets tacky you
can still add more texture with a cheap plastic brush. Use
the leftovers from your pour-cup to test before going to the
main model. You’ll find that at the beginning of the tacky-stage,
about 30-minutes in for me, the texture still will soften
after a few seconds. I made more texture at the bottom of
the falls and under the foot.
One problem was when I tried to speed up the
curing a bit (since temp is a factor) with a heat-gun. I had
it set to low and was far away but it curled a few of my drips
as you can see below. Easy enough to remove them though and
make new ones so at least it’s a minor issue and not a huge
peeling shrinking mess like the hovertruck.
Next I’ll be adding more ripples and drips on
the legs, water surface, and two waterfalls. I’ll add froth
with polyester polyfill. Fake cotton fill for pillows. It’s
clearish, shiny and should work well if used VERY sparingly.
I’ll also be tinting the water a bit lighter under both the
falls with some tinted gel. I’ll add some Tamiya “Sky”
which is a pale gray-green and Flat Earth.

Since next up is also the groundwork I began
looking through my bins and found some items I had forgotten
about or didn’t think would work. For one I found a bunch
of oak leaves I had punched out of fall leaves god-knows when.
These will be great in the ground litter.
I knew I had some “Model Scene” 1/35
dandelions that might work which are made from laser-cut paper
but I forgot I had a ton of other plants from the same company.
All 1/35 scale plants and leaves but should work anyway here
as they’re large enough for small random plants. I think they
just need a slight semi-gloss finish. Right now they’re too
matte for real-fife. Thanks to Jindra for sending me all these
great laser-cut items.

01.08.09 » Day Nine: Plant Life and Completed Water Effects
First up the last of the water effects. The
Castin’ Craft has some issues but all of these are workable.
One problem I had with the Hovertruck base was that the surface
of the water seemed tacky forever. Well there’s a reason for
that. Apparently after doing some searching, this type of
resin will not cure completely where exposed to air. That’s
right… air. What to do? Well there’s sprays and stuff to
use or a waxy thing that ruins the clear effect. My solution
is my solution to all of modeling’s woes…
Future Floor Acrylic. Simple! Let the resin
cure for at least 8-12 hours on its own in a dust-free place.
Then simple brush some FFA over the surface. The future will
begin to cloud which freaked me out on my test pour but just
dry it with your airbrush or let it air-dry and it goes back
to crystal clear. Apply it in several thin coats. So there’s
something else to help you and me in the future when I wonder
again why my clear resin is tacky.
First on the images is the waterfall in-progress.
You can see how I used dabs of Clear Acrylic Gel to attach
more stretched clear sprue pieces. It goes on white but dries
clear. Once dry you can add more “dots” to the stretched
sprue pieces to make them look like falling water.

I did the same thing for the foot. Below is
the dry and clear water effects. At the bottom of the main
falls I added a very little bit of polyfill. (used for filling
pillows, toys, etc) It’s clear and simulates the tiny splashes
at the base. I added some clear gel dots to it as well.

Lastly for the base I applied the plant-life.
Moss was used for the random small plants in the leaf litter
and between the rocks. I also used the Fiba laser-cut plants
which I’ll describe below.

Roots were used for two small vine-type plants
branches. Each used my leaf technique as described above.
The small maroon leafs are from a Fiskars Maple punch. I just
dabbed on a semi-gloss maroon mix to my oak-leaf paper before
punching. The other bush also used leftover oak paper. These
leafs were made using those “pattern scissors” used
for borders on paper. I simply cut one loopy edge of lined-up
1/2 circles, flipped the scissors over and cut again. The
result was lots of these small eye-shaped leaves.

The leaf litter is just crushed-up fall leaves
with some punched fall leaves mixed in. TO apply it to the
surface I mixed some dark soil colored pigments with some
Matte Gel and brushed the dirt with it. Then I poured on and
pressed the leaf litter into that. Lastly I applied some Prepared
Matte Medium which is watered down matte medium. This seals
it, lets it keep it’s fullness but invisibly glues it all
together. Glue some full punched fall leafs to the top for
contrast and to cover up bare spots.

Now back to the laser-cut Fiba paper foliage.
I used “hart’s tongue” and “burdock”.
The burdock is the larger one in the pic. These are easy to
use but need some prep IMO before placing on the base. First
the paper looks like paper… very flat and well… like paper.
Plants are smooth so I airbrushed on a few thinned coats of
Future. Not to gloss it but to semi-gloss it. Afterwards it
looked much better. Then you simply cut them out of their
paper-sprues (easy) and take a rounded tool and press the
vein creases into them. Laying them on a soft surface makes
this easy.
Once “planted” I thought the burdock
was too green. A few coats of Mig Productions Tan Filter solved
that. Apply them with some Matte Gel.

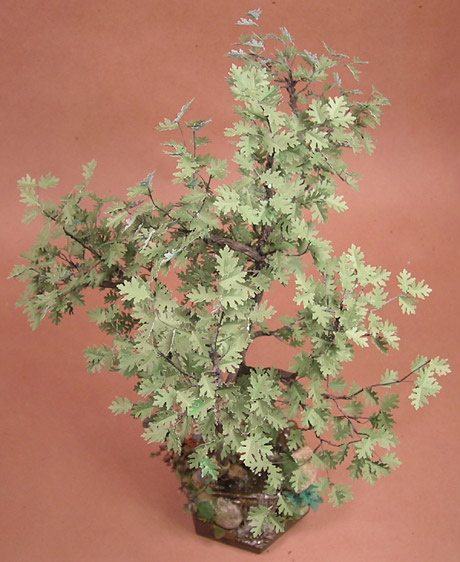
01.09.09 » Day Ten: Completed Tree
Last night and today I completed applying the
leaves to the tree. This was a painstaking process with a
few learning curves. The first thing I learned is that CA
gel is wonderful stuff for this. I usually use the liquid
CA aka Super Glue, but the gel clung to the leaves and branches.
Small dabs of accelerator and the leaf was affixed. At first
I tried Matte Gel but it took too long to dry and the leaves
wouldn’t stay up on their own.
The other thing I learned is to work from the
inside out and from the bottom-up. The first few branches
I applied leaves to I applied them all over and at first this
was fine. However as I got more leaves on I began to knock
others off while trying to use the tweezers and a rod to apply
the leaf and CA accelerator. Since each leaf was added one
at a time this was very annoying and a hard-learned lesson.
Lastly I learned that trees have a LOT of leaves.
I made one sheet of leaves and thought I’d have plenty. Then
I thought with my second sheet of leaves would be enough.
Then it was another 1/2 sheet. In the end I used almost 3
letter-sized sheets of punched out leaves. This was a lot
as I am quite frugal with the punching getting them as close
to the next as possible. So make more than you think you’ll
need then double that. You can always use any leftovers for
a later project.
Lastly is the additional moss and lichen. I
used my own tutorial to make this which
can be found here. The only difference with the moss is
that I applied it thin first then added some thicker patches.
Then as it started to dry I stippled it with a stiff brush.
This teased up the fibers in the flocking and made it look
more natural and carpet-like. I sparingly added a brown-black
wash when near-dry the sparingly drybrushed it with a bright
light green to simulate the new growth. I changed my lichen
application as well by adding it sparingly and as dots as
per my reference photos seen again below.


Yay! Ten days from start to completion. I’m
very proud of myself for doing this piece in that amount of
time and then sticking with it after I found out I couldn’t
enter it in that contest. I even have 2 days to spare! Sweet!
01.10.09 » Day Eleven: Photos Uploaded!
The project is done and photographed. Click
here for the final photos »

![Maude [Cyborg Action-Doll] (Files Only)](https://fichtenfoo.net/blog/wp-content/uploads/2023/01/Maude-Promos-300x300.jpg)


