


Your cart is currently empty!
In Progress » Wing Gundam Version Ka.
01.15.2005 » Concepts
I bought this kit in March 2004 at the Pittsburgh
Comicon along with an MG Strike and VF-0s. Almost a year later,
I’m finally getting to it. After doing the MG
Ex-S, Malevolent Creature, and
Vorflugkontrolle, I need a small, quick
build. Plus, I’m in the middle of painting my Vorflugkontrolle figures
so this gives me something to do while waiting for the oil paint
to dry.
Since I got the kit, I’ve been toying with various
ideas for color schemes. Nothing was really fitting this kit however.
I’ve also gone through 3 prior revisions of an anime-style girl
I illustrated in Flash to use on the shield. Then a week ago, I
was working on it again since I was planning on starting it soon
and I hit a total mental roadblock. I had a scheme I liked based
on a WW2
German aircraft scheme, but again, it wasn’t doing anything
for me.
So I was sitting at my desk, knowing that if I thought
too hard about it, nothing would get done. I picked up my VF-0s
to mess with some designs for that, and then my VF-1s Battroid toy
and suddenly an idea came to me. I opened up my Wing line art and
did a scheme based off Roy Fockers Skull Squadron valkyrie.
I didn’t want to be too literal with it, so I used
just the colors for the most part. Greens for the eyes and snesors,
charcoal gray instead of black, a gold stripe on the chest, and
a Jolly Roger on the cockpit. Finally, I had a scheme that I would
be happy using on this kit.
The kit will be done OOB (out of box) with the custom
scheme and decals. I want to see how long it will take to finish
after doing those last 3 HUGE projects.
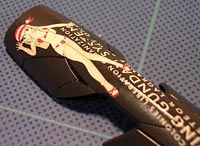
I went right to work on the decals using one that
came with the MG Wing Zero as a reference for inspiration. The decals
that came with the Ka are great, but not what I wanted. I also went
and recreated all of the fantastic warning decals so that I can
have waterslide versions instead of the craptacular stickers that
Bandai supplies. I used info at MAHQ and the original decals as
reverence for what to write. 4.7.195 is the date Operation
Meteor bagan in Gundam Wing so I used that in the scheme. I
also used Lagrange Point One and Colonies Liberation
Organization in the theme.
The pirate girl for the shield began as a purple-haired
girl in a dress I created for one of my older thoughts for a Wing
Gundam scheme. I later changed her to fit the German scheme by changing
the clothing, left arm, head and hair. To make her fit the new “Skull-Leader”
scheme, I added a pirate-esque bandana, and a flipped-up eye-patch.
Since I created the original girl in Flash, I kept the bare body,
clothing, hair, etc. on separate layers. To create the pirate girl,
I merely removed all the clothing layers and added a bandana-matching
bikini, changed the face and hair style. I’ll use the others for
future projects.

The above image shows the transition between my original
sketch and the various modifications to eventually create the pirate
“nose-art” girl. Using layers in Flash (or illustrator)
lets you play with different looks without having to use multiple
files.
The base will be a pirate cove or a small island.
Maybe a skull island! Yeah, that’s the ticket!
01.22.2005 » Building, Go!
Since I’m waiting for oil paint on my Fliege Figures
to dry, and we’re in the middle of a snow-storm, and there’s nothing
much else to do, I started on the construction of the Wing Ka today.
So far I’ve cut out the torso, head, arms, and wings. I’ve sanded
everything I could and everything that needed glue for seams is
drying. Those parts will be sanded later.
01.23.2005 » More!
Today I cut out and sanded the rest of the pieces.
I still need to sand all the glued seams, then check to see if they
need putty. Here’s a shot of the pile-o-parts.

01.24.2005 » Sanding is not fun
Today I sanded all of the parts that I glued to remove
seams. Afterwards, on those that needed it, I either applied Tamiya
basic putty or ran Mr. Surfacer 500 (in a jar) along the seam to
fill the hairlines and accidental gouges. I also skewered all of
the parts except those that have putty drying.
01.25.2005 » By The Power of Grayskull!
Today I finished sanding all of the parts I applied
putty or Mr. Surfacer to yesterday. I skewered those parts and painted
the yellow pieces since they’re first in my list for masking ease.


I also started on the base. I did a search on Yahoo
Images for “cove” and one of the first
pics to pop-up was exactly what I wanted. I’m using a small
oval base that I finished this summer (along with 10 others just
so I have them when I need them) I put 3 wood screws into the top
to act as supports for the celluclay shrinkage. I then applied the
celluclay around the back edge. I dug the mouth hole out with a
clay tool and proceded to do all of the rock shaping with my clay
tools.
After this dries completely, I’ll prime and paint
it. I’ll add the rubble at the base before priming. I’ll be using
fine ballast gravel used for railroad sets. I have a lot more of
the tree sets that I used on my GunTank, so I’ll add those to the
top of the cliff. For the water, I’ll be using acrylic gel medium.

Later on I got a chance to paint the internals. I
mixed a warm gray color very similar to the stock internals ABS
plastic color. I readdy liked that color as it’s not the normal
gray. I used Tamiya Neutral Gray, Black, and A left-over custom
orange-brown mix to achieve the color.
01.26.2005 » Masking Begins
Today I masked off the gold ammo cartridge parts and
the chest piece and painted all of the charcoal parts. The color
was mixed using 50/50 Tamiya Black and Neutral Gray. I also gave
the elbows a shot of future to protect them while working on the
forearm seams. Later I painted the Medium Gray parts (claws, shoulder
stripe) and the lightest gray.
01.27.2005 » Farther than I thought…
I’m much farther along with this kit than I thought
I’d be. I’ve gotten all of the colors painted. I even got the internals,
charcoal, gold, and medium gray parts sprayed with their first coat
of Future. Just need to do a little touch-ups here and there, then
clear-coat the rest and ink those panel lines.
01.28.2005 » Almost there…
All of the painting is done! All of the parts have
1 coat of Future! Half the parts are inked! Other than that, today
I made my lenses and decided to document the process for a tutorial.
Click here for the tutorial.
I also worked on the base a bit… I painted it black,
but then realized that I forgot to add the talus. So after it dries,
I’ll have to reprime. Oh well.
01.29.2005 » Ready for decals!
Today I finished up with inking the panel lines and
just got done giving the parts a pre-decal coat of Future. That’ll
seal in the ink and give the decals some extra gloss to set on.
I also did some more work on the base. Earlier I reprimed
the base and tonight I airbrushed on the colors for the water. First
I airbrushed on a light blue green for the shallows. Then I blended
in a medium blue to give it more depth. Then in the deepest parts,
I sprayed on a mixture of blue and black. Finally I brushed on a
coat of Future to seal in the paint for when I start drybrushing
the rock.


01.31.2005 » Making Waves
Yesterday I drybrushed all of the rocks with cheap-o
acryllics. Today I went to Michaels and got a jar of Liquitex Gel
Medium to use for the water. It dries transparent and goes on thick.
The jar was about $10, but I paid about $6 with a 40% off coupon.
I love those!
Basically I just dabbed it on with a stiff brush and
pushed/glopped it on with a flat brush for the waves. This pic shows
how it goes on white, but all of that will be clear when it dries.
I’ll have to drybrush on some white afterwards to get the frothy
effect back.

02.01.2005 » Surf’s Up
Okay, the Transparent Acrylic Gel Mudium water is
all dry and as you can see in the first pic, it’s dried clear. All
that white from before is gone.

So to get the white caps back, I mixed some Liquitex
white acrylic and more gel medium together (about 50/50) and drybrushed
it carefully onto the waves and peaks. It’s not as white and stormy
looking as in the first pic, but that’s not the look I wanted anyway.
It now has a calm, paradise feel to it. Well… except for the ominous
skull lurking overhead. I may go and give it a sectond drybrush
to bring it out a bit more. It looks better in person though as
opposed to the pics.

And a close-up…

I might add a coat of Future over the water to gloss
it up a bit more and for protection. After that, I’ll remove the
tape.
03.01.2005 » Decaled and Done!
So I got my decals on Saturday from Models4U who did
a fantastic job as usual. Seriously… this guy is the best. Anyway,
I went to work imediately applying them. In keeping track of my
time spent on each task, I found it funny that I spent more time
decaling than painting.
The grand total… 61.25 Hours! Not
sure whether to feel happy, sad, or patheticly geeky.
Anyway, it’s all done so expect some final images
soon.


Project Time Sheet:
Out of curiosity, I want to know just how much time
I’ll spend on this project. This part will remain at the bottom
of my in-prog page. So for the concepts, I spent about 15 hours
total. That includes doing the color scheme, designing and drawing
the girl in Flash, creating the decals and getting them ready for
print. The ‘Building’ time will be how long I spend on cutting,
sanding, and modifying. Painting will be just that. And so on…
Estimated Concepts: 16 Hours
Total Building: 14.75 Hours
Total Skewering: 1.75
Total Painting: 4.5 Hours
Total Masking: 1.75 Hours
Total Clear Coating: 3.75 Hours
Total Panel Lines: 4.25 Hours
Total Decaling: 7.5 Hours
Total Construction: 2.5 Hours
Total Base: 4.5 Hours
Grand Total 61.25 Hours

![Maude [Cyborg Action-Doll] (Files Only)](https://fichtenfoo.net/blog/wp-content/uploads/2023/01/Maude-Promos-300x300.jpg)


