


Your cart is currently empty!
In Progress » Tallgeese 1
08.02.07» Sources, Concepts &
Initial Building
The Tallgeese is one of my favorite suits from
Gundam Wing. Maybe it’s the Romanesque look or that it doesn’t
look like the other Gundams. But I love that stoic look of
this mobile suit. The HG 1/00 kit suffers from all the usual
HG wing kit problems. Loose joints, ugly joints, poorly articulated
joints, (basically bad joints) and it could use some added
detail to make it really pop. With this particular kit I could
make one of 3 different versions of the Tallgeese as seen
in the series and Endless Waltz movie. Since the original
is my favorite, I’ll be doing that one.
I’ll be making a lot of small changes to the
kit such as added detail and joint replacements/fixes. First
I removed the plastic under the collar of the head so that
I can tilt the head downward more and show some piston internals
under the back of the head. I also increased the height of
the head crest by about 60% by layering thin strips of styrene
on top, sanding down the sides then using SGT to fill the
gaps. The torso was split and a ball joint was added to improve
mid-waist posability. The knee joints were detailed and a
few leftover parts (red) from my Rick Dias killed in the front
detail gap.


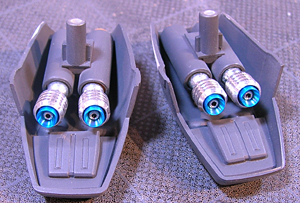
For the feet I added detail and a thruster to
the sole and added pistons that go from the front of the feet
to the lower leg. The pistons are attached in the foot using
a ring magnet and metal bearing. I also cut out the shoulder
joints from the side of the chest and fashioned new ones using
the shoulder joints of an old MG Zaku kit I use for spare
parts. I replaced the barrel of the dobergun with brass tubing
and added details here and there. It’s still a work in progress
but will have a camera mounted above the new trigger grip
and a grenade launcher attached under the barrel.


08.05.07 » Binder Mod
The binders on the back of the shoulders needed
some kind of mod to make them not hit eachother when in a
dynamic pose. At first I contemplated making a balljoint or
an angled rod into the current polycap. Instead I figured
out that I can merely cut the 2 outer parts of the joint cover
from the back of the shoulder, glue them to the joint box,
slice off a small part of that box and in the end I had a
very simple plastic on plastic joint using only what was already
there. (peg and hole) Later I’ll need to thicken the peg,
possibly with some CA to strengthen the joint. Here’s some
pics:


09.14.07 » Rest of InProgs
Here’s the last of the inprogs I promised to
post up. The last pics just show what isn’t easy to see once
the kit is done. The forst few show the arm joint mods. I
basically used some rectangular tube with one thin side removed
for the lower arm joint and some detailed rectangular rod
for the upper. A leftover MG kit screw on each joint was screwed
into a pre-drilled hole. This makes the joint nice and tight.
I had to remove the upper parts of the forearms earlier in
order to be able to add the screw in later. This hides the
screw nicely as well. The top of the joint was later pined
and glued into the upper arm (bicep).


![Maude [Cyborg Action-Doll] (Files Only)](https://fichtenfoo.net/blog/wp-content/uploads/2023/01/Maude-Promos-300x300.jpg)


