


Your cart is currently empty!
In Progress » Round Buckler
08.30.2005 » Concepts
and Initial Build Info

Blub blub blub… time for a quick ‘mental health’
kit while I work on the Gerbera Tetra. I try to stop in the
middle of large projects to do quick little ones just to keep
from getting burned out.
Anyway, this mental health kit is
the ‘Round Buckler’ or ‘RB’ from the anime ‘The
Mars Daybreak’. I’ve never seen it and don’t know
a whole lot about it aside from what I read on
the manual, (it was in English for a change! Score!)
but the robot was too cool to pass up. Plus I
dig almost anything having to do with Mars.
The premise is that there’s oceans
on Mars (probably after some terraforming effort)
and people apparently live in city ships. There’s
some war or something and Mars ends up a haven
for criminals and other such outcasts. Enter the
typical plot of boy stealing giant robot and for
whatever reason is great at piloting it and there
you go.
Whatever… it’s a cool underwater
robot and that’s all that really matters. What
I like most about it is that it has a Rahxephon/Zone
of the Enders feel to the design. Same mechanical
designer? Beats me!
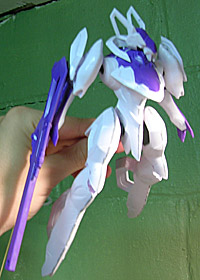
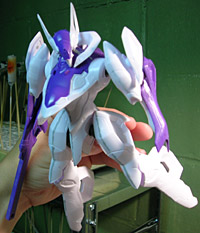
The kit is in 1/48 scale and only
has about 40-50+ parts. When I prdered it and
saw the box I expected a small kit, but to my
surprise this kit’s actually quite large. It’s
a little bigger than your average Master Grade
kit. It’s got a lot of nice detail, however the
joints kinda suck. They’ve got those crappy rubber
joint covers that don’t do much since they still
leave gaps that leave the ball joint pegs visible
when you try to pose the RB. Because of that I
am making the kit fixed-pose and sculpting new
joint covers from Magic Sculpt.
Everything comes in halfs and there
will be a lot of masking required to paint it
like the box art (or any scheme). Some of the
seams can become very difficult to reach since
you’ll need to build the arms and legs before
painting to fix the seams. Speaking of seams,
you can’t beat Bandai when it comes to easy-to-fix
seams. The parts go together so well that you
merely need to run some Tamiya Extra Thin Cement
down the gaps and give a slight squeeze. Sand
the flash when the glue is dry and you’re pretty
much ready to prime. The problem is getting into
crevases to sand. Those areas will requite extra
effort.
I started this kit on Sunday and
within a few hours had it all glued together.
Later I sanded half the seams. Today I started
making the joint covers and the display base.
It comes with a nice, but boring display stand,
but I’m making my own with an underwater scene.
Sand, coral, star fish and a shark. It’s looking
pretty good so far.
As for what color I’ll paint it,
I’m still undecided. I might go with a variation
of the stock scheme. Below you can see the built
kit (and it’s crap joint covers), the new ones
I am in the process of sculpting, and the base.
The shark is in the process of being scratch-build
from styrene and MS as were the shells and starfish.


![Maude [Cyborg Action-Doll] (Files Only)](https://fichtenfoo.net/blog/wp-content/uploads/2023/01/Maude-Promos-300x300.jpg)


