


Your cart is currently empty!
In Progress » Powered GM
09.11.03 » I’m on
cloud 9
I decided after all the annoyances
with the MG ALEX, that I would put it away for
now and move onto a project that I am way more
excited about. I Ordered the Powered GM conversion
set and Type C GM from Ako Hobby in Hong Kong
a few months ago. It’s a plastic (not resin) conversion
parts set to turn the RGM-79 Type C MG kit into
the Powered GM from the first episode of Gundam
0083.
I never go with the standard color
scheme anymore so I came up with an idea for an
“Ariel Drop Assault Unit” based on the
PGM. Basically, this unit would be dropped from
a plane over an enemy target as a surprise attack.
Being that it would come from above, I am giving
it a “cloud camo” scheme.
Modification/addition-wise I’ll
be scratch building a booster parachute ala 8th
MST. This will attach to the bazooka mount on
the rear of the kit. I have a rough idea of how
I’d like this to work/look and will put a scan
below.
Decal-wise, I went with a Mario-esque
angry cloud symbol for the shield and some various
custom markings for the rest of the kit. Also
on the shield is the lyrics for ‘I’m just a little
black rain cloud” from Winnie the Pooh. Once
again… I have an odd sense of humor.
Cloud Camo Color Scheme »

Booster-assist Parachute Sketch »

09.17.03 » Test Fit,
Glue, and Putty
Okay, all of the parts are cut out.
Now I’m in the process of puttying and sanding
those parts that are in need of it. I also wanted
to test fit the option parts to make sure all
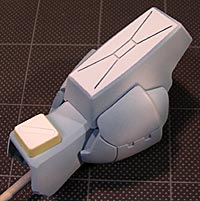
was well. There was parts of the shoulder assembly
that needed IMO some putty. There is a seam down
the top of the shoulders and on the sides as well.
You can see in the pics where I have puttied those
parts.
Next up I will need to start sanding
and smoothing out these parts.
I am also waiting on an order of
option parts so that I can begin construction
of the booster-assist parachute. Hopefully by
next week I’ll be able to get started on that.
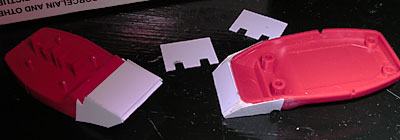
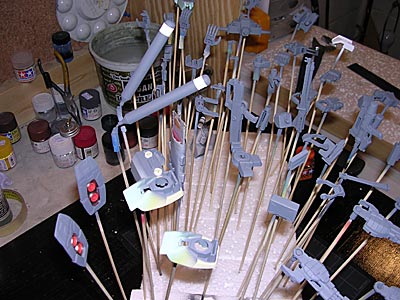
All of the parts cut out. They are
currently separated into those that will be painted
with internal colors and those that won’t. I have
a system, believe me! »

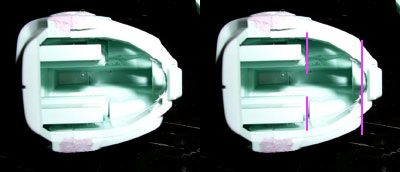
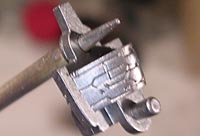
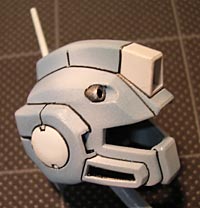
I had to dremel out the posts inside
of the head so that I can slide in the lens innards
later. »
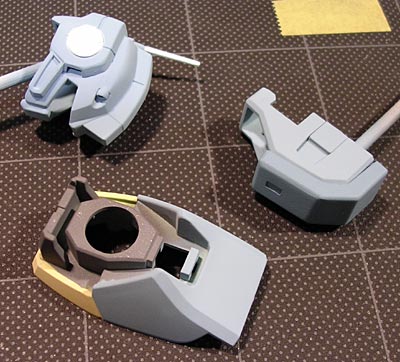
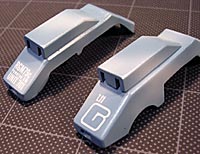
 « «Test fit of the PGM leg parts. Needs some sanding and putty, but fit well. |
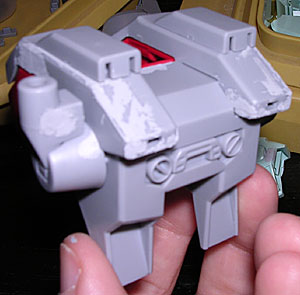 « «You can see here where I have put putty in order to fill in the gappy seams. |
 « «Detail of side seam (puttied) and test fit of shoulders/backpack. |
09.26.03 » Ugly Feets
Yeah, the GM Type C has ugly feet.
Normally, I’m not a stickler for proportions and
whatnot, but what the hell was Bandai thinking
with these!? So because of this I have been forced
into a modification.
I’m going for a simplified Katoki
styled foot. Not an exact Katoki foot, but something
similar.
First I cut 2 pieces of styrene
and glued them at an angle. Then after they were
dry, I glued them to the front of the foot. I
then put a piece or sprue inside as support for
the sides which are of thinner styrene sheet.
»

Then I glued precut styrene to the
sides. »

In this picture you can see the
pre-cut styrene to add the details to the top
of the foot after it has been puttied initially.
The white you see inside the styrene is crappy
testors putty that i used to fill in the foot.
The only reason I used that crap as a support
is because the tube has a thin enough tip that
I was able to squirt some in there. »
Not shown here is the feet with
the putty applied. I used Milliput to fill in
the corners and big gaps. I’ll smooth out the
putty with sandpaper when it is cured, then glue
the feet details on.
09.27.03 » More Feet
Progress
Since yesterday, I was able to putty
and sand/file down the feet. They’re almost done
now. I primed them to see if I missed any areas
that might not be filled in or that need smoothed
out more. Of course there are, so I’ll have to
putty a little more with the Tamiya Basic Putty
and sand to finish. But for my first major modifications,
I’d say this isn’t half bad.
Here’s some pics. »


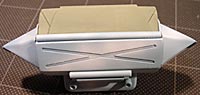
09.28.03 » Scratchbuilding
the Booster-assist Chute
Wow, I’m on a roll today. Gotta
love the rain. Okay, I started on my booster-assist
parachute this evening. So far it’s going together
much easier than I had anticipated.
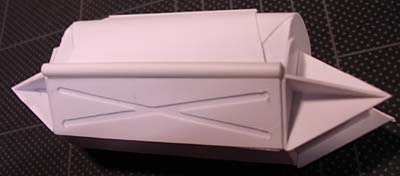
Here’s a shot first of all the parts
for the “box”. »

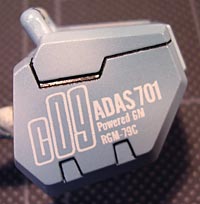
Next up in this series of shots
is how I built the “X” on the front
of the box. First, I took my small round file
and drilled some holes near the corners. Next
I began cutting lines between the boxes. When
that was done, I smoothed out the edges with my
file again. The result was a rounded edge “X”
detail that I glued to the front of the chute.


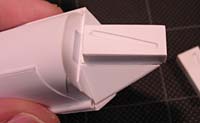
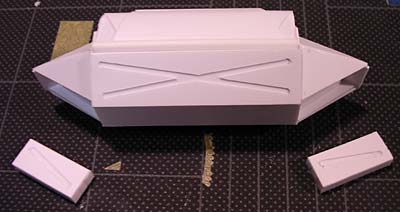
Lastly is a shot of the bazooka
mount, back vent for the box where the bazooka
mount poles will attach, and the box in it’s current
phase.
The mount is a piece of styrene
tube and extra arm/minus molds from my Gundam
Ver. Ka. kit. The strap attachment bars are extras
from my GM (G) kit. I’m debating on using them
until I see what the booster part will look like.

09.28.03 » More Chute
Here’s a shot of the parachute as
of today and a shot of my PMG build-drawer. I
have a nifty little drawer system where I keep
supplies and parts for specific projects.


09.29.03 » Option
Parts!!!!!
My option parts came today from
J-Hobby.
Nice new store! Anyway, since they came, it was
the perfect excuse to do about 45 minutes of modeling
tonight. Now that I have the boosters, I can measure
for the side assemblies.
First I made a couple wedges like
I did for the feet. Then I glued the 2 half boxes
to the sides. Next I measured out some triangles
by holding notebook paper up to the edges and
tracing. I did 4 for the wedge sides, and then
measured more out for the angles. (see below)
I still need to make the angles for the back,
but now you’ll have a better idea of what they’ll
look like when completed.

09.30.03 » Getting
there…
Okay, tonight I only got to start
a few quick control boxes and finish the basic
paneling on the side assemblies. All of the above
need putty and sandpaper.
Here are some pics. »

10.04.03 » Aww Chute!
 You
You
know… if I had known that scratchbuilding something
was this easy, fun and satisfying, I would had
done it a long time ago.
For todays update I have images
of all the chute parts so far. The first two are
shots with the Milliput applied. The last is of
the parts after being filed and sanded to smooth
out the Milliput. Tamiya basic putty was applied
to fill in any little gaps/pockets left from the
Milliput.
You can see where edges have been
beveled. The control boxes for example are beveled
on the corners and the upper edges.
The fuel tanks are still missing
their “ball” for the ball joints. I
need to crack open my epoxy for that.
Here’s a key as to what is in the
first image.
-
- Bazooka mount. Made
up of two 8th MST cannon holders, 2 minus
molds, and styrene tube. - 2 shoulder roll bars
from my GM (G) - Angled mount for back
of parachute. Contains Kotobukiya mesh and
sheet styrene. - Parachute
- Control Box
- Detail for inside of
booster assemblies. Will be more “visible”
once it is primed. - Kotobukiya Boosters
- Fuel tank assembly
- Wave G-Tanks
- Bazooka mount. Made


10.04.03 » More shots
Here are a few shots of the parachute
in a near-complete state. The control boxes, boosters,
and Wave tanks are just temporarily held on with
sticky tack.
I had to change my bazooka mount
design since neither the Tamiya cement or the
5 minute epoxy would hold my parts very well.
So instead I drilled some 1/16 inch holes and
used 1/16 brass rod. Then I added styrene tubing
to make it look piston-like.
I still have more sanding to do.


10.06.03 » Test fit
(whew!)
After seeing bhops PGM pics, I got
a bit worried that the bazooka mount would be
too wide and the parachute pack wouldn’t fit.
So I decided to do a test fit. It was easy enough
since I only had to put about 9 pieces together
to test it.
As a result, I can rest assured
that all that work was not in vain! There is plenty
of room to spare. In fact, I could probably fit
a bazooka in there instead if I wanted to.


10.09.03 » Paint Time
All the sanding and scratchbuilding
is done so it is time to paint! The first color
in my plan is the sandy yellow color. I base my
color-painting order on what would be easier to
mask off later. The yellow goes into a lot of
holes that can be masked by Stycky-Tack. The yellow
is actually not as saturated as it looks here
in the pics. It is duller in real life.
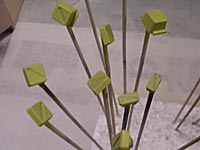
The first picture is all the parts
that needed yellow paint. These parts are placed
onto bamboo skewers so I don’t finger up the paint
job..

These are the after shots. The yellow
will be masked off and the parts will be painted
with their other colors.

10.09.03 » Paint Colors
I’ll be using many colors to achieve
the look I’m going for in the lineart. Here’s
a breakdown of my pallet so far. All the paints
marked with an asterick (*) are custom mixed,
the rest are straight from the jar. »
-
- Medium Metal Gray* (internals,
weapons, exposed metal) - Bronze* (boosters, cables)
- Gunmetal* (boosters,
weapons, internals) - White (clouds, armor,
highlights) - Light Blue* (cloud base
1) - Light-Med Blue* (cloud
base 2) - Red-Orange* (crotch,
door plates, boosters) - Yellow-Orange* (crotch
emblem) - Sand-Yellow* (minus
molds, control boxes, highlights) - Chrome Silver (lenses,
minus molds, rivets, buckles) - Clear Red (lenses)
- Black (panel lines)
- Green-Grey* (cloth parachute
“bag” and straps) - Blue-Grey* (Guns)
- Medium Metal Gray* (internals,
All those colors plus several will
have black mixed with them in small amounts for
post shading. In all, I’ll have 21 colors.
All of my paints are Tamiya Acrylic.
To thin them for airbrush use, I use 91% isopropyl
rubbing alcohol. How much? As much as I need.
I never measure my paints and thinner exactly.
I just eyeball it. If it’s too thin, I’ll need
to spray more layers. To thick? Add more thinner.
Simple as that. I try to thin to the consistency
of milk.
10.10.03 » Red-Orange
Tonight I got to paint the red-orange
parts. There are only a few parts that will need
that color. The door and crotch emblem and the
boosters. For the boosters, I first sprayed down
a coat of my sand color. Then around the edges
(as seen in the pic) I sprayed the red orange
for a faded effect. (I remember the days when
I used to think booster colors were unnecessary.)
Next up will be the booster external
colors.


10.10.03 » Painting
the Boosters
The booster and gun barrel painting
is done. Here is a step-by-step of how I did the
boosters.
-
- Painted insides of boosters
light yellow - Painted red-orange around
edges of boosters - Placed sticky-tack inside
of boosters to mask them - Sprayed boosters with
a mixture of bronze and copper - Sprayed mixture of Gunmetal
and Silver around middles of boosters leaving
slight bit of bronze mixture showing. - Sprayed a wash of Alcohol,
Tamiya Clear, and Black as a post shade around
edges of boosters - Removed sticky-tack
- Painted insides of boosters
That’s about it. I’ll ink a few
panel lines and the inside tubes for the boosters
later when I am at the inking stage.
Here are some images in order of
the steps above. »


10.11.03 » Whites
and Lens
Next up on my paint list was the
first of the white parts. I split the whites into
two sections depending on what is easy to mask
now and what is easy to mask later. For example,
the forhead sensor and the knee fronts will be
much easier after the blue is painted.
The forst pic is the parts with
the sand color masked off either with sticky tack
or Tamiya masking tape. The second is the whate
painted parts with the masking materials removed.


The next pics show a method for
painting GM lenses I am experimenting with. I
am painting the inside silver like I normally
would, but instead of painting the clear window
with clear red, I painted the inside part with
the clear red (inked too). I am hoping that this
will look good while keeping the clear red from
gatting scratched.

Lastly is a shot of all the parts
needing my gray color that I’m using for internals.
Some of these parts still need masked off such
as the fuel tanks and feet boosters.

10.12.03 » Internals
and External Metal Gray
Mix Tamiya Neutral Gray, White,
a touch of Blue and some Metallic Gray and you
have the internals color for the Cloud 09. As
you can see, I masked off some parts like the
stripe around the fuel pods and the minus molds
on the back pack.
10.13.03 » Cloudy
Gun
First off I glued the painted control
boxes to their skirt plates and legs. They were
easier to paint first and mask later than to glue
them first, then mask them.

Secondly… I started the cloud
camo!!! Doing the camo/special masking is always
my favorite part. Especially when I get to see
the results of a first try effort and they look
good!
First I painted the metallic gray
and then I post-shaded it. The reasom for the
speckles on the handle is not due to lumpy paint,
but to light hitting the metal speckles. Next
I masked off the gray and sprayed down the gray-blue.
Then I sprayed my clouds on. I used white + clear
+ alcohol for the clouds. The clear white made
the fadedness of the clouds easier.

There’s more detail than shown in
this pic, but I need better lighting to show it
off. Trust me, it looks great!
10.14.03 » Guns in
the Sky
Okay… 20 minutes to spare tonight,
so I painted the other guns clouds. Same deal
as above. I may go back and paint the round part
on the back the same gunmetal as the barrel though.
Maybe.


Also, I took a pic of what I use
instead of foil stickers for my gun lenses. Basically,
it’s a part of a package. I think for lightbulbs.
You can use action figure plastic or whatever.
I sprayed it with chrome silver, then clear red.
(or green, yellow, orange, bule, whatever) I cut
them to the shape I need and glue them into place.
Perfect for the little lens on the back of a Gundam
or GM head and the lenses on the guns.

10.17.03 » Calm Before
The Storm
Well, I haven’t updated in a few
days because I really didn’t have too much to
show. Here’s what I have as of today however…
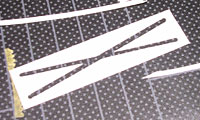
I made the straps for the parachute
as well. For the “in flight” straps
(seen on the skewers) I used very thin styrene
and bended it to look folded with hot water. The
straps taped to the screws are for if I have the
kit standing up. I wouldn’t want the straps blowing
out so I used sliced up video tape and painted
it the same gray-green color. These straps will
flow downward nicely. Gravity-style.
You can also see my work area. Much
neater than some of the other work areas I’ve
seen. I never could work in a messy area. You
can see the jars and the 2 blues I will be using
for the sky-camo. Mmmm… Cherry Coke.

I painted the darker of the blue
parts only to find that the blue dried darker
than I had anticipated. So I lightened it up and
repainted them. Here is a shot of the chest and
a part of the backpack with the darker blue. The
white was painted first, then masked off before
applying the blue.

Next you can see some of the masked
lighter blue parts. The crotch-plate shows both
the darker and lighter blues. Notice that they
are not too drastic as far as dark/light goes.
This is what I wanted from the start and you can
see that on the lineart.
Also, you can notice the color of
the sand-yellow on the foot. Almost the same color
as the Tamiya tape. The white circle on the head
has since been touched up around the edges.
Finally, here is a shot of all the
dark and light blue parts. You can see that this
was taken before I got a chance to remove all
the masking tape.

Next up will be putting some of
the parts together so that I can do the clouds.
I don’t want to paint each cloud piece separately
because it’ll look odd/unnatural when put together.
10.18.03 » Cloud City
The clouds are painted and the masking
is removed. Next up is a few misc. parts that
couldn’t be painted until this was done. Maybe
10 parts total. Here’s some pics.


10.18.03 » Finishing
Touches
All the painting is done so now
it is time for the finishing touches. This will
involve several steps:
-
- Spray all parts with
gloss Future Floor Acrylic (done!) - Ink panel lines on all
parts (done!) - Spray all parts with
gloss Future Floor Acrylic to seal in the
ink (done!) - Apply custom designed
waterslide decals. - Spray all parts with
Semi-Gloss Future Floor Acrylic (10%:90% Tamiya
Flat Base:Future) - Apply weathering
- Spray all parts with
Flat Future Floor Acrylic (30%:70% Tamiya
Flat Base:Future) - Build Kit
- Photograph Kit
- Show off (best part)
- Spray all parts with
So tonight I will spray the first
coat of future and allow it to completely dry.
This takes about 1 day.
10.18.03 » Step 1
is Done
Everything is coated with Future.
The gloss of the future really brought out the
blue in the flat paint. I like it, but it will
go back to “normal” when I apply the
dull coats of Future. Now I have to let it dry/cure
for a long time (12-24 hours but my impatience
will make it closer to 12) before messing with
it.
10.19.03 » Step 2
is underway
Now that everything has been Futured,
I am in the process of inking all the parts. I
use several sizes of technical pens for this.
They are Kohinoor Rapidograph and are refillable.
The photo below is of my smallest size pen.
What’s great about these pens…more
specifically their ink is that is cleans up on
the furuted surface with only a little 409/water
mix. About 30%/70% respectively. Use a q-tip or
little pieces of paper towel. So because of this,
it’s like using a pen and a wash for
panel lines.
Now the ink goes on glossy and shiny,
but will even-out when a clear or flat coat is
applied.


Here’s some shots of the parts I
have inked so far. I’ll still have to go back
and do a little clean-up with the 409/water solution.


10.20.03 » Step 2
and 3 are done!
I finished up the inking that I
had left and still had time this evening to put
the second coat of Future on. One thing I like
about doing the Future, Ink, Future, Decals in
that order is that I get 2 coats of Future to
apply the decals to.
For those that don’t know, gloss
is better for water-slides that flat. Less silvering
that way.
Now I get to apply those many decals!
10.21.03 » Step 4
is in production
The decals are going on very nicely
so far. Thanks to Peter (Bawoo) at Models4You
for the wonderful print job on these. Here is
a shot of what is done so far. The large EFSF
decal on the right shoulder is in the process
of being set. Notice that the decal currently
does not sit into the panel lines. That will be
rectified tomorrow.
Okay, since this is a tutorial/progress
page, here’s my decal setting process.
-
- Cut decal from sheet
with sharp exacto knife - Brush Micro Sol onto
area to be decaled - Dip decal into water
- Slide very wet decal
into position (on top of Micro Sol) - Position very carefully
as to not tear the decal - Carefully bruh Micro
Sol on top of Decal - Let dry
- Prick any air bubbles
and apply more Micro Sol - Let Dry
- Whatever you do… DON’T
TOUCH until completely dry. Decals becom sticky
and very soft in Micro Sol
- Cut decal from sheet
Onto the images.


Gotta love a macro lens!

10.22.03 » Step 4
is still in production
More decals have been added and
a solution to the EFSF circle has been decided
upon. I needed to cut it. Later, after the next
coat of Future, I will re-ink it to hide the white
of the decals that sank into the gaps. Here’s
some pics.


10.25.03 » Step 4
and 5 is Done. Step 6 is skipped.
All the decals have been applied
and the semi-gloss coat has been applied to the
entire kit. I decided to skip the weathering on
this kit. It’s a beautiful piece as is and when
I started to add weathering it just wasn’t looking
right. Perhaps on another kit.
I did however add the inked lines
to the decals I had to cut. No images right now,
but you’ll be able to see it in the finished photos.
Next up is the final coat of flat
Future, building, and photography.

![Maude [Cyborg Action-Doll] (Files Only)](https://fichtenfoo.net/blog/wp-content/uploads/2023/01/Maude-Promos-300x300.jpg)


