


Your cart is currently empty!
In Progress » Patrol in the Debris Field
01.06.08 » Source, Concepts &
Initial Scratchbuilding
The Dunehopper was starting to burn me out and
Christmas business left me with a few weeks without modeling.
Instead of going back to the DH, while almost done but close
to burning me out, I decided to start on something new and
“easy” to regain my modeling mental health. The
MaK suit kits are fairly small simple builds once you do a
few and realize what parts will cause you trouble. I started
this on 12.30.07 so what you see below is about 8 days of
work.
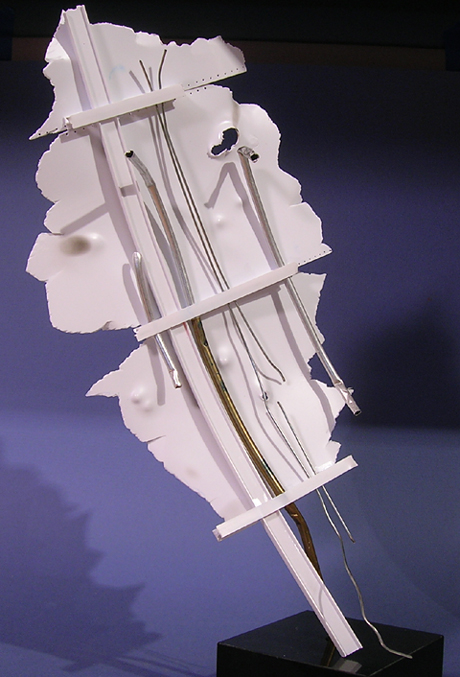
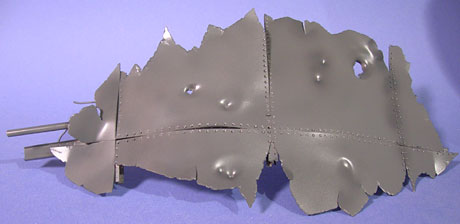
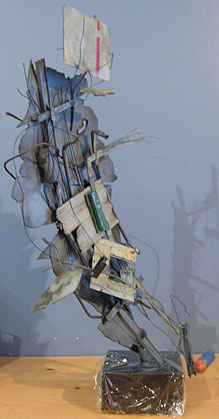
First up is a large piece of space debris from
a destroyed ship which will support the two Fireball SG suits.
It is constructed from some styrene I-beams and metal tubes
and rods. To the exterior, rivets were added made by placing
cut pin-heads into drilled holes. Dents and holes were added
by heating portions with a candle and pressing the soft plastic
with various implements. The larger panels were curved by
heating them with a heat-gun and forming them over a large
bucket. The base is a nice heavy block of marble I liberated
from an old bowling-type trophy. Other miscellaneous torn
up panels and space scrap will be added later supported by
wire, tubing, and other items to make it look as if it is
floating.

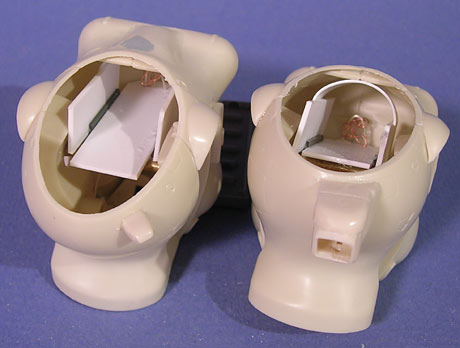
Next up are the two Fireball SGs. One is a Stock
FBSG while the other has some Raccoon parts to make it a recon
unit. I’ll be using the MechaSkunk FB-Bells which have a clear
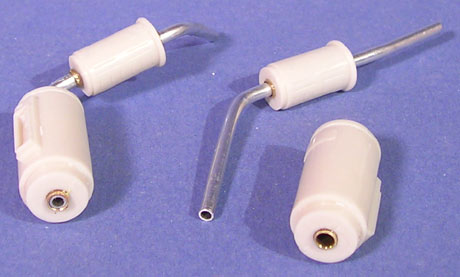
plastic baffle to allow for lighting the bells up. In order
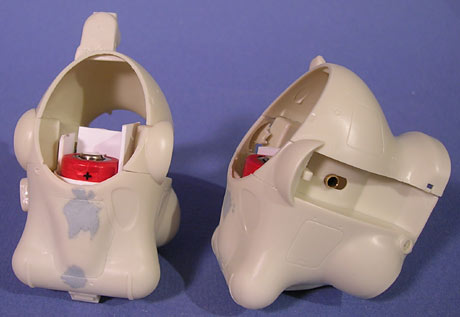
to facilitate this, each FBSG needed a small battery. I found
a package of small 3 volt lithium batteries on clearance at
Big Lots which are PERFECT for this. They’re about the thickness
of a AA battery, but not quite as tall. Plus at 3 volts they
have just enough power to run the 3.3 volt LEDs without the
need for resistors. Below are pics of the batteries and the
inner holders I constructed for them. The holders sit on a
brass tube that goes from arm-hole to arm-hole…


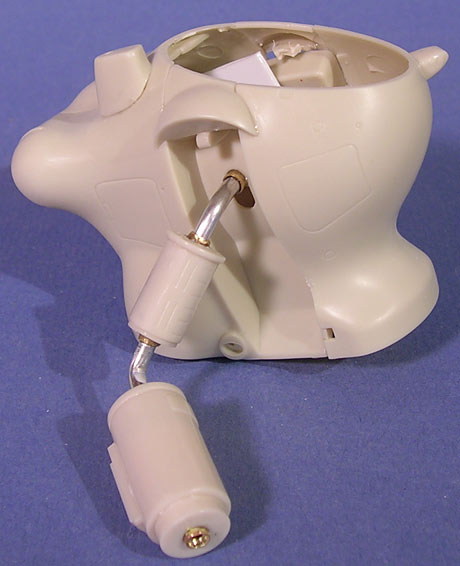
In order to give maximum support to the suspended
fireballs via their arms, I decided to really overenginneer
the are supports. First is a single length of brass tubing
that is mounted inside of the body. Inside of this, both arms
will fit. For the arms a single piece of aluminum tubing (1
for each limb) was bent into the desired pose. I decided to
use a single tube instead of just pinning the subsections
for added support. Over this aluminum tubing, cloth joint
covers will be sculpted using Aves Apoxie Sculpt.
The legs don’t need as much support since they
won’t be holding any weight. Therefore I just pinned them
using copper wire. The leg and arm cavities were also taped
on one end and filled with resin. This gives the pins and
support tubing extra support and also gives some nice rigidity
to the pieces.

As mentioned before, I’ll be using the MechaSkunk
FB-Bells to replace those that come with the kit. The kit
supplied bells have a nasty seam down each side. Quite a pain
to clean-up nicely due to the raised ridges. Another added
benefit of the MechaSkunk bells are the clear baffles which
have an opening for a 3mm LED. To use these just glue the
bells as normal, then cut off the bell heads and glue on the
new MS bells.

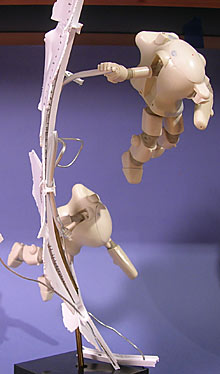
Lastly is the final poses for the Fireball SGs
on the piece of debris. A piece of brass rod runs through
the hand and into the wrist on one side and through the aluminum
support posts/debris on the other giving it fantastic support.
What you see here uses no glue to hold it up! Whew! You can
also see the sculpted joint covers and the start of my suit
armor texturing. To do the texturing I dabbed Un-thinned Tamiya
basic gray putty on with a make-up sponge until it dried creating
a textured and pitted surface. Then the roughness was smoothed
down with some sanding film. I like this method better than
my usual Mr. Surfacer texture. The texture is finer and I
feel like I had more control.

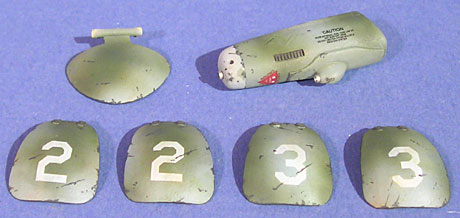
01.11.08 » Painting and Decaling
First up for this update is the large hull section.
This has been primed and painted with German Gray. Afterwards
a gloss coat of Future Floor Acrylic was added to gloss it
up for the next step which will be the application of hair
spray and a lighter coat of gray to create a chipped surface.
More on that, step-by-step later.
The Fireballs were given a camo scheme based
on a drawing in a MaK book. I started with airbrushing on
a light greenish beige to all the parts. Then a slightly darker
green was applied in spots to build-up the effect. After that
a light blue was applied randomly. Finally the darkest green
camo was applied. The result is a nice mottled and discolored
looking camouflage.

A gloss coat of Future was applied then the
parts were decaled. Before painting the white highlights some
liquid mask was applied with a sponge to leave base-camo chips
through the white paint.


Next is the MechaSkunk bells which have been
painted. The process is as follows: First I polished the bare
aluminum bells by spinning them on my drill and buffing with
some fine steel wool. Next I gave them a thin coat of Alclad
2 Jet Exhaust. This was applied right over the bare aluminum
with no primer. I’ve done this before and it works out great
leaving the shine of the aluminum intact. Over that I added
a thin coat of Alclad 2 steel and pale burnt metal in spots
to make for some random blotching and heat tarnishing. More
effects will be added later with some blue oil paint and smoke
pigments.


Last up is the exhaust pipes. First off I have
no clue why a space unit would have these, but whatever…
they look cool and that’s what matters. After priming these
I used the Sophisticated Finishes Rust kit to texture and
rust them. Over the rust I rubbed powdered graphite from a
#2 pencil with my finger. Another coating of the rust solution
was applied which blended in the graphite and gave it a little
more rust. After a coat of prepared Matte Medium to seal it
I added a touch more graphite is a few raised spots then added
some Mig Black Smoke pigment inside the exhausts.

01.12.08 » Hair Spray Technique
So a while back I got an issue of Tamiya Model
Military International magazine featuring an Euro winning
model by Phil Stutcinskas. Phil used hairspray in order to
achieve a realistic and fairly simple to do whitewash effect.
I wanted a smoother and easier way to do the massive amount
of chips and missing patches of paint on my debris so I decided
to borrow that technique. Here’s how it works:
First I primed and basecoated my debris with
german gray Tamiya acrylic. This is a color I often use for
chips. Afterwards I coated it with a few layers of Future
Floor Acrylic using my airbrush.
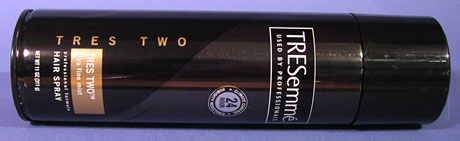
The next day when that layer had cured I sprayed
the outside of the piece with some Tresemme hairspray. Two
caots worked well enough and it doesn’t leave a texture when
dried.
After the hairspray dried I sprayed the outter
hull with a light battleship gray I mixed up. I also sprayed
what would be part of a ship number in white over top of the
battleship gray.

A few hours later I took a small bowl of warm
water and a semi-stiff brush and began to rub the paint off.
The water dissolves the water-based hairspray underneath and
loosens the top layers of paint. The paint comes off, but
not easily so you have great control. toothpicks can be used
on the wet surface to make scratches. I found that brushing
a large section with water and letting it sit for a bit helped
to loosen the upper paint layers before rubbing.

Next up I’ll give it another coat of Future
to seal it all down before additional weathering.

01.14.08 » More Chips
Continuing with the hairspray and chipping process,
I’ve added several coats of gloss FFA and a coat of Satin
FFA to the debris. Seen below is after the gloss coats and
before the satin. You can also see the interior chipping.
For the interior I used a different gray than the exterior.
Both the interior and exterior have the same German Gray as
the base however. The slightly darker interior gray is used
to depict primer where the exterior paint is the ships body
color. I also wanted the interior a little darker to make
the fireballs pop more without getting lost.


Next is something I haven’t shown yet and that
is the various smaller pieces of debris that will be either
attached or floating with the large chunk. It’ll all be connected
with wires, tubes and such and will look as if it’s floating
as well, caught in a dangerous webbing of wires and such.
I imagine this kind of mission would only be undertaken by
experienced pilots as to help avoid being snagged in the debris.
I-beam and similar hull chunks are painted in the same primer
color as the large chunk interior. Deck-tan was used to the
part lining the interior of the vessle before being destroyed.
Non-slip diamon plated floor panels, interior siding, hatches,
etc…


And finally I’m just about finished chipping
the fireballs. For these I used the raditional fine-brush
method as well as sponges to apply the chips. I figured that
wading through a zero-gravity debris field with misc. scrap
hurtling by and sharp edges of metal would lead to a lot of
random scrape and dings to the paint. Before the chipping
a satin coat of FFA was applied.


01.15.08 » Discoloration
Today I started the discoloration of the Fireballs
and wreckage using oil paints. Since I’ve described this technique
before in detail here,
I’ll spare you the details and get to the pics. Here’s the
results so far which is subtle and in the case of the Fireballs
not very visible in the photos. I actually exagerated the
look in the wreckage to make it look more aged and beat-up.
Again, while the exterior would not rust, some would be able
to form on the interior due to humidity and oxygen.


01.16.08 » Wash and Wear
Today I finished the discoloration on the hull.
The brownish color on the chipped parts is burnt umber. I
know rust doesn’t form in space, but that doesn’t mean the
base materials didn’t have rust before priming/painting. Plus
the brownish color looks a little like heat tarnish from the
explosion and offsets/balances the blue-gray. So really it’s
more necessary from an artistic standpoint than anything else.
LOL!

I also gave the Fireballs a thin wash of black/burnt
umber oils mixed with turpenoid. This left a nice thin layer
of grime, but isn’t so overwhelming as you’d see on a ground
based unit. The FB’s also recieved a final flat-coat as they’re
pretty much done hull-wise. Next I have to paint the joint
covers using oils only since they simulate cloth and for me,
oils are the way to go to paint cloth.


Here’s the final shots of the bells as well.
Since the last time I photographed these they recieved some
blue and black streaking on the insides and some blue heat
tarnish on the exteriors. They were finished up with a satin-coat
and are ready to be installed and lit.

01.17.08 » Hunk of Junk
Here’s some not-so-great shots of the debris
being put together so far. This part is done, but I have a
few more chunks of debris that will be attached to the arm
of the lower Fireball as if he’s pushing it out of the way
to proceed. Here’s some shots and a mock-up of how the extra
debris will be added.


01.18.08 » Ignition!
Let there be light! The bells and batteries
are all wired up now and look great. The nice part about the
LED being in the translucent part is that if you don’t prime/paint
the back of the translucent baffle the light can still shine
through the thin coat of primer/paint/weathering. I experimented
with several colored LEDs but all of them were too rich in
color. I finally settled on bright white LEDs dipped in clear
red-orange. This gave me a great orangish glow without being
too electroniclly “amber”. Below are shots of the
bells lit and unlit and with the lights on and off. You can
also see the exhaust covers I recasted from my Raptor to reuse
on these. Adds a little more visual interest.


Below are the same white LEDs. One OOB and one
dipped in clear red-orange.


![Maude [Cyborg Action-Doll] (Files Only)](https://fichtenfoo.net/blog/wp-content/uploads/2023/01/Maude-Promos-300x300.jpg)


