


Your cart is currently empty!
In Progress » Fourth Planet Terraformation Initiative
01.12.04 » Independent
Permanant Mars Colony and Terraformation Study
“…The Men of Earth came to Mars. They
came because they were afraid or unafraid, because they were happy
or unhappy, because they felt like Pilgrims or did not feel like
Pilgrims. There was a reason for each man. They were leaving bad
wives or bad towns; they were coming to find something or leave
something or get something, to dig up something or bury something
or leave something alone. They were coming with small dreams or
large dreams or none at all…. it was not unusual that the first
men were few. The numbers grew steadily in proportion to the census
of Earth Men already on Mars. There was comfort in numbers. But
the first Lonely Ones had to stand by themselves…”–Ray Bradbury: The Martian Chronicles
ter·ra·form
tr.v. ter·ra·formed, ter·ra·form·ing,
ter·ra·formsTo transform (a landscape) on another planet into one having the
characteristics of landscapes on Earth.
During the Sentinel Era of the Universal Century,
let’s say 0086 or something (Whatever, I’m not that big of a fan
boy.) Aneheim Electronics Advanced Research and Projects Group (AEARPG)
led an independent study on the feasibility of placing a permanent
colony on the martian surface. This colony would be the launching
point for a terraformation project. To make Mars into another Earth
could solve the problem of overpopulated space colonies in the Earth
Sphere.
A special task force dubbed the Fourth Planet Terraformation
Initiative was created to oversee the project. Phase one of the
Independent Permanent Mars Colony and Terraformation Study (IPMCTS)
would be to seal off large portions of the Valles Marineris Canyon
system making the Canyon itself into a colony.
Having no support from the Earth Federation, AEARPG
took it’s own security measures in the form of three mobile suit
squadrons amid fears of terrorism from Zeon remnants and other military
capable groups. These MS squadrons would patrol and scout the martian
landscape and defend the project if necessary.
For the first year of the project, all was quiet.
Work proceeded on schedule and the 29th Zeta Plus MS Squadron spent
most of their time mapping the landscape and escorting shuttle and
transport craft.
01.12.04 » Concept Work
I’ve been very interested in Mars and especially the
exploration of since reading several sci-fi novels. The first is
a classic: The Martian Chronicles by Ray Bradbury. The other three
Red Mars, Green Mars and Blue Mars by Kim Stanley Robinson which
chronicle the colonization and eventual terraforming of Mars based
on the science of today. It was really an enjoyable series.
Because of this I decided to do a kit based on a martian
theme. The Master Grade Zeta Plus A1 Type seemed to suit this quite
well. It’s transformable nature made it a great choice for exploration/defense.
I’ll be giving the kit a martian style camo. Now you’re
thinking “why isn’t it all orange?”. Well, while Mars
does have an iron rich soil giving it an orange/red appearance,
the martian surface actually has a variety of warm colors. You can
see this in many of the satellite probe images from Mars.
I don’t think I’ll be doing any modifications to the
kit itself. Probably just a custom color scheme and custom decals
seen below »


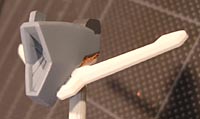
01.21.04 » Head Modifications
Here are a few shots of my modifications to the head
to make it more like the A2 type Zeta Plus. I’m making this front
piece interchangeable with the standard so that I can display either.


01.28.04 » Head Modifications Complete
+ Painting
Here’s the final shots of the head modification. You
can see the build/prime/sand/prime/sand/ etc…


I have gotten pretty far with the painting. I have
the internals, light gray, gold, red-orange, beige and darker beige
painted. You can see where I have painted the red and gold first,
then masked them off for the grays and beiges.


01.30.04 » Camo Painting
Okay, I’m gonna go step-by-step on painting this camo
pattern. THis will help you do it yourself, but more importantly,
it will help me remember how to do it for a later
kit I’m planning.
Here is a top-view of the camo pattern that I quickly
threw together as a guide for where I need to mask. »

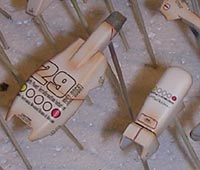
First, I masked and painted all of the parts with
the martian rust color I custom mixed.

Next I masked off everywhere that I needed to keep
the rust color. Afterwards I painted the areas where the brownish
purple rust color goes. Note that the image of the wing is the closest
to the “real-life” colors. The other pics were taken with
a flash and are over-saturated.


Tomorrow morning I will need to mask and paint the
gray-brown. Tomorrow evening I will mask and paint the reddish brown
which is the final color. The reason I’m waiting to long between
coats is to allow some time for the paint to cure. Also, I am not
removing the tape until all of the colors have been painted. Otherwise
I will have trouble remasking the previous areas.
01.31.04 » Camo Painting is Done
I finished the camo painting today. Here are the final
pics.


02.07.04 » Panel Lines
I am trying a new technique for my panel lines. Check
it out here on my tips page.
03.08.04 » Base
I started and almost finished the base for the mars
Z+ this weekend. The only things I have left to do is to give it
a flat coat and drill for the rods that will hold the waverider
up.
The base is another circular wooden plaque exactly
like those I used for the Griffon and PGM Cloud 09. I coated the
plaque with glue and baking soda and sanded it down to a rough surface
when it was dry. Then I primed it with flat black spray paint and
drybrushed many layers of reds and oranges. They don’t show up too
well in these pics due to the gloss, but will show up better when
I flat coat it.
The ejecta (rocks) are little bits of petrified wood
which I pummeled with a hammer. They’re attached to the base by
a coat of future. After the future dried, I dusted the whole thing
with a very transparent coat of the same orange I used on the Z+.
I’ll apply the flat coat when I flat coat all of the
other pieces after I’m done with the decals.


03.20.04 » Internals
The internals are all done on the FPTI Zeta. I painted
them a dark gray, then drybrushed them with silver Rub ‘n Buff,
then post-shaded them with a martian dust color. The “dust”
was made using the orange color from my camo mixed with a good bit
of Future to make it semi-transparent. The weathering looks nice
when combined with the brown ink panel lines.


03.22.04 » Final Update!
Everything’s all set and ready for the final build.
I’ll post photos up after I build the kit and attach it to the base.
Here’s a few shots of the dusted externals.


![Maude [Cyborg Action-Doll] (Files Only)](https://fichtenfoo.net/blog/wp-content/uploads/2023/01/Maude-Promos-300x300.jpg)


