Your cart is currently empty!
Creating Copper Finishes
This is going to be a long one… I’ve been thinking a lot about copper finishes lately for my Steampunk Fish-Shaped Submersible product. While considering how to achieve the look I wanted I realized that I have a LOT of copper products. Not sure why… maybe I’m looking for the perfect copper or just love metal finishes. Either way it’ll make for an interesting tutorial. Here’s a photo of all of the copper products that I have. (or at least those I remembered)
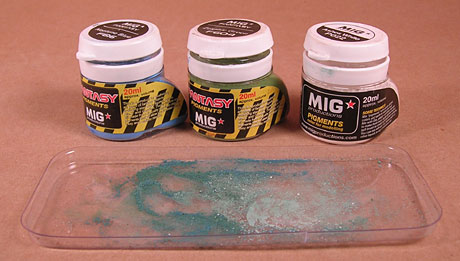
There’s Copper leaf, Sophisticated Finishes Copper Patina set, Apple Barrel “Pure Bronze” (looks like copper), Tamiya Acrylic Copper, Mr. Metal Color Copper (there’s also a Mr. Color Copper that I haven’t tried/bought), Alclad II Copper, Hawkeye/SnJ Copper Polishing Powder (they also make a paint that I’ve not tried/bought yet), Mig Productions Fantasy Pigments Copper, PearlEx Antique Copper and Sparkling Copper, Autumn Gold (copper) Rub n’ Buff, and of course copper sheet, rods and tubing. I’ve tried every one of these for one project or another. Every one is useful in some way, but combined they make some great colors.
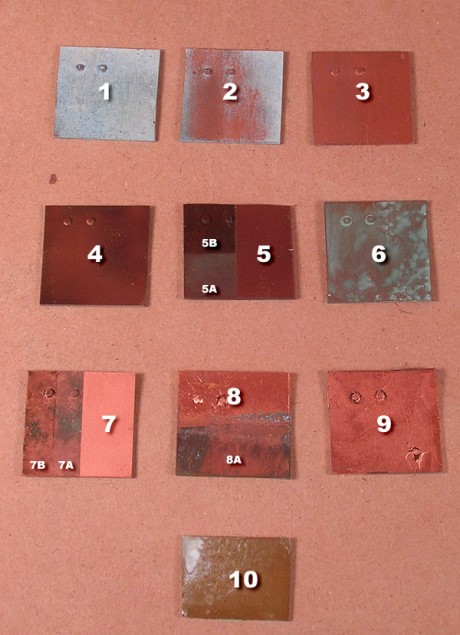
Here’s a bunch of swatches that I made tests of the above on. These tests are to create a realistic looking copper with patina. Patina is a fine coating of oxide which forms on the surface of the metal when exposed which protects the surface from weathering. Here’s a link to the oft mentioned Future Floor Acrylic clear-coat mixes.
1: Sponged on Apple Barrel-style acrylic paints. Used Regency Blue, Bright Blue, Green Sage and White. Then dry-sponged white streaks vertically. Then applied Hawkeye/SnJ copper powder with finger. (doesn’t show up, not great look anyway)
1: Sponged on Apple Barrel-style acrylic paints. Used Regency Blue, Bright Blue, Green Sage and White. Then dry-sponged white streaks vertically. Applied Autumn Gold (copper) Rub ‘n Buff mixed with a touch of black oil paint using a somewhat dry-brush. Airbrushed flat coat of Future Floor Acrylic.
3: Primed with black spray paint. Painted with thinned Autumn Gold Rub ‘n Buff thinned with Odorless Mineral Spirits. Mineral Spirits started to eat primer unfortunately. Buffed with cotton t-shirt rag.
4: Primed with black spray paint. Airbrushed on Alclad II Jet Exhaust. Airbrushed on Alclad II Copper in a mottled light pattern.
5: Primed with black spray paint. Airbrushed on Alclad II Copper.
5A: Track Brown Mig Pigment blended in with Odorless Turpenoid.
5B: Coated half of #5A with Gloss Future Floor Acrylic.
6: Primed with black spray paint. Airbrushed on Alclad II Copper. Next a mixture of Zombie Green, Ashes, and Neptune Blue Mig Pigments was sprinkled/dabbed on with a brush. These were then blended with Odorless Turpenoid. Clear-coated with Satin Future Floor Acrylic.
7: Primed with black spray paint. Airbrushed with Mr. Metal Color Copper.
7A: Track Brown Mig Pigment washed on with Odorless Turpenoid. Next a mixture of Zombie Green, Ashes, and Neptune Blue Mig Pigments was washed on with Odorless Turpenoid. Coated in Satin Future Floor Acrylic.
7B: Coated half of #7A with Gloss Future Floor Acrylic.
8: Primed with black spray paint. Copper foil leaf applied.
8A: Bottom half of Swatch #8 was dipped in ammonia cleaner then left to air dry. I repeated this twice. A month later, the result is as seen. I love it, but I fear it’s unpredictability.
9: Primed with black spray paint. Copper foil leaf applied. This was then soaked in ammonia cleaner for a few days in a patina/tarnishing attempt. The only result was clean copper and a slight dissolving of the glue under the leaf making it shrivel/warp.
10: Primed with black spray paint. Sophisticated Finishes copper paint sponged on. When dry the patina solution was applied. The effect and look are not so great in my opinion, but maybe I did it wrong. The patina solution on it’s own works nicely on real copper though.
Here’s more shots of the above in various stages of completion.
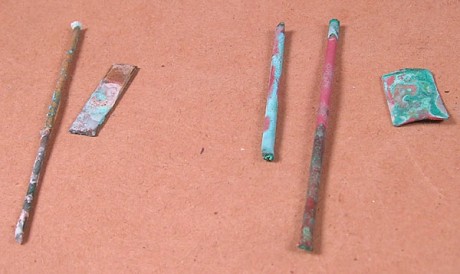
Here’s some real copper (right) and brass (left) bits placed in salt water for 6 months as a test. Why so long? I forgot about the sealed jar!!!
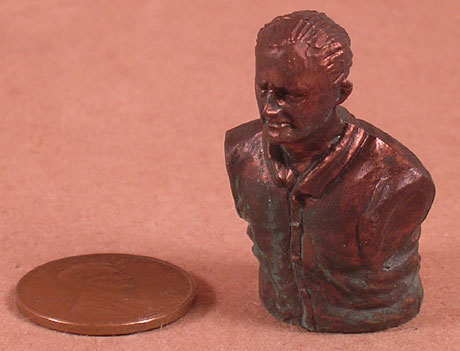
The method I liked best from my test is that seen in swatches #5, #6 and #7. I’ll demonstrate this on the figure bust below:
Primed figure with flat black spray paint then airbrushed on Alclad II Copper. (above)
Track Brown Mig Pigment washed on with Odorless Turpenoid. Allow to dry fully then airbrush on a satin coat of Future Floor Acrylic mix. (above)
A mixture of Zombie Green, Ashes, and Neptune Blue Mig Pigments was sprinkled/dabbed on with a brush. These were then blended with Odorless Turpenoid. Finally it was clear-coated with Satin Future Floor Acrylic. (above)
Side View… (above)
Another Angle… (above)
Watch my Fish Sub Build-Up thread for more copper techniques as I’ll be documenting what I learned above as I apply it to an actual model. I’m sure there’s more methods and products than those I showed above. If you got one, send me a pic and process. If you make a copper product, contact me and send me a sample to review! I’ll add them to this post or if cool enough to an all new post.


![Maude [Cyborg Action-Doll] (Files Only)](https://fichtenfoo.net/blog/wp-content/uploads/2023/01/Maude-Promos-300x300.jpg)


