


Your cart is currently empty!
In Progress » Gerbera Tetra
08.30.2005 » Concepts
and Initial Build Info
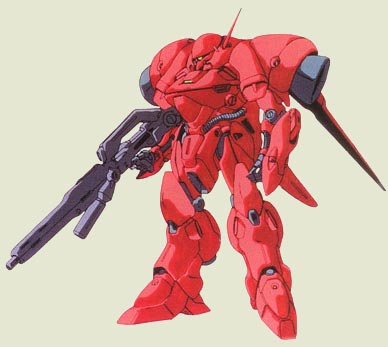
Well… with the news that Bandai will be focusing on Zeta and Seed
kits for the next two years at least, it’s starting to look
as if we’ll never see a Gerbera Tetra Master Grade. I could
sit around and bitch about it on every freaking message board,
but instead I decided to take my skills to the next level
and convert a $10 Gp01 MG from Amazon’s sale to the Gerbera
Tetra (hereby referred to as ‘GT’). This won’t be an exact
GT by any means but my ‘interpretation’ of the GT. I really
like elements of both the original GT and the GT Plus so I’ll
be combining those favorite elements into my build. The result
should be a GT Hybrid of sorts.
I’m taking my inspiration and reference
from many GT builds I’ve seen. There was a recent
build of a GT using an MG Gp01 which I saw in
a contest gallery which was awesome and really
made me wanna persue this project. I’m also using
images of both G-Sys GT versions, The 1/144 Bandai
release, The B-Club 1/100 full resin kit, and
anything else I gan get my grubby hands on.
I’ll be using misc. leftover bits
from previous projects, the Gp01 internals and
misc. parts, Wave and Kotobukiya option parts,
Magic Sculpt, and styrene shapes, rods, tubes,
and sheets to complete this project. I’ll probably
cast the duplicate parts such as legs, arms, etc…
to save work and to make sure those parts are
symetrical. Most of my plans are in my head and
are being thought-up on the fly. I know what I
want it to look like in general, the rest is done
either out of necessity or on a whim.
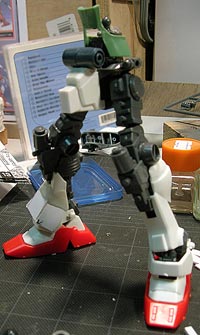
So far I’ve built the lower half
internals of the Gp01 (legs, feet, and crotch)
and have begun modifying the Gp01 armor that fits
onto those internals to be more like that of the
GT. I have the lower shin at approx 80% complete,
the crotch at 50%, the calf at 10%, and the torso
at 30% completion.
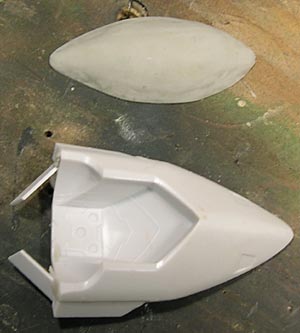
The first image shows how I started.
I’m trying to keep the articulation in the ankle
so I flared out the shin armor a bit. I first
made a rough shape from sheet styrene then applied
Magic Sculpt (MS) to blend the shape together.
The crotch is the original G-01 crotch which has
been bulked out with sheet styrene and magic sculpt.
The torso is the bottom half of a leftover MG
GM Type C leg internals covered with the upper
portion of the lower leg armor of a MG Zaku held
together with MS. I used the leg part since it
had the same size ball joint as the polycap in
the crotch.

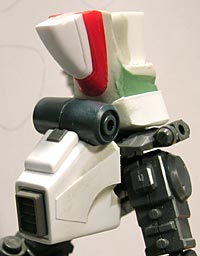
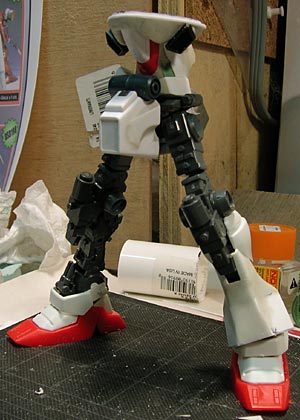
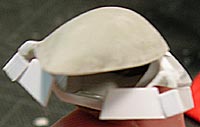
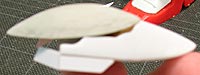
In the second and third images,
you can see the progress thus far. The crotch
just needs the side buldges sanded and rounded,
then panel lines and added details applied. The
torso still has a way to go as I bulk it up. I’ll
be making the top part of the body separate from
the torso so that I can have some added mobility.
That’s the plan anyway.The hatch is actually the
foot from an old destroyed 1/144 V-Dash Gundam
which was my second Gundam kit I ever built (snapped
and stickered it) back in 1994.
09.01.2005 » Chest
Started…
I got the torso and crotch nearly
complete minus some detailing and clean-up. Now
that that is done, I’ve started on the chest.
I find myself working upwards and outwards. Just
to be sure the parts fit one another and look
right size-wise. The chest is very early but I
got some Magic Sculpt glopped on roughly for general
shape. When that cures I’ll add more to make the
shape more defined. I added the underside vents
as well since I’ll need to form the shape around
them. I also started on the head (not pictured)
tonight. Since I’ll only be using the skeleton
of my PG WZC I’m free to use the armor for whatever.
So I’m using one of the shoulder pieces for the
rough shape. I’ll be grinding, filling and adding
to it, but it gives me a nice solid base to start
with. I need to build the head before the upper
chest so that I know where to add the neck and
such. Here’s a pic of the build so far:
09.03.2005 » Upper
Chest and Head
Since I need some parts done before
I can make others I started on the upper chest
and the head. I need these done so I can finish
the lower torso and lower chest and make sure
everything fits properly. Anyway for the upper
chest I made 2 walls which also function as templates
for where to apply the Magic Sculpt. I molded
on the MS and pressed the vents in lightly to
position them When it and the lower chest were
dry, I used my electric sander (a 4″ vibrating
square) to smooth out the MS and shape it. It’s
not a percision tool, but it saves time for rough
sanding work like this. Next for the chest I’ll
need to apply more SM to the sunken in areas to
build them up so it’s one smooth piece.
For the head I used a shoulder armor
part from the PG WZC. I made the top of the head
out of MS and again used my sander to smooth out
the shape. I need to add more MS tofill in some
rescesses then it should be near done. The back/lower
part of the head still needs more MS applied and
the form of the armor around the face built up.
I’ll add that after the MS that’s on it now cures.
Once that’s ready I need to carve out the bottom
of the head and start detailing it with MG Zaku
head internals. Here’s some pics:


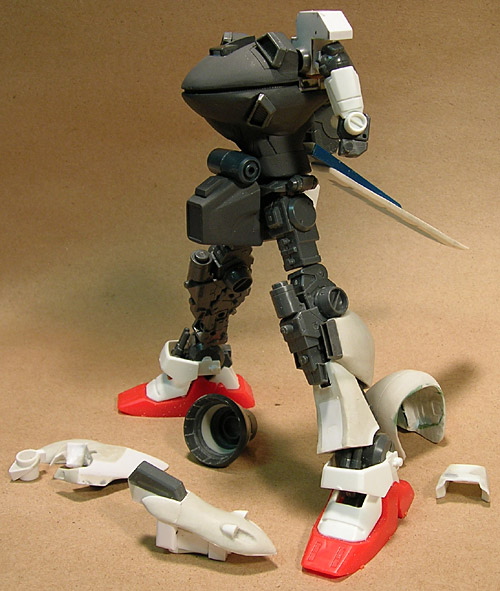
09.17.2005 » Progress
So Far…
It’s been a while since I posted
any progress on this build. It’s progressing,
just not in ways that are very photogenic. Everything
is still in the rough and undetailed stages. Most
of my time is spent waiting for Magic Sculpt to
dry on one piece while I either work on or plan
another. The body got to where I needed to prime
it to start doing clean-up and adding detail.
The legs are mostly on hold while I wait on some
option parts to arrive. The fore-arm is almost
to the primer-stage and is looking pretty good
if I do say so myself. 😉 The head needs some
option parts and primer. The shoulder armor is
roughed out and needs some more work before primer.
The back is getting there. I have the aileron
and booster on a ball-joint that is attached under
the back to allow it to move. I’m waiting on option
parts to finish the large booster. And that’s
about it. Here’s a pic:

![Maude [Cyborg Action-Doll] (Files Only)](https://fichtenfoo.net/blog/wp-content/uploads/2023/01/Maude-Promos-300x300.jpg)


