Your cart is currently empty!
In Progress » Armored Dune Hopper
11.19.07» Source, Concepts &
Initial Scratchbuilding
And I said to myself… well, how did I get
here? I started this project out mentally as another Martian
Hovertank like my prior one… gathered all the parts
I’ve been stashing for it then somehow used none of those
parts and decided to add wheels and a suspension and a lack
of curves. Seriously… I am not sure how this came about.
HAHAHA! But I’m all for going down the opposite path if the
end result is something interesting.
The Armored Dune Hopper (ADH) is an armored
recon vehicle for use in desert environments. I haven’t decided
yet whether this will be martian, lunar, or terrestrial. It
started out martian with the large enclosed cabin and large
wheels. The size of the cabin is so that the driver can get
in and out easily and fit into it with a bulky space suit.
I still plan on having a large, double hatch opening to allow
for a bulky suited driver, be it armored bulk or space suit
bulk. I’m also added a couple of large storage compartments
on the sides. The insides of those have the diamond-plate
texture since it’s fun to weather and I saw it used in fire
truck storage compartments.
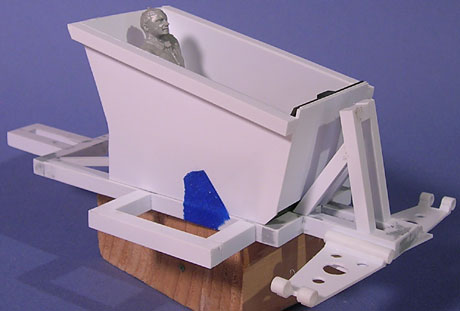
First I constructed a frame using square tubing.
On this frame will sit the cabin, engine, suspension, etc…
Everything so far has been scratchbuilt from styrene sheet
and styrene tubing. I have a lot to clean-up and do yet like
figure out the front shape, do the rest of the suspension,
make stabilizers for long booster-assisted hops, and make/add
the engine. I’m waiting for an Anikins Podracer kit to use
parts of for the two booters on the upper rear of the engine.
The engine will sit behind the cabin and will be somewhat
exposed. Impractical to be sure, but it’ll look much more
interesting that way. It’ll have lots of greeblies tubes,
wires, etc….
Here’s some initial pics of it sitting up on
a scrap of 2×4. That’s actually the height it will sit off
of the ground once the tires are attached. The hood and roof
will be somewhat squat and won’t add too much more height
to the profile.



11.26.07 » More body-work
Still plugging along on the chassis and body
of this beastie. I’ve been doing mostly clean-up on the body
before adding any finer details. I did manage to make the
“hood” of the vehicle as well as the hatches. I
got the low cabin profile I wanted with plenty of room for
the driver inside. The front of the “car” will have
a small laser mounted inside the left “tube”. The
right 2 tubes will have optical equipment. A sheet of armor
will hang below those like on my Martian Hovertank and in
front of that will be a nice big roll-bar-looking bumper.
Still waiting on the pod-racer kit so that I can begin work
on the rear 1/3 of the vehicle. Looks like an odd Snowspeeder
at the moment, but after I add the engine/wheels it’ll change.


Below is a shot of the tires I took from an
old RC car. Unfortunately 2 of the tires are in horrid shape
so I’ll have to make resin casts of these 2. They’re 3″
tall and shown next to a 1/20 scale figure.

11.29.07 » Start Your Engines
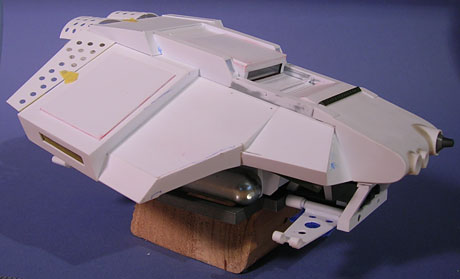
Got a little further on this, but there’s still
a very long way to go. The Pod-Racer kit came so I built-up
and sliced off the parts of that engine that I wanted. The
rest of the kit is great for little greeblie details. I made
a radiator grille for the back of the engine and used parts
of prior scratch-builds that I started, but never finished,
to make the mount for the rockets and engines. I also made
my “air break” flaps for the rear of the craft.
These will help steady and level the vehicle when doing a
booster-assisted jump.
Next I need to work on the suspension some more,
interior, exterior details, and create a nifty overly detailed
engine.

12.02.07 » More Engine
Here’s a shot of some more work I did on the
engine. Started making the engine block shape then added some
misc detail parts to it. Later I’ll add some more details,
pipes, tubes, etc… The exhaust pipes were made by measuring
the circumference of the tube (1.625″) and laying out
the dot pattern in illustrator to that size. Then I printed
it out, taped it to the tube and used the printout as a template
as to where to drill holes. Took me an hour to do the two
large holed pipes. More details and pics in a few days.

12.05.07 » Guns A-blazin’!
Here’s the gun that some of you have been asking
about. It’s a belt-fed mounted gatling made from misc bits
and scratchbuilt parts. The ammo box was especially fun to
do. I’ve also included a shot with a large Tamiya paint bottle
to give a sense of size.


12.08.07 » Cabin Pressure
 One
One
of the good parts about a project such as this is that if
you start to get burned out on one part, such as the suspension,
you can work on another such as the interior which is what
I’ve done since the last update.
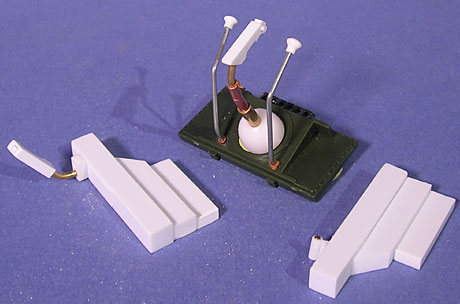
I started out by making an interior roll-cage
using styrene rod. For the bends I simply heated that part
over a candle until slightly pliable, then I bent it into
position and held a minute until cool. For the cross-bars,
some Ambroid Pro-weld (styrene glue) did the trick. I just
need to sand the glue-connections now to remove the melted
out styrene.
Next-up was the seat which was made from scrap-styrene
then covered in half-round. An indentation was made where
the drivers back-pack containing life-support would fit. That
way there’s no need to remove it to sit in the car.
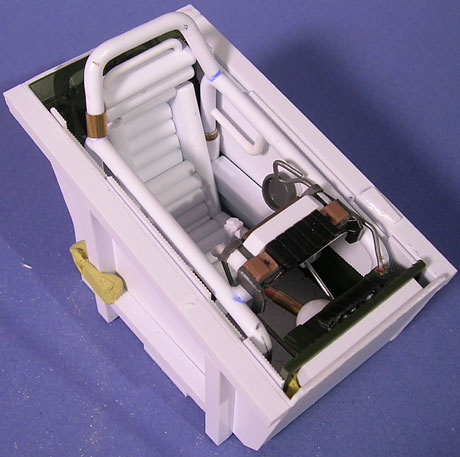
The gauges and main view-screen were made from
leftover parts from the parts bin and option parts. The main
steering and gun-aiming sticks were made from thick styrene
strip which had the narrow part dremmeled in to create that
shape.

Shifting knobs were made by placing the end
of styrene rod close to the heat of a candle flame. This causes
the end to expand and form the mushroom shape. They were then
cut-off and had a hole drilled in for the wire/shaft.
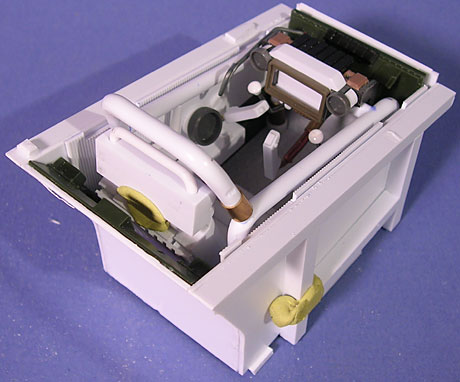
Another piece of wire was bent to create some
sort of emergency pull-handle. This won’t be for an ejection
seat, and quite frankly I’m not sure what it’d do… but it’ll
look cool with it’s black/yellow striping and that’s why I
added it.

Overall I’m glad that I left as much space for
the cabin as I did. Once everything was created and added
in it’s made for a cramped and busy-looking space and a great
reason to leave the hatches open in the display case.

12.10.07 » Suspended
Lots more pics and info for todays update. First
off you can see the smoke dischargers that I finished yesterday.
They’re made from aluminum and styrene tubing and steel bearings.
Next for those I need to make caps/chains. I also made a jerry
can weeks ago for this build. When I was making the mounts
yesterday I thought… “wouldn’t a jerry can full of
water externally on Mars just freeze solid? So what’s the
point?” Well… it’s now a Jerry can full of… ANTIFREEZE!
Probably useful.

The front suspension I roughed out last week
but forgot to take pics of. It still needs details added but
the basics are there and it works!


Here’s a small shot of my new wheels. Nice treads
and about as big as the hard plastic ones I would have had
to cast before. What I like about these are that they’ll have
a nice realistic sag from the weight of the Dune Hopper. The
removable rims makes for nice painting and all 4 wheels with
rims only cost $12.


Next is the main hatch. I made some working
pistons, a padded foor-top (for rough landings) and a pull-bar
for opening it or something.


12.11.07 » Roll Call
Here’s a shot of almost everything I have done
put together. I finished the front and rear bumper which are
made from heat bent styrene rod. Grills were added on the
armor to protect the headlights. The grills were “dented”
using heat from a candle. Headlights will be made using T-Flat
aluminum thrusters from Mechaskunk.com. They’re the perfect
shape for this… just need to make lenses and mounts. The
penciled stripes are where I’ll add non-slip texture.

The bottom grill on the front bumper is damaged
so badly that a piece of diamond plate will be retrofitted
there to keet rocks from hitting the steering box. This was
a frequent modification to this type of vehicle. (in my alternate
universe)

Like your car hood, a thin bar holds up the
cargo hatches. I also added the fuel entry hatches seen in
this pic.
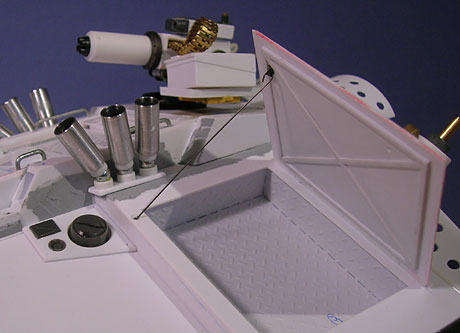
Here you can see the rear bumper/grill and some
more braided tubing mounts behind the cargo hatches.

12.15.07 » Detail-up
So many pics that a page 2 is necessary! I’m
starting to feel like this projects construction phase is
nearing it’s end. Whew! I still have a lot to do before I
can start priming and painting, but now it’s just the wheels
and minor things. I decided to put everything that I have
done together and double check it’s fit.


First up is the engine. You can see in this
first pic the brass brackets I made to hold the long gas-tanks
that sit on the frame on either side of the cabin. You can
also see one of the bent-styrene d-rings I added.
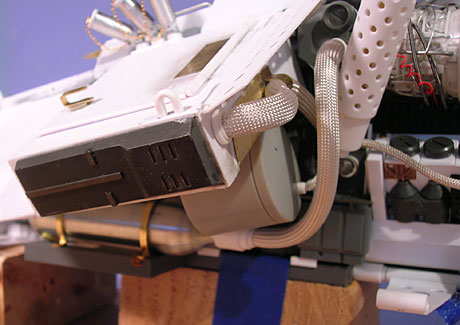
Here you can see the many pieces of wire and
spring I added to the boosters. The engines have a lot of
this detail molded in, but layering it like this really adds
to the busy and detailed effect. You can see the small brass
turn-handles on the smaller braided tube couplings and all
of the mountings for the various braided tubes.

Here you can see a close-up of the wiring.

In this pic you can see the small hinges and
pistons I made for the airbreaks.

I finished up the smoke dischargers by adding
caps and chains. Straight-pins were inserted through the chains
and into the caps and tubes to connect the really small chain.
This is the same chain I used on my Gelgoog
NT. Small stuff! Another chain was added to prevent the
maintenance crew from losing the gas-cap. I’ll properly align
the tubes when I go to glue them in after painting.

Lastly is the complicated 3-point mount for
the lights. Much flame and bending required to get these just
right!

03.08.2008 » Back on it…
After a brief hiatus from this project for my
own mental health I’ve returned to it. I started doing the
final clean-up of parts and work on the figure. Nothing new
to show for the parts, but I can show progress of the pilot
figure. The head is from an MG Dom figure which I’ll be modifying
a bit with some head-gear. The rest is all sprue/wire-frame
covered in Magic Sculpt and Aves Apoxie Sculpt. The clear
dome is a cap from one of my daughters dried-up stamps. Perfect
size and fit! The gun is just from my own imagination.


03.09.2008 » Non-Slip
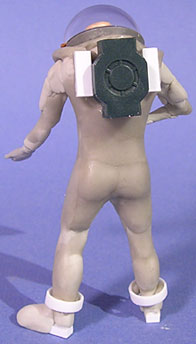
More bulk has been added to the figure so that
his basic shape is being formed. After I bulk the arms I’ll
start adding wrinkles/folds to the suit, details, armor, equip,
etc… My Magic Sculpt has gotten old and the hardener part
is well… hard. So I’m only using it for build-up. Over that
I’ve been adding the Aves which is very very nice to use for
the details.

I also added the non-slip texture to the hull
today. For this I masked off where I wanted the texture to
be and then sprayed those areas with Krylon Fusion texture
spray paint. Afterwards I reprimed those spots. The only odd
thing, and I’m glad I tested it on scrap first is that the
Krylon Texture paint sprays REALLY HARD and forceful. It blasts
out of the can so be sure to hold your parts at least 12-18
inches away from the nozzel. No joke.

03.13.2008 » Bulking Up
More figure progress. The gun is about done
and the Mars-suit is coming along rather well. Still a lot
of detail to add though such as finishing the feet and headgear.


03.15.2008 » Martian Blend
Now that the figure is done, primed and base-coated
(no pic yet) I’ve started painting the ‘Hopper. Last night
I did some research on Mars images from the various rovers.
I picked some colors I thought would work right, but wasn’t
sure about a pattern. I decided to look up WWII German tank
camo patterns and found several that I liked so what else
was there to do but blend them together. What I like about
this pattern and colors is that from a distance the squiggly
gray would look like waves of Martian regolith. The dots simulate
rock highlights, but mostly just look cool.

Looking at my references the color should be
a little more yellow-orange and slightly less saturated. However
there’s three reasons for my not doing that exactly. 1: the
colors will blend better once filters, washes, and such is
added. 2: Mars dust colors in the wash and pigments won’t
show up if the base colors are exactly the same as them, and
3: making it off will visually seperate it from the groundwork
making it more visually interesting. Otherwise you end up
with a very monochromatic piece. In this first pic you can
see what the various weathering effects will do to the base
camo to blend it in.



03.20.2008 » Paint and Chips…
Here’s a little teaser of the paint so far.
Decided to paint the frame in semi-gloss black instead of
red. Added rusty chips to those parts as well. I made a stencil
for the unit numbers and mainted them on sloppily leaving
some overspray for that quick and dirty look. Also added a
few decals. Painting the details and accessories in various
colors breaks up the rust montony. Sheet-metal covered sections
of the repaired hull are being painted using Adam Wilders
mild steel technique. I’m up to the oil-paint portions there
and will add rust pigments to them later after washes and
such.
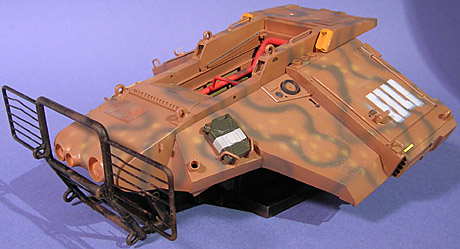
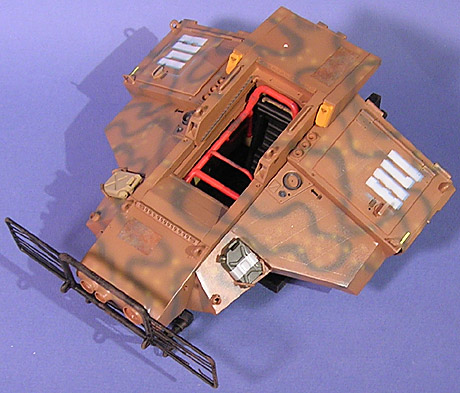
03.22.2008 » Engines
Here’s a shot of the engines so far. This is
just the construction phase. Next up will ne weathering the
whole kit.

03.27.2008 » Near Complete
Here’s some shot’s of the ADH near completion.
I still have some dusting and weathering to do, straps to
add to the jerry cans, and need to make a base and paint the
figure.


![Maude [Cyborg Action-Doll] (Files Only)](https://fichtenfoo.net/blog/wp-content/uploads/2023/01/Maude-Promos-300x300.jpg)


