![]() |
Posts Tagged ‘Worn Effects’ »
The Remora and Lillian G »
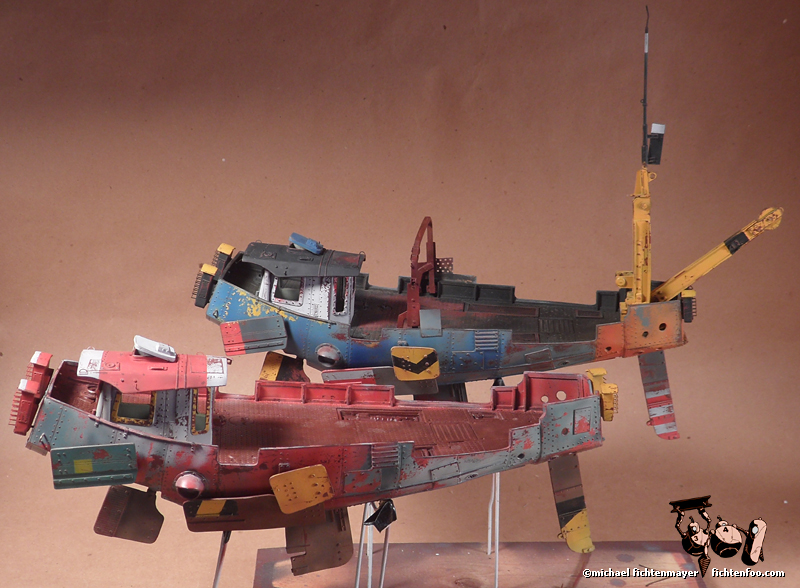
Well, here they are… my two build-ups of Ian McQue’s Remora. The red one will be shipped off to Ian in a few days where he’ll do the final rigging and the blue will most happily collect dust in my display case. Overall these were a LOT of fun, not only painting/finishing, but building the master as well and producing the kit through Industria Mechanika.
You can preorder the Remora’s next edition at Industria Mechanika.
Here’s 40-something images for you to browse. Enjoy!
In Progress » Remora Pair » Remora Paint-ups » Part 3 »
First up: You can preorder the 2nd Edition of this Remora kit now at Industria Mechanika!
Finally I have a chance to continue with the progress posts. First up was the rusty streaks. For these I used the AK-Interactive rust streaks, light rust and their white spirits. I also used a small flat brush and my airbrush. I misted on a VERY light coat of the Rust Streaks, then Light Rust Wash onto the hull sides and let dry a few minutes. Then I took a brush dampened with thinner and streaked the enamel product um and down creating the rust streaks. This stuff works great! Below is a few examples and a before/after.
You can simply paint streaks on with a thin brush, then blend them in with the thinner and flat brush, but the airbrush method gives you a heavier effect.
For the engines… What I did was paint them in dark gray, then hairspray, then a lighter gray-khaki color. Then I chipped the hell out of it with a toothbrush and water revealing the dark gray. Then I rubbed it with my finger in some of the AK-Interactive steel powder (graphite will work too). Then I did something similar to the discoloration technique, but with thicker globs of black and blue and worked that in. It removes and spreads around some of the steel powder giving it all a nice faint metal look. Then I drybrushed some gold, metallic blue, then metallic purple around the nose cones.
I used some of the optional dot-plate from the PE fret to make a rounded engine cover. I also used some of the leftover wire on the engines to greeblie it up.
Lastly for this update, here’s a few shots of the Red Remora with some cargo and the rigging of the crane done. Currently I’m in the process of adding bird poop and other rigging and will show those off with the final images.
Adding some chain and a bead to the end of the crane/hook helps weigh down the cable, keeping it straight.
In Progress » Remora Pair » Remora Paint-ups » Part 2 »
I finally finished doing all of the paint and chipping on the two Remora build-ups. For the most part, it was all the same hairspray steps described in the last update. You can see on the blue ship, the ‘Lillian G’, that I added an extra boom to the mast that I had scratchbuilt to make it a little different.
After the paint was done I clearcoated and began decaling using the supplied decals. They worked really nicely and provide a LOT of ship names. As you can see Ian’s is the ‘Remora’ and mine is the name of the favorite boat my dad worked on before he retired from working on river tow-boats, the ‘Lillian G’.After decaling I airbrushed on a satin coat of Future and added a dark-brown, the rust filter to all the parts.
In Progress » Remora Pair » Remora Paint-ups » Part 1 »
Been a very busy modeler since the last update. The nature of the paint-work, inspiration, and following Ian’s painting is making painting and chipping one part at a time a necessity for my own sanity. It’s very enjoyable and I love the challenge of interpreting Ian’s painting into realistic paint and chips on a physical model. I’m also working on my own color scheme version inspired by Ian’s other paintings so let’s break down how I’ve done everything so far.
Build-up for Ian McQue:
After I did the base rust colors shown in the last update, I sprayed the entire hull in hairspray and let it air-dry. When dry I first sprayed on a thin base of white to make the next red mix pop. After I immediately sprayed a mixture of Tamiya Red, White, and Earth to get the faded old red color. Then I staded it streaking up and down focusing on the underside with a dark warm gray color. Tamiya Acrylics works best for the hairspray technique. Do not use enamels, lacquers or Vallejo for this.
I let the paint cure for only about 10-15 minutes then began chipping away at the red using a stiff brush and a needle to smaller scratches. Heavier chipping was added around the entryways and edges.
I removed much of the paint from the deck, but will paint the deck in grays and rusts later after masking the sidewalls.
After the chipping was complete I gave the hull a thin coat of Future Floor Acrylic to seal the red and chips. I waited about 6 hours then sprayed on a more hairspray then a random coat of minty blues and whites focusing on the rear and front of the ship based on Ian’s Remora painting.
I chipped away at the “mint” coat revealing the reds and rusts beneath. I love this multi-layered approach to painting chips as it adds a lot of depth and visual interest.
Afterwards I gave the hull another thin coat of Future to seal the blues. While that was curing I started on the fins. Using the box art as reference I did the same hairspray steps as above using custom mixes of Tamiya acrylics and tape to get the desired look.
I asked Ian what the fins on the opposite side looked like as I assumed they weren’t mirrored and he sent me a quick render. Using that ref I did what you see below. Next I’ll start on the deck and wheelhouse painting.
Build-up for FichtenFoo:
Meanwhile I was working on my personal Remora build-up. I started off with a layer of hairspray then painted the deck and inner walls in Nato Black oversprayed with Khaki to highlight it.
On the outside I sprayed custom mixes of cool blue-green grays. I then chipped this quite heavily using a toothbrush. I gave the hull a thin coat of Future and let it cure overnight.
The next day I applied more hairspray, then more custom mixes. First some Tamiya “Sky”, then over that lightened Tamiya White + Blue, then straight blue for panel edging using some post-its to define the edges.
I masked the blue and painted the orange front by first laying down some white, then the orange. Afterwards I removed the tape and began chipping the blues and oranges. You can see towards the front of the blue where the grays from the first coat start to show through on the chips.
When I was done with the blues and oranges, I wanted to add some random yellow chips to the rear. I tore off some wide Tamiya tape with rough edges and masked the areas I wanted yellow. Then I used my airbrush to put down some of the AK-Interactive chipping fluid. It works just like hairspray, but can be airbrushed making it great for spot-work like this.
I sprayed the white, then yellow and removed the masking. Then I took a wet toothbrush and chipped away most of the yellow. The end result gives that mottled colorful feel that you see in Ian McQue’s paintings.
That’s if so far. Watch for more on the next update!
|


Tired of expensive and slow web design services? Looking for quality design with a fast turnaround? Whether you need an all new design or updates to your existing site, I'll give you the same speed, professionalism, and attention to detail.


