![]() |
Posts Tagged ‘Tantive IV’ »
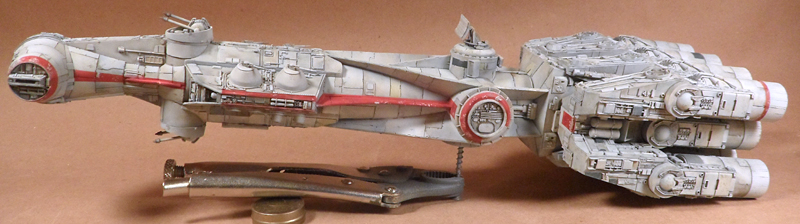
Completed » Rebel Blockade Runner [Tantive IV] »

After some finishing touches, the Tantive IV is all done. As of now, this kit will be on display at Wonderfest in Kentucky this May (2011). If that changes, I’ll let you know. It’s also making a trip to the guy the commissioned it shortly after. So check it out if you get a chance and let me know what you think. Till then, here’s pics:
In Progress » Tantive IV Rebel Blockade Runner » Modulation »
My next step in a variation on the “modulation” technique. I’m basically using thin oils to blend in shadows, filter panels, and highlight raised areas give the model a more dimensional look. For this I used Faded Navy Blue, Starship Filth, Dark Rust, Yellow (on certain yellow panels based on studio model) and Snow White. Next I’ll apply the modulation to the red parts. I did not yet as I didn’t want to accidentally “pink-up” and of the other parts. And still… NO WASHES! Those will be thin and after the reds and just sporadic at best where the other discoloration and modulation effects did not do enough to make small things or panel lines pop. Gotta apply that window decal too.
In Progress » Tantive IV Rebel Blockade Runner » Filter and Discoloration »
Continuing on, I applied medium gray chips to the ships hull using first a small piece of sponge, and later a thin brush for larger areas. Then dry I applied a filter of very thin German Ochre oil paint mixed with odorless turpenoid to warm up the base coat.
After letting that dry overnight I applied the oil paint discoloration technique using more odorless turpenoid and blue, burnt sienna, dark mud, and buff oils. Apply small dabs then blend them in. This makes the surface look varied and worn without resorting to the typical awful looking thick wash of black paint. A pin-wash will be my last step, however it’ll be very thin and applied only to certain panel lines as needed with a very thin brush.
My next step once this dries will be to further enhance the look with more oil paints. I’ll use lighter colors to make raised panels and detail pop and blend some darker blues and grays (The Starship Filth oil paint color by 502 Abteilung works great) Click the “Star Wars” tag below this post to see how I used these steps on other builds. The Y-Wing and in-progress Snowspeeders are favorite examples of other times I’ve done this.
In Progress » Tantive IV Rebel Blockade Runner » Initial Painting » »
After priming the Tantive IV yesterday, I was able to start painting today. I started off by preshading with a dark gray over all the panel lines and inside of detail areas. Next I sprayed a solid white + a touch of gray mix over that. The preshade barely shows through in the end, but that’s what it’s supposed to do… just be a subtle shade in areas to add more depth to the overall paint.
Once that dried for a bit I began masking off small sections which needed red paint based on the reference photos. I would mask a few areas, sponge on some liquid mask, then spray the red. I’d then remove the masks revealing the chips and move onto the next areas. This took some time, but is done. Tomorrow I’ll do the same for areas needing darker gray panels. Lighter panels will be shaded with oils later on.
Now the red areas look to have excessive chips… for now. This will all be blended in and adjusted later on with oils.
In Progress » Tantive IV Rebel Blockade Runner »
I’m baaaaaaaaaack! Hopefully! Been a tad busy with the kids, a trip to Disney World in Florida, video games, freelance, and projects that I’ve been scratching, but are not finished. No finished model kits for 2011 yet and that’s gonna have to change. Don’t want to end up like a certain “Doctor” I know.
Tantive IV As seen in “A New Hope”
Anywho… a friend hooked me up with a side gig painting up this 1/350 scale Rebel Blockade Runner (Tantive IV) resin kit I had sitting on my shelf as a table display at Wonderfest in Kentucky this year. I’ve been wanting to build it anyway and so it was a good motivation to get something FINISHED.
The kit is decent enough. Some air bubbles here and there that wear easily fixed with some Aves or spot-putty. In fact with this kit you’ll definitely need some Aves. Not that it’s a bad kit. I think it’s decent enough, but due to the nature of the ship-design, kit-master, and the fact it’s resin, you’ll need to fill some minor gaps. Mostly where main fuselage parts fit together, but nothing that affects detail areas thankfully. In fact the only part of the kit that I disliked was that some mold lines were over some round engine parts that made for some difficult to reach sanding.
I decided to save myself some sanding headache and replaced the resin engine pipes with wire/styrene tube. The supplied ones were decent, but I kept breaking them due to their thin nature. Better for my sanity to replace them. I also eplaced the gun barrels with aluminum tube, but I hate sanding round parts. It’s a pet-peeve, I know…. I’m seeking professional help for it.
Because I’ll be shipping/transporting this kit, I made the more fragile parts such as the guns and radar removable via neodymium magnets. Works great and I don’t have to worry about breakage.
So here’s some pics of the kit before primer. I hope to prime tomorrow barring any inclement weather.
|


Tired of expensive and slow web design services? Looking for quality design with a fast turnaround? Whether you need an all new design or updates to your existing site, I'll give you the same speed, professionalism, and attention to detail.


