• Tired of expensive and slow web design services? Looking for quality design with a fast turnaround? Whether you need an all new design or updates to your existing site, I'll give you the same speed, professionalism, and attention to detail.

    Contact me, Michael Fichtenmayer, a freelance web designer with over twelve years of experience in web and visual design.

    Portfolio »   Resume »
    WordPress Design Service »
    Contact me for a quote »

  • Recent Posts

    • In Progress » HH-1N ‘Abandon Chute’
    • Reference » HH-1N ‘Abandon Chute’
    • In Progress » BergeLuther » Discoloration and Burned Out Modern Car
    • In Progress » BergeLuther » Painting Part 2 / Chipping
    • In Progress » BergeLuther » Mods and Painting Part 1
    • In Progress » Hoth Diorama » Tauntaun Running
    • In Progress » Hoth Diorama » Snowspeeders » Weathering
    • Reference » ESB Snowspeeder Screen Shots
  • RSS New In the Forum Gallery

    • Friday, February 5, 2010
      1/60 Exia Repair II
    • Wednesday, February 3, 2010
      Tamiya 1/35 Russian T62-A
    • Tuesday, February 2, 2010
      RX-110 GABTHLEY
    • Monday, February 1, 2010
      MG Gouf Ver 2.0
    • Sunday, January 31, 2010
      Tyrannosaurs Hunting scene
  • RSS Model News Feed

    • Thursday, January 7, 2010
      No More Lacquer Paints from Rainbow 10!!!
    • Thursday, December 31, 2009
      1/20 Groβer Hund Altair by Rainbow Egg, Open Box Review and Report!
    • Saturday, December 19, 2009
      MG 1/100 Astray Red Frame Kai coming in Feb!!
    • Thursday, December 10, 2009
      FichtenFoo's Light Martian Hovertank NOW AVAILABLE!
    • Sunday, December 6, 2009
      Hasegawa Lunadiver Stingray 1/35 sneak preview!
  • Categories

  • Post Tags

    1/20 Scale 1/35 Scale 1/48 Scale 1/72 Scale 1/100 Scale 502 Abteilung AFV Armature Bandai Chipped Paint Clean Commission Completed Models Dagobah Dagobah Diorama Diorama Empire Strikes Back Figure Grass Groundwork Gundam LEDs Luke Skywalker Maschinen Krieger/Ma.K./SF3D Models In-Progress Models In-Progress Non-Scale Oil Paint Discoloration Pigments R2-D2 Resin Roots Rust Scratchbuild Sculpey III Sculpture Star Wars Super Sculpey Swamp Tips & Techniques Trees Tutorial Water Weathering X-Wing
  • Archives

  • Meta

    • Log in
    • Entries RSS
    • Comments RSS
    • WordPress.org

Posts Tagged ‘Paint’ »

In Progress » Hoth Diorama » Anti Infantry Battery » Paint Sample »

Posted on Sunday, September 27, 2009, 3:53 pm, by Michael Fichtenmayer.
Filed under Commissions, Company Websites, Modeling, Models In-Progress, Portfolio, Tips & Techniques.

turretpaint-13

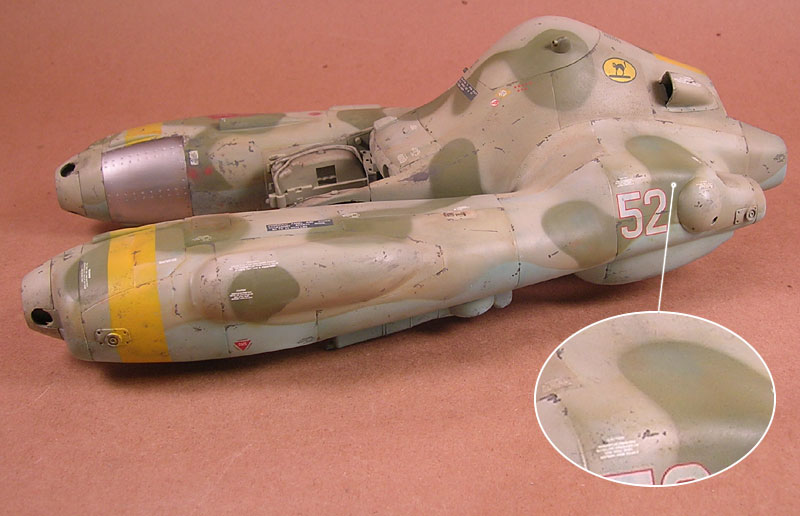
So I sent my turret off to a caster a few weeks ago. He decided to purchase the master and to produce it which is great because I got a bunch of copies for my use plus some trades which is nice. If you’re interested in a cast, contact Jimi Glancy. (bollod-at-sbcglobal.net)

I got my copies on Saturday morning and that night threw one into some ‘Purple Power’ to clean the mold release. They look great and with three parts, paint-up should be easy so I decided to see how quick I could paint one up. Here’s the process:

Saturday 9-27-2009:

Received the kits and threw them onto a bath of Purple Power. You can get it at Walmart. It’s an engine cleaner/degreaser and great for removing the mold release agent from resin parts.

Sunday 9-28-2009:

I removed the parts from the cleaner and scrubbed them down with an old toothbrush. I then did the minimal clean-up needed. A few small mold lines on the turret/gun and on the base of the base was all there was. Gave the turret two coats of primer. First was green Duplicolor Self-Etching then a coat of light gray Duplicolor filler primer. After that dried I buffed them with very fine steel wool to smooth out the filler primer.

turretpaint-01

After that I started on the base coat. This will be a multi-stage, multi-layered process so bear with me. I first sprayed it with Tamiya Light Sea Gray then I mottled some Deck Tan over that. Finally I did a post-shade of panel lines and shadow areas/damage with Tamiya Dark Gray. This was all later sealed with Future Floor Acrylic. It looks like an odd jungle camo, but this base coat will be mostly hidden by the next steps and serve to give a layered and used look.

turretpaint-02

turretpaint-03

Once the Future cured I gave the parts a few coats of hairspray and a sprinkling of crushed kosher salt over the still-wet hairspray. This will make for some interesting chipping effects through the whitewash when wet-down and chipped with small soft brushes and toothpicks.

debris-04.jpg

turretpaint-04

Over the dried hairspray and salt I sprayed on thin coats of Tamiya Flat White. Allow some of the base-coat to show through. Make the top of the turret and other parts lighter to get a sunlight highlighted effect. Spray under the turret thinner to make false shadows.

turretpaint-05

Once the paint cures a bit… (I only waited about 20 minutes) take and dunk it in some water and use various brushes and such to remove the salt and to add more chipped paint. The hairspray loosens the top layer of paint with water allowing fo easy and realistic chips ranging from small faint scratches to huge blasted away areas.

turretpaint-06

At this point the contrast between the white and the base coat is pretty stark. I expected this and this allows for yet another layer to be added. All of these layers make for random variations leading to a more realistic end result. Over this spray another layer of white to blend in the chips until you’re satisfied with the look. Vary your obacity as usual to get a mottled realistic look.

turretpaint-07

At this point we’re ready for the actual weathering. While some might call this done, a few extra steps will really bring out the look and make something that’s plain white to be something that’s far more visually interesting. First I applied a Sin Industries filter (gray for white) then after a few hours of that drying I added some discoloration with oil paint. I used white, blue, dark rust and dark mud colors. After that I added more white oils over that to bring back the lightness that the discoloration and wash took away. Finally I added some rust streaks with oil paint. Here it is all done.

turretpaint-08

turretpaint-09

turretpaint-10

turretpaint-11

turretpaint-12

Tags: Chipped Paint, Commission, DF.9 Turret, Diorama, Empire Strikes Back, Hairspray, Hoth, Hoth Diorama, Oil Paint Discoloration, Paint, Star Wars, Tags: 1/48 Scale
Comments Off

Completed » Falke Antigravity Raider »

Posted on Sunday, April 19, 2009, 12:47 pm, by Michael Fichtenmayer.
Filed under Completed Models, Modeling.

fichtenfoo-falke-18

The 1/20 Scale Falke from Hasegawa is completed. Overall a very fun build without any major problems. Parts fit was great and painting/weathering went smoothly. The base was fun as well. So nice to work with Celluclay at this scale rather than the large base for Dagobah. I used plaster rock molds from Woodland Scenics, gravel, dirt, and celluclay. I filled the bottom of the base with rocks and plaster for weight, but it wasn’t needed as the Falke is very light. To make the Falke look like it was flying very close to the ground on a ‘nap of the earth’ flight I made a tree trunk from wire and celluclay. Two wires stick up from the trunk to hold the Falke up. Then rotts were added to simulate the tree being broken by the Falke as it flies over it. This gives the illusion of flight. Jute was used for the grass.

Discussion on FichtenFoo Forums »


Tags: 1/20 Scale, 502 Abteilung, Camoflauge, Celluclay, Chipped Paint, Falke, Grass, Hasegawa, Hind, Jute, Maschinen Krieger/Ma.K./SF3D, Modulation, Oil Paint Discoloration, Paint, Plaster, Plaster Rock Molds, Rocket, Rub n’ Buff, Woodland Scenics
Comments Off

In Progress » Falke Antigravity Armored Raider » Chips and Discoloration »

Posted on Tuesday, April 14, 2009, 9:45 am, by Michael Fichtenmayer.
Filed under Modeling, Models In-Progress.

Just a quick update on the Falke progress. Yesterday I applied the paint chips then the discoloration using the 502 Abteilung oils. I did it one panel at a time and varied the amount of each color so that the result was different discoloration for each panel. I used Faded Navy Blue, German Ochre, Snow White, and Light Rust. The effect is just so cool every time I use it. Really gives a lot of depth to the color and makes the paint look old and worn. Chips were done with a thin brush and sponge using Tamiya Dark Gray thinned with water.

falke-21

Tags: 1/20 Scale, 502 Abteilung, Camoflauge, Chipped Paint, Falke, Hasegawa, Hind, Maschinen Krieger/Ma.K./SF3D, Modulation, Oil Paint Discoloration, Paint, Rocket, Rub n’ Buff
Comments Off

In Progress » Falke Antigravity Armored Raider » Panel Modulation »

Posted on Friday, April 10, 2009, 10:32 pm, by Michael Fichtenmayer.
Filed under Modeling, Models In-Progress.

Next up I highlighted and shaded the panels on the Falke to distinguish them from the adjoining panels. This makes it look more worn and makes the individual panels stand out more. This was also done to the underside. Various mixes of Mip Productions’ 502 Abteilung oil paint were very lightly glazed and worked into the surface to keep the undercolor, but lighten or darked the paint underneath. I also used more of the “Primer Red” color to add more primer spots near the primer sprayed panel. Here’s the pics.

falke-17

falke-19

Next up will be some oil discoloration.


Tags: 1/20 Scale, 502 Abteilung, Alclad II, Camoflauge, Engine, Falke, Hasegawa, Heat Tarnish, Hind, Maschinen Krieger/Ma.K./SF3D, Modulation, Paint, Rocket, Rub n' Buff
Comments Off

In Progress » Falke Antigravity Armored Raider » Heat Tarnish and Decals »

Posted on Friday, April 10, 2009, 10:45 am, by Michael Fichtenmayer.
Filed under Modeling, Models In-Progress.

The Falke progress continues with decals and heat tarnished metal effects. First I applied Mig Productions filters to the unsealed hull right on top of mjy Tamiya paint coat. Best way to apply them! Then after a gloss clearcoat of Future I applied the decals. I used those that came with the kit as well as some from a Soviet plane for the numbers and a few additional markings by the cat decal.

falke-15

I also started the weathering and tarnish effects for the engine and metal parts. After my initial Alclad II coats I applied a satin coat of Future to seal it. Then I used Silver and Gold Rub ‘N Buff as well as blue and violet oil paints. These were applied straight and blended randomly and applied to the surface. Then they were smoothed in. The results are great and gives that color-shifting look. Later I’ll ass some greasy grime and washes. I also added more red wires to clutter the look more after noticing that the Hind engines had a lot of these (and yellow) cable lines. The small red-coated handles were made from brass strip and striaght pins. The tip of the handle was dipped in cheap red acrylics to give it the rubber-coated look.

falke-16

Tags: 1/20 Scale, Alclad II, Camoflauge, Engine, Falke, Hasegawa, Heat Tarnish, Hind, Maschinen Krieger/Ma.K./SF3D, Paint, Rocket, Rub n' Buff
Comments Off
« Older Entries
Powered by WordPress. FichtenFoo.com/net � 2009 Michael Fichtenmayer. RSS
Total Views: Today: 336