![]() |
Posts Tagged ‘Gundam Seed’ »
Completed » MG Astray Copper Frame 2nd Revise »
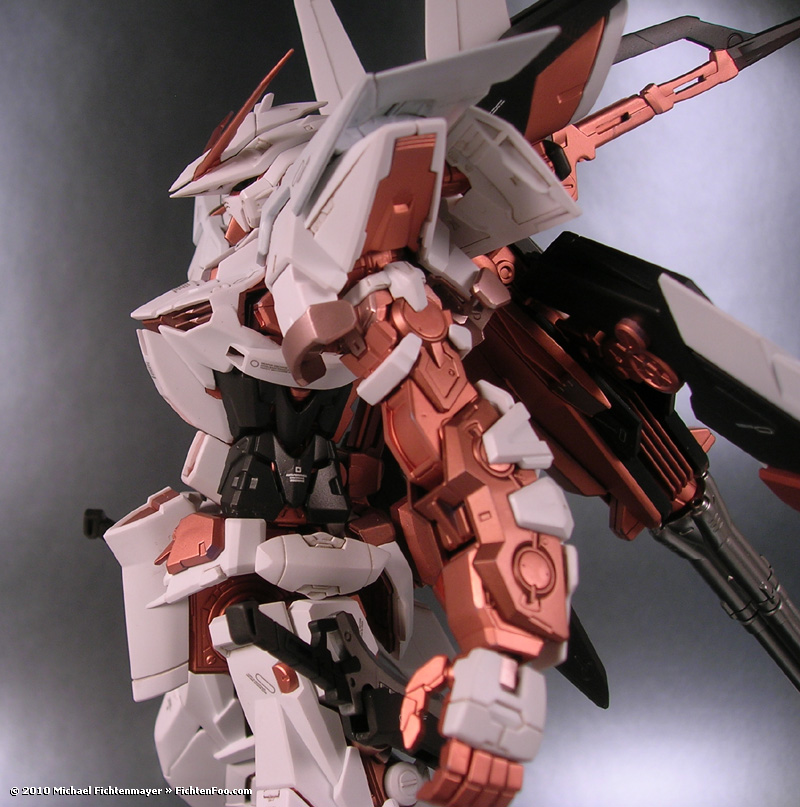
The 2nd completed build in my MGX4 challenge is a customization of the Astray Blue Frame 2nd Revise. Instead of blue, I went with copper (anti-beam-spam coating or perhaps anti-steampunk coating) which turned out beautifully, if I do say so myself. I wasn’t sure how it would look with the black and white as I was painting, but I’m very happy with the end result.
The only issue I really had with the copper paint was the parts in which I used the copper straight from the Mr Metal Color jar thinned with Leveling Thinner. The paint went on beautifully, but the copper for whatever reason rubs off when handled which is odd. I didn’t realize this of course until I was handling it for the final construction, but next time I use this paint, I’ll be sure to seal it. The other two tones of copper I used did not have this problem. One was mixed with Mr Super Titanium and the other with Mr. Color Semi-Gloss Black. The three tones really add some nice visual interest and break up what could be solid-colored boredom.
The kit is really nice for the most part. The blue polycaps and rubbery parts gave me some paint chipping issues, but thankfully those are all hidden after final construction. It was a pain however to get it positioned in any pose with that huge sword using the action base. That’s why there’s just a few pics and one pose.
Completed » Astray Gold Frame »
About The Build »
Another mental-health build for me after and during all of these scratchbuilds and involved projects. The kit is very nice OOB but I made a few minor changes to suit my likings. First off I removed the chrome plating by soaking the parts overnight in some Purple Power. (Also good for cleaning resin and removing Tamiya Acrylics) By doing this I was able to clean-up seams and paint the gold in a nicer more muted tone. The gold is Alclad II Pale Gold. MechaSkunk’s socket pins were used for the Triceros Kai lances boosters and gold cable beads left over from the Hi-Zack were added to the swords. The decal scheme for the wings was based on a Kimono pattern.
Completed » MG Strike Noir »

About The Kit »
This was my first completed commission piece. Overall it was a fun and relatively simple build-up. Below is a list of modificatons/additions I made to the kit:
- Added gold crimping beads as vernier and gun barrel details
- Painted all yellow parts gold as requested by the client.
- Replaced handgun center lense detail with painted silver bearings.
Completed » Astray Red Frame »
About The Kit »
This is the Bandai 1/100 MBF-P02 Gundam Astray Red Frame. I made slight modifications to the arms and legs for detail-up and to avoid seams after painting.
The bow was made from random leftover parts, styrene, and watch parts. The “string” is stretched sprue, the cams are watch parts.
I’m not sure of the need or practicality of a huge bow, but it looks cool so who cares.
The metal paint is Alclad 2 Aluminum with a light and random coat of Pale Burnt Metal. Over that I applied a clear blue green mix of
Tamiya Acrylic to give it a tarnished metal look. I modified the gun to look cooler with some styrene and option parts. Modded the
colors to be a buff and red-orange. I also used the new teeny Ako bells on the backpack. They fit perfectly there with some magnet rings and small steel bearings to hold them on. The bells were painted with a mixture of clear red and orange on the center parts.
Completed » Shinobi Strike Gundam »
About The Kit »
After completing this kit, I must admit I really like the Strike Gundam from Gundam Seed. Sure it’s “Seed”, but it’s not over the top like most of the other Seed Mobile Suits. The Strike is a basic and well-rounded unit and is not an elaborate design, but still more modern than say the RX-78-2.
The Strike Gundam is a general-purpose/multi-role unit. It’s a Gundam at the core armed only with 2 Armor Schneider Combat Knives and some head-vulcan cannons. The “Striker-Packs are what make this unit “multi-purpose”. Basically the Strike has multiple hard-points to attach various “upgrades”. There’s the Aile pack which is basically a flight back-pack, shield, and beam rifle, the Sword pack which gives the Strike greater melee capabilities with a large beam-sword and cable-claw dealie, and the Launcher pack which is your basic BFG and rocket launchers. Pretty nifty design that way.
Because of this I wanted to design my own “Striker Pack”. I had been wanting to do a “ninja” MS for quite some time now but nothing seemed right for the base kit. The Strike had been sitting on my shelf for about a year and I had one of those “doh” moments and got to work on the “Shinobi Strike”.
My main feature was an arm-mounted sword and sheath. I played with a lot of ideas before I came to the one I built. I got the idea
from a cool blind swordsman from the PS2 game – Shinobi who had a sword strapped to his forearm.
The sword is made from a leftover gun handle, sharpened styrene strip, and misc. bits. The sheath is made from square-tube styrene
which was cut, shaped, sanded, etc…
The other idea I had was for a sensor-jamming backpack of sorts. I wanted a nice-size round part on the backpack, but nothing seemed right. Then I found a large washer and got the idea for the jammer-ring. After holding the rubber washer up behind the Strike the look of it grew on me. I went to Home Depot, bought a PVC test-cap, cut the lip off it and that’s what the ring is made from. The rest of the backpack is made from ReGZ BWS parts and Sheet Styrene sanded to taste.
The color scheme and decals reflect that this is a testing unit for prototype Striker Packs. The decals were designed by me and printed as usual by Models4U who did an excellent job as always.
About The Base »
The base is the stock launch deck that came with the MG Strike. I drilled out the little holes and added blinking LEDs using the 4060 timer chip. No movie clips yet.
In Progress » Strike Gundam – Pack Test Unit »
07.29.2005 » Concepts
So I’m in the mood to do another gundam kit so I
started on my Master Grade Strike Gundam from
Gundam Seed. I got this kit well over a year ago
at the Pittsburgh Comicon and it’s sat on my shelf
while I thought about what to do with it. For
this kit I’m making a test unit for new Striker
Packs. Basically the Strike can be equiped with
various packs to server different roles in battle.
In Seed we saw the Aile, Launcher, and Sword packs.
I’ll be making the Aile pack that comes with the
kit, but also creating my own custom test-pack.
The Strike has a lot of modification potential
due to the pack system.
My pack will be called the Shinobi
pack. It’s roll would be for light armor infiltration
and reconissance. I’ll be making a backpack with
a sensor jammer. For armament the Strike will
have a forearm mounted sword for certain and possible
a chain weapon and beam saber. Plus it will have
the standard Armor Schneiders located in the hip
skirt armors.
Color-wise, the Strike will be mostly
light warm buff-gray and a splash of test orange.
Decals will aslo depict this as a test unit.
07.29.2005 » Cutting,
Sanding and Pre-building
I’m almost done cutting and sanding
this kit. All I have left is the weapons and Aile
Pack. I also need to make the Shinobi Pack for
it. I decided to pre-build and pose the kit to
see how the pack would fit. Here’s a few pics
of one of my intended final poses. I plan on photographing
several poses. The sword is made from sharpened
styrene srtip and various leftover gun and MG
parts. The hand is not the final hand. It’s the
sniper rifle holding hand from my GM Ground Type.
I plan on modifying one of my b-club hands to
be bent back like that.


08.10.2005 » Sheath
Progress
Here’s my progress so far on the
forearm mounted sheath. I didn’t take pics of
the mount part off the arm for whatever reason,
but I’m pleased with how it’s turning out. The
small holes within holes will contain the cut-off
heads of metal pins after it’s painted so that
they retain their metal finish. The sheath is
hinged under the box in the back in 2 spots. The
box hides the hinges, keeps the pins in place
and best of all blocks the door from opening too
far. I’ll be adding some more in front of that
box to make it look less “open”. I still
have a lot of clean-up to do but wanted to post
the little bit of progress I made before I get
busy with freelance work again.


08.11.2005 » Sheath
Progress Part 2
Due to some requests from the forum
I decided to take some more pics of the sheath.
Below are pics of the arm mount portion, the double
hinges and the hinges I bought and modified from
the RC department at HobbyTownUSA.


08.18.2005 » Not as
much progress as it seems..
Due to a few freelance projects
going on at once, I haven’t had much time to work
on the Strike, but here’s where I’m at so far…
I’m almost done with the scratch-building
and just need to add finishing details before
I can prime and paint. Yay! The backpack is almost
done as you can see below. I originally was going
to just have a 2-3cm disk as a raddar jammer,
but after finding some misc junk in my plumbing
extras, I got the idea to go bigger and have a
halo as a radar/sensor jammer. (It’s Seed.. gotta
have a uselessly huge backpack!) I looked for
large thin washers and the like, but nothing as
large as I wanted was in any other material then
rubber at home depot. Instead I bought a 59 cent
PVC test plug and used my razor saw to remove
the lip. That lip is now my halo. I had to do
a lot of cleaning up to the lip, but my big (5″)
wood sander made short work of that. The two armatures
are from modified my ReGZ’s BWS that I’m using
for scrap. I attacehed the halo with leftover
MG screws and those screws will be covered with
minus molds.
Here’s the pics:


08.21.2005 » Painting
has begun…
I primed everything today with my
Duplicolor Dark Gray sandable primer. Then a little
bit ago I used Alclad II for the first time using
my old Badger 150 dual action AB that I used when
I started until it broke. I’ve had it since 1993
and recently fixed it with some parts from another
that my brother found cleaning out some property
owned by an inlaw. So it’s my “beater”
airbrush now so I don’t mess up my good one with
Lacquers and primers.
Anyawy, I used Steel and I LOVE
it. I still can’t wrap my mind around it being
dry and ready for masking in 10 minutes. How strange.
The main reason I used it was so that I could
avoid scratching up the internals like I normally
do when posing. Hopefully the Lacquer holds up
better than Tamiya. The finish is beautiful and
the color works great for internals. Darker than
silver, but not gunmetal dark. I might have to
get some more colors now since I bought it on
a lark in March at the IPMS show.
I also finally bought a pressure
regulator since my compressor doesn’t have one.
Since the Alclad recommends 12-15 psi and my aztec
hobby compressor sprays much higher than that
I figured it was a good idea to get one. Got it
at walmart for $14 too which wasn’t bad.
It’s funny, I think I’m getting
great results then I buy an airbrugh upgrade and
some new paint and I’m getting even better results.
Can’t wait to try some camo with the lower pressure.
The higher pressure made freehanding camo difficult
due to excessive overspray.
Pics later…
08.22.2005 » Painting
has just about been completed…
Yeah, everything is painted and
Futured. Well, except for the eyes, but I do those
last anyway. Next up is inking, more Future, then
Decals. Here’s a shot of all the colors except
the Steel Alclad which I neglected to photograph.
The sword is silver rub’n buff buffed on over
gloss black.

08.23.2005 » Addition
Here’s those Alclad parts I forgot
to photograph yesterday. It’s Alclad 2 Steel over
Dark Gray Duplicolor Primer. Very nice color for
internals. Not quite gunmetal. It’s about the
same shade as Tamiya Metallic Gray but all metallic
and not flecky. You’ll notince a little sprue
nub unsanded on the second pic, but my philosophy
is if you can’t see it, don’t sand it. That part
will be covered up by the torso armor.


|


Tired of expensive and slow web design services? Looking for quality design with a fast turnaround? Whether you need an all new design or updates to your existing site, I'll give you the same speed, professionalism, and attention to detail.


