![]() |
Posts Tagged ‘Green Two’ »
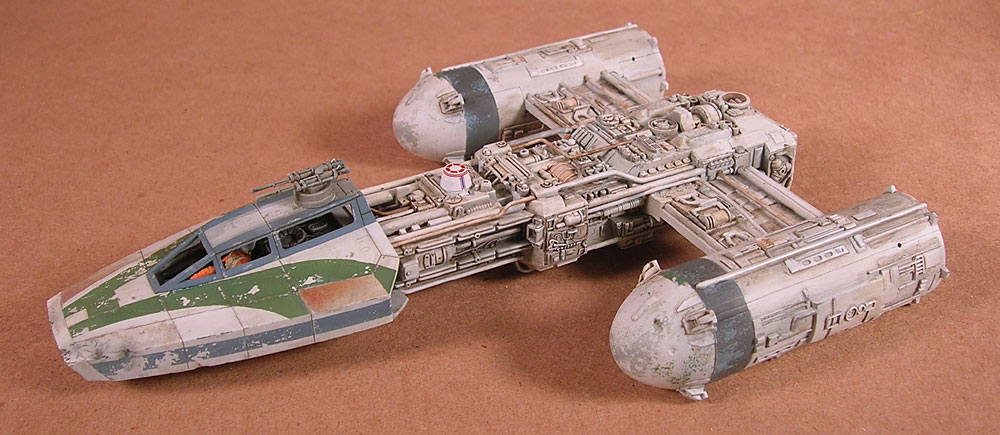
Completed » Y-Wing [Green Two] »
The Y-Wing is complete. The plan is for this to be part of a larger diorama down the road, so not a ton of images or a detailed base. The base is the stock one that came with the kit spray painted in matte black. The last step was to apply various Mig Pigment powders to do the scorch marks and engine burn. For the engines I used both “Plasma Burn” (blue) and Rock Exhaust” from their Fantasy line. To seal the pigments I sprayed the Mig Fixer lightly onto the kit with my airbrush. This seems to be the best way to use it unles your pigments are in piles. Then the airbrush would blow them away. Anyway, here’s the pics!
In Progress » Fine Molds Y-Wing (Green Two) » Highlights and Shadows »
Next up was highlights and shadows. The wash does a lot to bring out the details, but a little extra work will really make them pop. First I used Mig Productions “Wash” to deepen some of the recesses and bring out some details that the first discoloration wash did not. I used their Neutral color and a very thin brush and applied it around some of the deeper areas, panel lines and things I wanted to pop more.
After that dried I used a little white oil paint and highlighted some of the raided panels and details by applying very thin coats to those areas. I used some various oils and cleaned-up my rusted panels as well. After some pigments those should look really nice.
And that’ll be the final step. Pigments will be applied for scorch marks, engine burn, etc. Migs new Fantasy line has some great colors to really bring the engine nozzels to life and their new metalics (coper, silver, steel) should look great rubbed on some of the conduit and guns. I also need to give the R5 unit a little discoloration as he’s so far just been painted and decaled. I do want him to look relatively clean compared to the Y-Wing though for some contrast.
In Progress » Fine Molds Y-Wing (Green Two) » Oil Discoloration »
Next up is the application of oil paint to bring the model to life and give it a worn grimy appearance. For this I used oils from Mip Productions awesome 502 Abteilung line. The colors can be seen in the image below. Basically you take some odorless turpenoid on a brush and thin a little of the dark mud and work that into the recesses. Then add some dabs of blue and rust then work it all together with a thinner-filled brush. A very simple and quick process that yields wonderful and varied results.
Next will be to highlight panels with lighter/darker oils and work on blending that rust better.
In Progress » Fine Molds Y-Wing (Green Two) » Chips and Filters »
Since the last update I’ve added more paint details and a few filters to the Y-Wing. First-off I hand-painted more “white” chips onto the green and blue areas. I focused these around the edges of panels to better define them. I sponged on some liquid mask around the engine domes and lightly sprayed some light gray to add some chips there. Then I applied hand-painted gray chips with a thin brush and sponge here and there. I started applying some rust to some panels. Not totally happy with it, but it’ll be toned down and much better after my oil paint discolorations.
After the chipping I applied 2 coats of Sin Industries (Mig) Filter. I used Brown for White/Green camo and applied the second coat a few hours after the first as directed. This removes some of the starkness and coldness from the white/gray and warms it up a bit. Obviously it looks better in person as the difference in the pics is negligible.
Next-up: Washes and discoloration.
In Progress » Fine Molds Y-Wing (Green Two) » Scheme »
Last night I started painting the Y-wing. First I sprayed it all with a thin coat of off-white Tamiya Acrylics. After curing for an hour or so I started masking for the markings. For the straight and curved lines I used 1mm strips of Tamiya Tape. That gave a nice clean edge. For the larger areas I just brushed on the 502 Abteilung (Mig) Liquid Mask. To make the chips I used a piece of sponge and sponged on liquid mask before spraying the green, blue and gray. I may add some more green markings to the engine pod tips. Not sure if I’ll just add sponged on green chips or if I’ll add stripes too. Aside from that I need to hand-brush some clean-up around parts of the pods painted German Grey.
In Progress » Fine Molds Y-Wing (Green Two) »
As it turns out I have a few weeks before I get my speeders and Hovertank for the commissioned paint-ups. So I figure to kill the time I could probably bust out a 1/72 Fine Molds Y-Wing. I’ve been really inspired by the one that Adam Wilder painted up. Best one I’ve ever seen! Instead of going with a stock ‘gold’ scheme, I decided to make mine green. I’ll be doing some stock Y’s in the future anyway so might as well do something different. Here’s a quick Photoshop to show how the colors will work. I may end up making a different striping pattern for the green around the cockpit, but recoloring the yellow in the pic was the fastest way to go. Looks good in green too!
So I figured it’d take me all weekend to get the Y-Wing ready for paint. I spent about 3 hours on it yesterday and to my surprise, all I had left to do was sand seams and fill a few gaps which I did this morning.
I added some various blaster damage to the front of the left-hand front and on the right rear of the cockpit area. I also modified an R5 head from a 1/72 X-Wing to be used instead of the R2 head.
Initially I primed everything with dark gray Duplicolor primer. It’s very smooth and cheap at auto parts stores. However I realized that I’ll be painting it almost white to start and that the white over the dark would be a pain in the butt. So I gave it an additional coat of Duplicolor White primer.
I was hoping that the white primer over the dark would give me a sort of pre-shade and make nice shadows and it did! So my base-coat of very light warm-gray (same color used for my Maelstrom Exia “white”) will be applied thinly via airbrush and that natural shading will show through. Gotta love happy accidents.
What I’ll probably end up doing is creating some Death Star panels and turning this into a little vignette. Or perhaps I’ll make some Ties and expand it. Not sure if I’ll hold onto this piece or put it up for sale when complete. Stay tuned!
|


Tired of expensive and slow web design services? Looking for quality design with a fast turnaround? Whether you need an all new design or updates to your existing site, I'll give you the same speed, professionalism, and attention to detail.


