• Welcome to FichtenFoo.com. The main site of the modeler and web designer known as FichtenFoo. Browse the site and be sure to check out our fantastic online community in the forums.

    Follow FichtenFoo.com on Facebook »

  • Industria Mechanika, started by Michael Fichtenmayer aka FichtenFoo, connects concept artists with model makers to produce uniquely cool limited edition model kit designs. Check out some of our products below:

  • Products created by Michael Fichtenmayer aka FichtenFoo are now sold through his company: Industria Mechanika!

  • Tired of expensive and slow web design services? Looking for quality design with a fast turnaround? Whether you need an all new design or updates to your existing site, I'll give you the same speed, professionalism, and attention to detail.

    Contact me, Michael Fichtenmayer, a freelance web designer with over twelve years of experience in web and visual design.

    Portfolio »   Resume »
    WordPress Design Service »
    Contact me for a quote »

  • Recent Posts

    • In Progress » Prof. FichtenFoo’s Implausible Long-Nose Submersible » More Brass & Tarnish »
    • In Progress » Prof. FichtenFoo’s Implausible Long-Nose Submersible » Brass & Tarnish
    • In Progress » Prof. FichtenFoo’s Implausible Long-Nose Submersible
    • Completed » The Dustbuster [Industria Mechanika/Miguel Lopez]
    • In Progress » The Dustbuster [Industria Mechanika Release] » Weathering
    • In Progress » The Dustbuster [Industria Mechanika Release]
    • FichtenFoo’s Implausible Long-Nose Submersible!
    • Completed » The Industria Mechanika/Scott Robertson Orb Ship
  • RSS New In the Forum Gallery

    • SUFA Fireball
    • Darth Maul Bloodfin
    • RG Zeta
    • Metal Gear REX (Image Heavy)
    • Real Grade ZAFT MS GUNDAM Freedom ZGMFx-10A
    • WhirlyBot scratch-build
    • Moebius Battlestar Galactica
    • AMX - 003 Gazac
  • RSS Model News Feed

    • Ian McQue's Waldo
    • Freaky Gothic [by Calum Alexander Watt/David Richardson]
    • Mike Jensen's Drone Sniper 1/8 Scale, only $99!
    • FichtenFoo's Implausible Long-Nose Submersible Preorder Event
    • Michael Herm's Rook by Industria Mechanika
    • Industria Mechanika News 12.12.12
    • iMech Preorders (Sky Mark & Dustbuster) Plus Creature Sale!
    • Scott Robertson Orb Ship Preorder Event!
  • Categories

  • Archives

  • Meta

    • Log in
    • Entries RSS
    • Comments RSS
    • WordPress.org

Posts Tagged ‘Fine Turf’ »

In Progress » Fish Sub » Sealife Encrustation »

Posted on Saturday, October 2, 2010, 8:30 pm, by Michael Fichtenmayer.
Filed under Modeling, Models In-Progress.

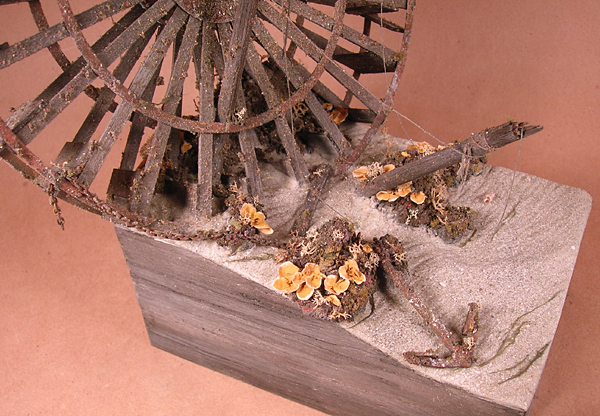
Once the plaster had dried for the paddlewheel, it was time to start the sand and sea-life. I molded the rippled sand on the base using Ave’s Apoxie sculpt. Ripples were added with various sculpting tools. The warm neutral color of the dried Ave’s was a perfect base for the sand so I did not need to prime it once it cured. Instead I used an old toothbrush and used it to flick paint from the bristles onto the sand to give it a speckled and varied appearance. I first speckled on some lightly thinned Tamiya German Gray, then Earth, and finally White. I’m very happy with the results and it gives it some texture without resorting to over-scaled grits. Then the Celluclay rocks were painted with washes of dark gray and brown.

Once those had dried it was time to start applying the random sea-life reef growth over everything. First I made a nice pile of PLFH (pocket lint from HELL) using a plethora of scenery and modeling supplies. Here’s the a few pics instead of a list. As you can see it’s various turfs, grits and flocking.

Mix the PLFH with some water and matte acrylic gel medium then add a touch of paint to tint. My first application was too brown due to too much paint. You’re going for more of a wash here.I applied most of it with tweezers and a small dental tool shaped like a teeny spoon. You’ll notice it clumps nicely when mixed, but should be slightly wet and seepy. Poke and fluff it a bit with the tweezers when applying to make it more dimensional. You can add more water and brush it onto other surfaces for a thinner application of growth like I did for the wheel. I also misted on thinned matte medium and sprinkled the PLFH onto it.

Once the PLFH dries, you can further color and tint it with diluted acrylics as well as sponging on a variety of colors to suit the look you need. My refs showed just about every color in the rainbow and the sponging on of purples, reds, and ambers looks really nice.

After even more drying, you can begin to apply other bits of corals and sea-growths. I have more to add, but here’s what I’ve added so far…

The golden growths are bits of toilet tissue which I punched out and dipped into a solution of acrylic paint + prepared matte medium. Use tweezers to pinch and apply. Check out the ref pic below to see what I was going for. Once these dry they’ll lighten. You can then apply more thinned paint to achieve the desired color. I brushed on some thinned white along the edges as well. The branchy corals are light colored lichen bits. I also applied small bits of colored sponge and “dead” colored coarse turf. White barnacle bits were made by mixing white acrylic with fine gray ballast and speckling it on with a toothbrush. Later I’ll add some photoetch coral and anemone I’m having made.

Tags: 1/35, Anchor, Baking Soda, Ballast, Basswood, Celluclay, Coral, FichtenFoo Foundry, Fine Turf, Fish-Shaped Submersible Build-up, Flowers, Models In-Progress, Ocean, Paddlewheel, Plaster, PLFH, Pocket lint from HELL, Rust, Sand, Shipwreck, Talus, Water, Woodland Scenics
Comments Off

In Progress » Panzerkampfwandern 38t(x) » Sample Painting pt. 3 Plus Base »

Posted on Sunday, May 2, 2010, 3:39 pm, by Michael Fichtenmayer.
Filed under Modeling, Models In-Progress.

I skipped over a few steps with the photography, but I can describe them here. When I left off it was time for additional modulation, but this time with oils. Using 502 Abteilung oil paint I highlighted and darkened areas to give them more depth. The colors I used for this were Buff, Light Mud, Dark Mud and Starship Filth. I basically just hand-painted and blended the colors into the surface to lighten and darken it. I added some very faint rust-colored areas in a discoloration technique as well then set it in a hotbox for a few days to dry.

The “hotbox” is just an old paint of speaker-boxes made from wood with one side open enough to put a lightbulb in and raise the temp to speed up oil paint’s dry time. I have a 1/35 DAK fig in it now drying to go with this vignette.

After the modulation/discoloration had dried I wen back and added darker and more defined rust areas with the 502 oil’s Dark Rust and Shadow Brown colors. Then I used thinned Shadow Brown to do light pin washes on the rivets and panel lines. Then once more into the hotbox for some drying. After that it was all hit with a flat coat of FFA. Next up is pre-dusting with the airbrush and then pigment dusting.

I also started on a small display base for this build just for my own uses as I doubt it’ll make it to the box art. I started with a leftover wood box lid from a jewelery box who’s “box” had been used elsewhere for another dio… maybe the “Taco”. Anyway, I then built up some 3/16″ basswood walls and stained it. After the stain dried I sawed off some edges to create a few levels then filled the box with green floral foam for bulk. Plaster rocks were added then it was all filled in with a gravel, ballast, tallus, sand, white glue, and Celluclay mixture. This was worked in with a wet stiff brush and then more tallus/ballast was added to simulate rockfall fixed with white glue.

I wanted to simulate a Moroccan desert scene so with the help of some reference started choosing colors to paint the groundwork. After the Celluclay dried, I hand-brushed on several coats of cheap tan/chocolate mixed acrylics with a very slight hint of red based on my refs. I added several coats until all the rocks and groundwork was a uniform color. Next I darkened the base color with a darker tan/chocolate/red mix. Once that dried I applied a wash of Mig Productions “Dark Wash and let it dry as well. When dry I drybrushed the whole base with light tan to make the rocks pop more. Once done the whole thing was dusted with African Earth, Gulf War Sand, and Dry Mud pigments and doused with Pigment Fixer.

Plants are bundles of dark shaded jute fiber, drybrushed with white glue and dipped in earth colored fine turf.

Tags: 1/35 Scale, 502 Abteilung, AFV, Celluclay, Chipped Paint, Commission, Desert, Fine Turf, Germany, Hairspray, Jute, Mecha, Mig Productions, Modulation, Oil Paint, Oil Paint Discoloration, Panzerkampfwandern 38(x), Plaster Rock Molds, PzKpfw 38(x) Ausf. G, Resin, Rust, Scratchbuild, X-Series Walkers
Comments Off

In Progress » Dagobah Diorama » Seaweed »

Posted on Sunday, July 12, 2009, 12:43 pm, by Michael Fichtenmayer.
Filed under Commissions, Modeling, Models In-Progress.

diorama-layout-28

The diorama is in it’s final stages and almost complete. All I have left to do is to make some little crates like the ones Luke was floating around with the force right before he threw a hissy regarding the X-Wing being too heavy. Once the figures were completed I moved onto the seaweed for the X-Wing. The seaweed was made using stretched cotton ball pieces just like my “spanish moss” recipe. The difference was that I used a darker green-black and mixed more dark soil fine turf into the mix. This was strethed out and set into place with a soft brush loaded with Future.

diorama-layout-29

Once the weeds were done I used 5-minute epoxy to mount the X-Wing onto the clear drip-supports and added the final drips using stretched clear sprue and clear acrylic gel medium.

I also finished the lighting using a flickering LED tealight candle that I converted to use wall-power instead of a battery.

diorama-layout-39

Here’s the pics:

diorama-layout-28
diorama-layout-29
diorama-layout-30

diorama-layout-31
diorama-layout-32
diorama-layout-33

diorama-layout-34
diorama-layout-35
diorama-layout-36

diorama-layout-37
diorama-layout-38
diorama-layout-39

diorama-layout-40

Tags: 1/48 Scale, cotton balls, Dagobah, Dagobah Diorama, Empire Strikes Back, Fine Turf, Future Floor Acrylic, Liquitex Acrylic Gloss Gel Medium, Luke Skywalker, R2-D2, Roots, Seaweed, Spanish Moss, Star Wars, Swamp, Trees, Water, Weathering, Woodland Scenics, X-Wing
Comments Off

In Progress » Shadow of the Minotaur » Grass is Always Greener »

Posted on Tuesday, June 16, 2009, 5:52 pm, by Michael Fichtenmayer.
Filed under Modeling, Models In-Progress.

minotaur-47

Still adding grass as you can see. Been a little busy with a garage sale last weekend  (thank goodness THAT’s over!!!!) so this has been slow going. You can see that I’m adding clumps of the Jute grass and teasing it around while the glue is still wet so that it doesn’t look like hair plugs. When the entire base is filled with grass I’ll apply the same flower/weed mixes as I did to the back of the beastie.

minotaur-46

Tags: 1/35 Scale, Armature, Bronze, Celluclay, Druid, Fantasy Pigments, Fine Turf, Flowers, Group Build #5: Period Piece, Jute, Megalith, Mig Productions, Minotaur, Monolith, Monster, Moss, Patina, Sculpey III, Sculpture, Shadow of the Minotaur, Sponge, Stone, Super Sculpey, White Glue, Woodland Scenics, Woodland Scenics Flake Snow
Comments Off

In Progress » Shadow of the Minotaur » Attack My Pretty! »

Posted on Thursday, June 11, 2009, 6:24 pm, by Michael Fichtenmayer.
Filed under Modeling, Models In-Progress.

minotaur-39

At this point the beastie is just about finished. A few touch-ups here and there and he’s complete. I still however need to make the Druid “pilot” and finish the base grass. First things first though…

Moss! Before applying the moss I first mixed up some of Mig Productions new Fantasy Pigments to create a moss color for a base coloring. Mixing together 50/50 Zombie Green and Graveyard Dirt gave me the color I wanted. I applied this with an old brush and then airbrushed on a thin coat of the pigment fixer to seal it.

pigments-moss

minotaur-38

After this I applied the moss Per’s way as shown in my last update. Basically you’re mixing Fine Turf, White Glue and water then eye-dropping and drybrushing (when dry) paint to tint.

Once the moss was done I began applying the grass using Jute twine as seen in my tutorial here. The only difference between that tutorial and this is that all of my Jute was dyed a deep green with thinned cheap acrylic paint. I also applied roots as seen in the Dagobah Diorama to some of the creature. I want to add more to his right hand side as I forgot about that.

grass-01

It took about 4-5 hours of unsteady work to apply all of the grass. Most of the grass clumps were about .5″ long give or take. Randomness is best here. Longer grass was used near the edges so that I could drape and curl it up nicer and shorter was used in the “chariot”.

minotaur-41

When the grass was dry I teased it up, trimmed any long out of place strands and masked all the stone in aluminum foil. I thought for a while about how to get nice little scale flowers without using REAL flowers that would fade/become brittle over time. Woodland Scenics makes a flower mix which comes on a card with 4 individually packed colors. Red, White, Yellow, and Orange. The Red, Yellow and Orange are just very fine turf. I had hoped the white was too, but it was basically their flake snow. I was annoyed at first as I wanted purple, pink and white clover (as I see EVERYWHERE this time of year) and figured the turf could be easily dyed. As it turns out though, the flake snow makes AWESOME flowers and weeds.

flowers-01

Just pour some of the WS snow into a cup and add a few drops of thinned acrylic paint and mix. After it dries you have colored flower flakes. Fantastic! Store leftovers in some small zipper bags for future use.

First I sprinkled green and yellow-grass turf onto the grass as well as some of the green flower mix. This was all to make the grass look more like thick leafy weeds. I misted on some thinned matte medium to stick the weeds on and then sprinkled on my flower mixes to simulate  clover and wildflowers. Again, randomness is best.

pigments-moss
minotaur-37
minotaur-38

minotaur-39
minotaur-40
minotaur-41

minotaur-42
minotaur-43
minotaur-44

minotaur-45
grass-01
flowers-01


Tags: 1/35 Scale, Armature, Bronze, Celluclay, Druid, Fantasy Pigments, Fine Turf, Flowers, Group Build #5: Period Piece, Jute, Megalith, Mig Productions, Minotaur, Monolith, Monster, Moss, Patina, Sculpey III, Sculpture, Shadow of the Minotaur, Sponge, Stone, Super Sculpey, White Glue, Woodland Scenics, Woodland Scenics Flake Snow
Comments Off

In Progress » Shadow of the Minotaur » Groundwork and Moss Test »

Posted on Tuesday, June 9, 2009, 2:35 pm, by Michael Fichtenmayer.
Filed under Modeling, Models In-Progress.

Since the last update I’ve finished the painting for the golem and added his bronze accessories.  I also made and painted some more megalithic rocks for the base as well as constructing the base and basic groundwork. I’m really quite pleased with how my rocks have turned out. I’ve always had trouble painting rock to look like natural stone. Because of this I tend to use real stone when I can, but that really limits what one can do. Being able to make and paint realistic rocks may not sound like a big deal, but it adds a lot to a scene. Below I took a shot of the paint I used and my sponge bit I used for aplication.

minotaur-33

The base is my typical plywood bottom encased in basswood then finished. Crumpled paper, wire mesh then a thin layer of Celluclay make up the groundwork. I painted it with a dirt color, (I need to darken it I think) but for the most part it will all be covered in grass.

minotaur-34

minotaur-35

Here’s my moss tests. Moss was done using Per Olav Lund’s method as shown on the Mig Productions forum. Basically it’s a mix of fine turf, white glue and paint. With my tests though I found my best bet was to not mix in the paint, but instead use an eyedropper to apply it later as I ended up smearing paint where I didn’t want it as seen on the rock between A and A2 below. Dropping a “dead” yellow-brown to the dry mix soaks down and looks like the brownish roots and die-off as seen in “A2″.

moss-test-01

A: Light Green fine turf with a touch of “Earth” fine Turf.

A2: Dead-colored paint eyedropped on later.

B: A blend of Light Green, Soil and Earth fine turf. Dead-colored paint eyedropped on later.

C: Soil fine turf only

D: Earth fine turf sprinkled with real dead moss “dust”. Can be applied is parts of other mixes for die-off.

minotaur-33
minotaur-34
minotaur-35

minotaur-36
rock-paint-01
moss-test-01


Tags: 1/35 Scale, Armature, Bronze, Celluclay, Chicken Wire, CPVC, Druid, Fine Turf, Group Build #5: Period Piece, Megalith, Minotaur, Monolith, Monster, Moss, Patina, Sculpey III, Sculpture, Shadow of the Minotaur, Sponge, Stone, Stone Texture, Super Sculpey, White Glue, Wire Mesh, Woodland Scenics
Comments Off

In Progress » Dagobah Diorama » Water and Leaf/Ground Litter »

Posted on Saturday, May 30, 2009, 11:56 am, by Michael Fichtenmayer.
Filed under Commissions, Modeling, Models In-Progress.

This week I’ve been working on the ground litter and finishing up the base water. The ripples on the large body of water are made by applying Liquitex Acrylic Gloss Gel Medium with my fingers to create the peaks and ripples. Finer ripples under the X-Wing were made with a piece of coarse car-sponge. The smaller pools need cleaned up a bit as they’ve got ground litter sprinkled on them I can’t clean that though till it dries.

diorama-layout-24

The ground leaf litter is a combination of Woodland Scenics fine “soil” and “earth” tone turf and crusted basel and autumn oak leaves. I never thought I’d be able to use that WS turf stuff for anything as with most application I’ve seen it looks like bad railroad scenery. However I think I’ve got it looking pretty good thanks to some great builds at the MIG forums.

To apply the litter I first soaked the area with “wet water” which is just tap water with a few drops of dish soap. This lets the later glue app flow nicely. I first sprinkled the surface with the dark green soil tone followed up by the dead-leaf earth tone. Then over that I sprinkled a fine layer of the crushed leaves. Then I used an eye dropper to soak the area with a mixture of Future Floor acrylic, water and Prepared Matte Medium. A ratio of 1/3 of each liquid is fine. Once this dries the area still looks wet, but is set pretty solid.

Once I’m done with the ground clutter I’ll blow off the excess, clean off the water pools, then coat the water with a few more layers of Future to really gloss them up and seal them.

diorama-layout-23
diorama-layout-24
diorama-layout-25

diorama-layout-26

Tags: 1/48 Scale, cotton balls, Dagobah, Dagobah Diorama, Empire Strikes Back, Fine Turf, Future Floor Acrylic, Jute, Liquitex Acrylic Gloss Gel Medium, Luke Skywalker, Pigments, R2-D2, Roots, Seaweed, Spanish Moss, Star Wars, Swamp, Trees, Water, Weathering, Woodland Scenics, X-Wing
Comments Off
Powered by WordPress. FichtenFoo.com/net � 2009 Michael Fichtenmayer. RSS
Total Views: Today: 544