![]() |
Posts Tagged ‘Falke’ »
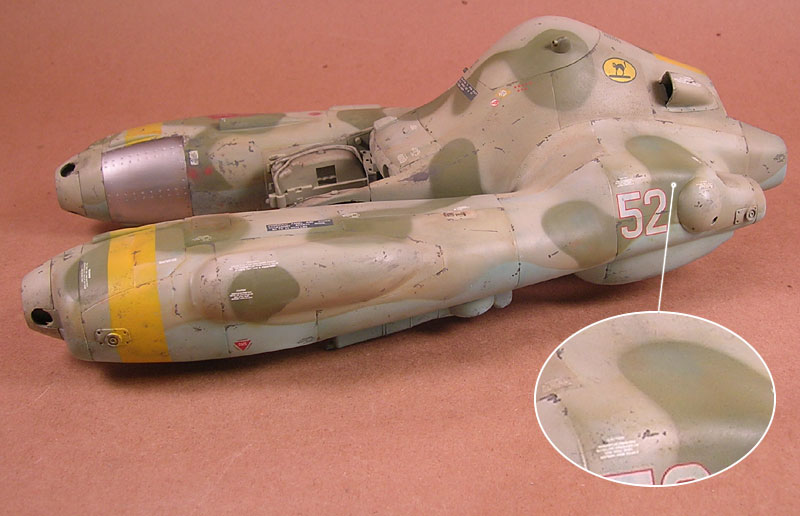
Completed » Falke Antigravity Raider »

The 1/20 Scale Falke from Hasegawa is completed. Overall a very fun build without any major problems. Parts fit was great and painting/weathering went smoothly. The base was fun as well. So nice to work with Celluclay at this scale rather than the large base for Dagobah. I used plaster rock molds from Woodland Scenics, gravel, dirt, and celluclay. I filled the bottom of the base with rocks and plaster for weight, but it wasn’t needed as the Falke is very light. To make the Falke look like it was flying very close to the ground on a ‘nap of the earth’ flight I made a tree trunk from wire and celluclay. Two wires stick up from the trunk to hold the Falke up. Then rotts were added to simulate the tree being broken by the Falke as it flies over it. This gives the illusion of flight. Jute was used for the grass.
Discussion on FichtenFoo Forums »
In Progress » Falke Antigravity Armored Raider » Chips and Discoloration »
Just a quick update on the Falke progress. Yesterday I applied the paint chips then the discoloration using the 502 Abteilung oils. I did it one panel at a time and varied the amount of each color so that the result was different discoloration for each panel. I used Faded Navy Blue, German Ochre, Snow White, and Light Rust. The effect is just so cool every time I use it. Really gives a lot of depth to the color and makes the paint look old and worn. Chips were done with a thin brush and sponge using Tamiya Dark Gray thinned with water.
In Progress » Falke Antigravity Armored Raider » Panel Modulation »
Next up I highlighted and shaded the panels on the Falke to distinguish them from the adjoining panels. This makes it look more worn and makes the individual panels stand out more. This was also done to the underside. Various mixes of Mip Productions’ 502 Abteilung oil paint were very lightly glazed and worked into the surface to keep the undercolor, but lighten or darked the paint underneath. I also used more of the “Primer Red” color to add more primer spots near the primer sprayed panel. Here’s the pics.
Next up will be some oil discoloration.
In Progress » Falke Antigravity Armored Raider » Heat Tarnish and Decals »
The Falke progress continues with decals and heat tarnished metal effects. First I applied Mig Productions filters to the unsealed hull right on top of mjy Tamiya paint coat. Best way to apply them! Then after a gloss clearcoat of Future I applied the decals. I used those that came with the kit as well as some from a Soviet plane for the numbers and a few additional markings by the cat decal.
I also started the weathering and tarnish effects for the engine and metal parts. After my initial Alclad II coats I applied a satin coat of Future to seal it. Then I used Silver and Gold Rub ‘N Buff as well as blue and violet oil paints. These were applied straight and blended randomly and applied to the surface. Then they were smoothed in. The results are great and gives that color-shifting look. Later I’ll ass some greasy grime and washes. I also added more red wires to clutter the look more after noticing that the Hind engines had a lot of these (and yellow) cable lines. The small red-coated handles were made from brass strip and striaght pins. The tip of the handle was dipped in cheap red acrylics to give it the rubber-coated look.
In Progress » Falke Antigravity Armored Raider »
Looks like this will be another speed build for me. A few weeks ago I recieved my new 1/20 plastic Falke kit from Hasegawa’s entry into the Ma.K universe. Thanks to Lin.K for hooking me up with this and his wife for the deliscious snacks that came with it! It’s been sitting on my shelf on top of my 1/35 Hind helo box staring at me, begging to be built. Then it hit me that this would look great in a Hind camo scheme. Construction and clean-up only took about 4 hours not including drying time for putty. The seams were very easy to deal with and part fit is wonderful and unusual for a MaK kit! I decided that since my plan is for an in-flight falke that I’d skip all the parts for the figures and save them for another MaK build.
I was only going to build it OOB, but decided that the engine could use a little more pipe-detail to make it more interesting. So I added some brass and floral wire as well as a socket pin inside of the thruster. I replaced the gun barrels with aluminum rod since I hate the flash on OOB tubes and guns. Hard to sand it smooth and perfectly round again. I also added a few panels on the top-front with brass sheet where the craft was damaged and repaired. The only other mod was some detail on the side-seams that made clean-up annoying. I just replaced that with thin styrene.
Like I already mentioned, I’m giving this craft a Soviet Hind helicopter scheme. I have a few reference books on the Hind so getting a good pattern, colors as well as paint/detail pics of engines was easy. I went with the tan/green clover camo and the minty bottom. Always liked that scheme. I used some paper masks and highlighted some panels as well as making some panels completely different. One is bare metal, one coated in red primer, and one that looks like it was repainted in a slightly off color. This is to give the craft a used, repaired, used some more look. Even with that I want the chipping to be minimal. It is an aircraft and not a ground-pounder afterall.
The engine was painted in many colors of Alclad II metalic lacquers. Jet Exhaust, Steel, Stainless Steel, and Pale Burnt Metal. Then some Tamiya clear blue was added. Later more metal variation will be applied with rub-n-buff. As of now the main paint is done and I can start on the filters/chipping/weathering.
|


Tired of expensive and slow web design services? Looking for quality design with a fast turnaround? Whether you need an all new design or updates to your existing site, I'll give you the same speed, professionalism, and attention to detail.


