![]() |
Posts Tagged ‘Corellian’ »
In Progress » YT-1380f Corellian Light Freighter » Detail… FINALLY! »
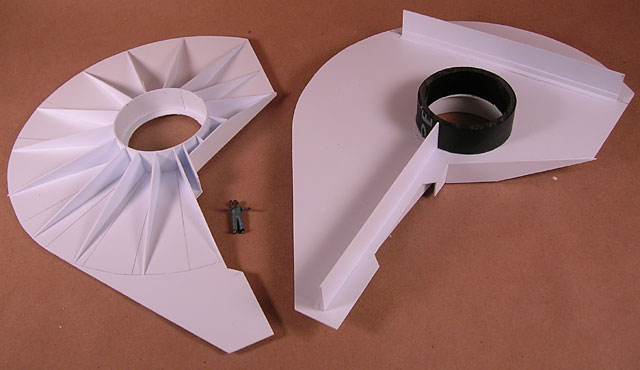
Finally I’ve gotten the hull to a point where I can begin to add detail. First up is the heat radiators and the plate-armor. The armor is .020″ styrene sheet. One of the first items I ever purchased when modeling was a pack of frisket film. It turned out to be pretty much useless for modeling, at least for me, until today. I was trying to figure out how I would get all of the wedge-shaped armor plates to be cut correctly and all line up over the curved surface. Turns out that frisket was the key. I laid some frisket down over the ship and using some wire to make the lines and circles then lightly cut the frisket enough to cut it and not the plastic underneath. Then I peeled the frisket off and placed on the styrene as a guide for cutting. Then it was all glued into place after adding the notches and doing some minor clean-up.
For the radiators I used a metal circular watch-part and some plastruct tread-place. I made a mold then cast myself 4 of them.
In Progress » YT-1380f Corellian Light Freighter » Hull Lamination Complete »
Yesterday I began laminating the outside of the bondo with styrene sheet. I also forgot to mention WHY I did the balls/bondo thing and didn’t just add the styrene over the ribs. Simply enough I’m clumsy and heavy-handed and would had crushed the shell without the underneath support. Plus it gives something solid in which to mount things. Mostly my accidental destructiveness though. Once the .020″ styrene wedges were epoxied into place I trimmed the edges took my sander to it all to blend it all together. Then I cut out the groove for the cabin tube and glued that into place and added a little styrene on the right-hand side to blend that in.

Cutting the slot wasn’t as easy as I thought it’d be due to the balls. They acted as bearings with my various cutting tools and the blades just rolled over them. So I ended up slicing, snapping and breaking the slot out a little at a time. And whatever balls fell out were saved for future use. Why throw them out? Markings were added to other cuts I’ll need to make like for the escape pod notch and the engine area. After doing my next cuts I’ll apply some putty to fill in any gaps between the laminated sheets and add some styrene strip to the edges to close off that unsightly mess.

In Progress » YT-1380f Corellian Light Freighter » Bondo Calrissian »
Hrmm… Maybe my pilot’s name will be Lando’s not-well-known bastard brother Bondo Calrissian in honor of the amount of Bondo I’ve applied today. Maybe not… bad joke.
Anyway, this thing is coming along fairly quickly as far as the hull goes. The hard part will be later with the details and cabin. Anyway, after adding all of the ribs I filled them with Airsoft BB’s. I got about 2000 of them at Walmart for $4. I figured they’d be great filler being relatively cheap AND plastic. The balls were held in place with white glue and left to dry overnight.

Today I added several layers of Bondo automotive polyester filler over the balls/ribs. First was a rough layer which I gave a quick sanding to with my electric sander. Then a smoother application over that and another sanding. That took maybe 45 minutes total. One issue which I forgot about was that Bondo REALLY heats up when curing. This warped the top half slightly so my only recourse was to glue the top and bottom halves together now as opposed to later. No big deal as it fixed the issue. Now I’m just applying a layer of .020″ styrene sheet over the Bondo as it will allow my to glue plastic parts and armor plating easier as well as save me a crapload of sanding/smoothing.
In Progress » YT-1380f Corellian Light Freighter »
With these new commissions, I’m definitely on a Star Wars kick. Since stuff is drying and I have the motivation, I started on a new scratchbuild project. This ship is my own design for a 1/72 scale Corellian Light Freighter based on the Millennium Falcon’s design. I will build a 1/72 Fine Molds MF one of these days, but for now I don’t have the display space. This design will give me all the elements I love, but in a smaller size for my cabinet. Plus it’s fun. It’ll have plenty of details, greeblies, and lights.
I started out with a few random ideas for a 1/2 Falcon styled ship. Something that was a cross between the Outrider and the Falcon. After some thumbnail sketches I came up with my basic shape. The shape was later fleshed out more when I happened to have a 12″ ruler in my kitchen and decided to measure my gas stovetop plates to see if they’d be a good size circle for this. The shape of the grate on top where I placed the ruler and the width of the ruler made the perfect outline! Later I laid out my design from a top-view in Flash. It and what’s in my head are all I need to complete this.
I printed out the plans in 1/72 scale at 100% several times and have been cutting them out and using them as guids for cutting. I started by cutting the main hull’s top and bottom shape. Thin styrene strips were laminated over some PVC to make circles in which to connect the ribbing to. The ribs will later be filled with Airsoft balls as light filler then Bondo over that to make the shape. Then I’ll cut out the slots for the cabin and escape pod/walkway. Here’s what I got done yesterday.
|


Tired of expensive and slow web design services? Looking for quality design with a fast turnaround? Whether you need an all new design or updates to your existing site, I'll give you the same speed, professionalism, and attention to detail.


