• Welcome to FichtenFoo.com. The main site of the modeler and web designer known as FichtenFoo. Browse the site and be sure to check out our fantastic online community in the forums.

    Follow FichtenFoo.com on Facebook »

  • Industria Mechanika, started by Michael Fichtenmayer aka FichtenFoo, connects concept artists with model makers to produce uniquely cool limited edition model kit designs. Check out some of our products below:


    Dmitry Parkin's 1/6 scale Vampire is available via preorder. Shipping Early Feb 2012.


    Ian McQue's 2nd Edition Remora, mastered by FichtenFoo will be available for preorder Late Jan 2012. A print of the Remora Artwork is also available now.


    FichtenFoo's Fantastical Fish Shaped Sub and Hornethopter are also available through the iMech Shop!

  • Products created by Michael Fichtenmayer aka FichtenFoo are now sold through his company: Industria Mechanika!

  • Tired of expensive and slow web design services? Looking for quality design with a fast turnaround? Whether you need an all new design or updates to your existing site, I'll give you the same speed, professionalism, and attention to detail.

    Contact me, Michael Fichtenmayer, a freelance web designer with over twelve years of experience in web and visual design.

    Portfolio »   Resume »
    WordPress Design Service »
    Contact me for a quote »

  • Recent Posts

    • Kallamity/Industria Mechanika’s 1/35 Kastor Hovertank » Discoloration, Streaking
    • Kallamity/Industria Mechanika’s 1/35 Kastor Hovertank » Top Coat, Decals
    • Kallamity/Industria Mechanika’s 1/35 Kastor Hovertank
    • The Remora and Lillian G
    • In Progress » Remora Pair » Remora Paint-ups » Part 3
    • In Progress » Remora Pair » Remora Paint-ups » Part 2
    • In Progress » Remora Pair » Remora Paint-ups » Part 1
    • In Progress » Remora Pair » Remoras and Bridge
  • RSS New In the Forum Gallery

    • Non-scale Metal Slug Tank
    • Panzer Kampf Anzug Ausf K-4 KETZER (WAVE)
    • [Armored Core] Interior Union Y01 Tellus
    • Junkbot.
    • Taco-34 Beetle Bot
    • (SorryWrongSection) 1/35 GNX Red Squad (My answer to DC23's Tieren Yellow Squad)
    • Catching up with Funaka - GM Diorama, Unicorn, Mega Zaku and Spitfire
    • Thunderbirds Mole (Aoshima/IMAI 1/72)
  • RSS Model News Feed

    • Ian McQue's Deckhands Series #1
    • Adrian Smith's Frankenstein
    • 1/6 Scale Vampire by Dmitry Parkin
    • The Dustbuster
    • Luca Z/Kallamity's Kastor!
    • Bandai GBWC Deadline in 1 week!
    • Ian McQue's Remora!
    • Scott Roberson Collaboration! [VOTE NOW!]
  • Categories

  • Archives

  • Meta

    • Log in
    • Entries RSS
    • Comments RSS
    • WordPress.org

Making Tall Late Autumn/Winter Field Grass from Jute Twine

Posted on Friday, July 11, 2008, 6:28 pm, by Michael Fichtenmayer.
Filed under Modeling, Tips & Techniques.

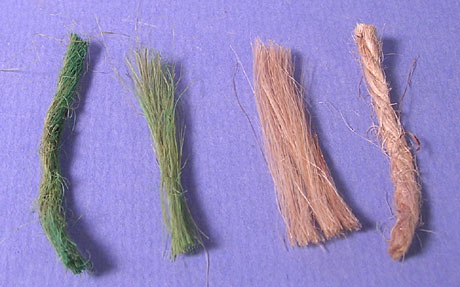
This tutorial is on how to create tall grass from 3 Ply Jute (aka Yute) from Darice Craft Designer (TM). I purchased this either at Michaels or JoAnn Fabrics. It’s been a while and frankly I can’t recall where it was. All I know is that it was cheap and I didn’t buy it for modeling purposes, but for a Halloween costume.

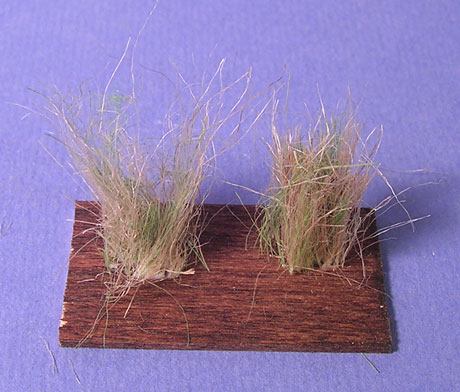
First you’ll want to cut some 3″ pieces of the Jute and soak them in a grass-green wash of cheap acrylics (Apple Barrel, Liquitex, Americana, etc…) thinned with water. Soak for a minute or 2 then dry on some paper towels which will draw away the excess. This will give you green fibers later on.

Now take a 3″ strand of the raw Jute and fray it out with a wire brush. Without removing the fibers from the brush split 1 of the 3-ply cords from the green Jute and fray that out. You’ll now have two potential bunches of grass. One neat bunch and one from the frayed brush-stuck material.

grass-01.jpg

grass-02.jpg

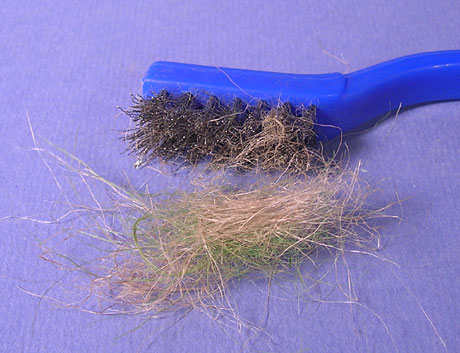
Take the brush mass and give it a few pulls to get it straightened out into more of a strand. Set aside. Take the green and natural “neat” strands and pull them together to make a second strand. See below:

grass-03.jpg

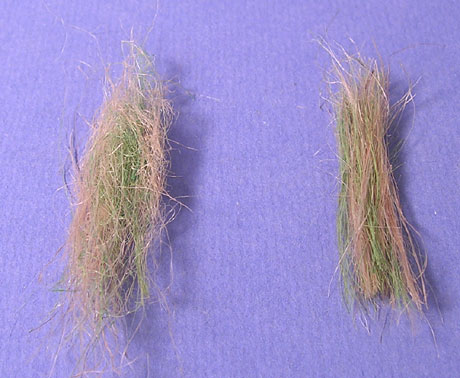
Now fold each strand in half and using scissors, trim the bottom to be flat. You’ll have two clumps of grass now ready to be glued to the groundwork. The neat is good for the middle of a grassy area where the messy brush-gathered clumps work best as borders.

grass-04.jpg

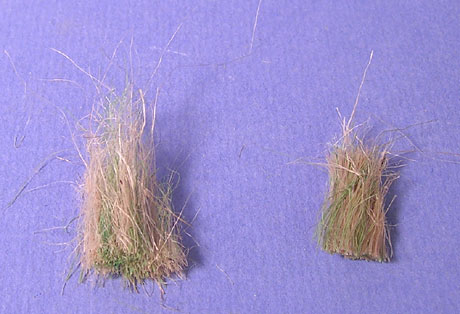
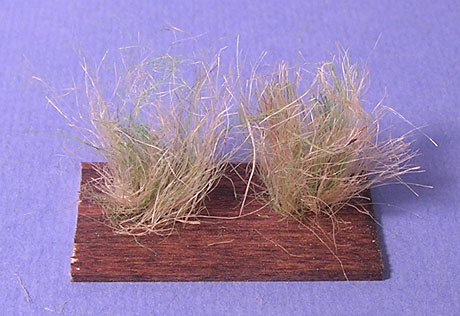
Hold a clump of grass in your hand and apply white glue to the flat trimmed underside. Press this onto the base and use some tweezers to pull the clump apart and slide it around a bit so that you don’t have a badhair plug-look, but a more natural random setting. Add the next clump as above and let dry.

grass-05.jpg

Once dry you can tease the grass and blend it into the adjacent clumps. You can also use scisors to trim longer straglers too. Mash down a little grass where it meats trails or the edge to hide the glued-down “roots” and to create a nicer more natural edge.

grass-06.jpg

Below is this grass applied to the base for my KV-X2. You can use different lengths of clumps to get a nice random and natural effect. Be sure to blend the clumps together to avoid the bad hairplug look.

^Above: Jute grass used in conjunction with Silflor grass and other natural materials to create a natural, random look. In that scene, far less natural colored Jute was used since it was for spring/summer.

base-04.jpg

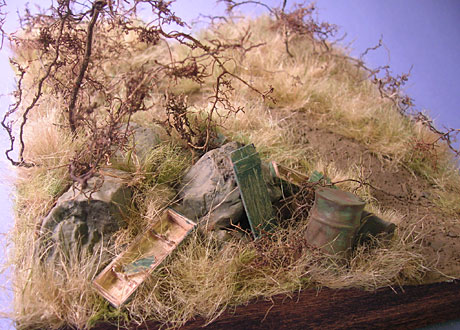
^ Above: Jute grass as shown in this tutorial applied by itself for a grassy brush-strewn field in winter.

Tags: Diorama, Grass, Tips & Techniques, Tutorial
« Snowy Groundwork and Brush (Modded from BK’s Method)
In Progress » KV-X2 to VICTORY! »
Powered by WordPress. FichtenFoo.com/net © 2009 Michael Fichtenmayer. RSS
Total Views: Today: 392