


Your cart is currently empty!
How to build Master Grade Gundams*
*Or Any Other Model
After a ton of questions on my message board, I decided to make a general step-by-step guide on building MG kits. This is the way *I* build them. Other people have other methods so do what works best for you. Below is an outline of what this tutorial covers. I’ll add more images and tutorials to this as time goes on. Click the links to jump down to that section.
*These same steps can be applied to ANY type and scale of model with a little modification to the techniques.
Hopefully this helps out some of you beginners that have questions. All I ask is that this not be copied and posted elsewhere. Just link here to my site. It’s not going anywhere.
- Introduction
- Terms and Acronyms
- Where to buy
MG Kits - Stock or custom
design? - Creating a
custom color scheme - Creating
custom decals - Following
the instructions- What to build before painting
- What to paint first and
build later
- Research!!!
- Washing
the parts - Cutting parts
from the sprue - Sanding sprue
nubs- Making sanding sticks
- Pre-building
- Taking care
of seams and flash- Gluing seams
- Sanding and Puttying
- Flash
- Modifying the
head seam on Gundams to allow the face to be inserted after
painting - Modifications
and scratch building- Added Details
- Pin-Vise Holes and Indents
- Rescribing Old or New Panel Lines
- Links to Scratch and Mod My Projects
- Preparing to
airbrush parts- Skewers
- Sticky-Tack (Blu Tack)
- Double-stick tape
- Alligator clips
- Priming the
parts- Spray Cans
- Mr. Surfacer in the jar
- Painting
- Mixing Colors
- Airbrushing with Tamiya Acrylics
- Thinning paint
- Pre and Post-Shading
- Masking
- Hand brushing details
- Painting eyes and sensors
- Curing and drying
- Gloss clear
coat with Future Floor Acrylic - Panel lines
- Pens
- Washes
- Gloss clear
coat - Applying
decals- Waterslides
- Dry transfers
- Ugh… stickers
- Flat clear coat
- Weathering
- Finishing
clear coats in flat, satin, or gloss - Final assembly
- Posing
- Display bases
- Conclusion
- Contributors
So you want to do more with your Master Grade Gundam kits than just snap them together like a toy? As with any hobby, it takes time and patience to make a great model. Take your time, read through the whole tutorial and be prepared to mess things up. Royally. I went through at least 10 kits before I finished one I was truly happy with. And even that kit had issues with seams and flash.
This tutorial will focus on building a Master Grade kit from Bandai. I’ll be using images from many of my build-ups to demonstrate the techniques I used. If it’s a topic I already covered in a previous tips page, I’ll link to the specific information.
Below are some abbreviated terms I use commonly.
MG = Master Grade
HGUC = High Grade Universal Century
HG = High Grade
LHS = Local Hobby Shop
CA = Super Glue
AB = Airbrush
FFA = Future Floor Acrylic
SAL = Surface Air Lift (Cheap Shipping)
Sprue = Tree or Runner that model parts are attached to
MaK = Maschinen Krieger (SF3D)
FFF = FichtenFoo Forums
HF = Hobby Fanatics
SSM = Star Ship Modeler
WF = WonderFest USA
MG kits are available in many places. You can search you local hobby store or go online. You can generally find kits cheaper online than in your LHS. If ordering from a store in Japan, SAL is a great shipping method. It takes 10-40 days, but if you’re not in a hurry, you’ll save a lot. EMS is faster, but more expensive. I always go with SAL and get my order within 2-3 weeks. Below is a short and incomplete list of sites selling kits and supplies:
- HobbyWave
- Rainbow 10
- HobbyLink Japan
- Ebay
- Yahoo
Shopping – I just search on the kit name and sort by price. Great way to find a deal. - 1999 Hobby Search
- Gundam Store and More
- Image Anime
Some people prefer their kits to be as accurate as possible to the cartoon. They want the exact colors, decals and the exact features. They’ll modify their kits to looks as close to the anime as possible. Others prefer to make up their own color schemes decal ideas and even weapons and other modifications. This is totally up to you and anything goes. I like to make up my own schemes and ideas for the kits. It adds a new layer of fun to the project for me.
Creating a custom color scheme
 Making your own colors isn’t difficult as all. All it takes is some imagination. People will ask others what they think about their custom scheme, but the reality is that you only have to lease yourself. Remember, it’s sitting on YOUR shelf, not theirs.
Having said that though, if you’re stuck for ideas, you can find inspiration almost anywhere from your remote control, a cool car, a WWII era German tank or your nifty 50’s retro-styled blender. There are also books and websites that specialize in color theory. It’s the science of color and the basis behind the art of color selection. Google yourself up some color theory and color swatch websites or go to your local bookstore and look for a book on color. You’ll find swatches of great matching colors for any scheme.
I use Adobe Photoshop to colorize the line art I scanned from the front of the MG instruction booklet. You can find a tutorial I wrote on colorizing line art here »
 People often ask me how I design and create decals. This is NOT an easy subject. First off, I am a graphic designer with over 10 years of experience so the design part comes from school, training, good typography, and a little talent. That helps me come up with the designs you see on my kits. The creation part comes from knowledge of various software packages that allow me to lay out my designs on the computer. I use a combination of Flash and Illustrator. Below is a brief step-by-step of my process:
- Think about the theme and color scheme for the kit
- Sketch some ideas out on paper
- Scan them in and recreate or trace them in Flash. I use Flash since it’s very easy for me based on experience) to draw stuff up quickly.
- Convert all text to paths. This way you don’t need to send fonts to your printer. I prefer Models4U. He does the best decal work I have received. Thin film and very crisp printing.
- Export them to Illustrator and resize them to their intended size.
- Then put each color on it’s own layer. This is called color separations. This helps when the printer goes to print them on the Alps printer.
- Duplicate all of your layers (except for black) and fill them with black. These will be used for the white back printing. Label your layers appropriately
- Zip your file and send it off to the printer.
Here is a great article that Fulcy found regarding custom decals from trains.com. Check it out!
Heh… I know this sounds obvious but it really helps if you read through them first. This lets you identify ahead of time where you’ll need to fix seams and what might need to be built before painting.
I cut my parts from the sprues and pre-build as I read through the book. (More on technique later) This way I can see where problems with building and painting might arise. Examples of problems could be:
- Joints that will be partially covered while painting and need repositioned to paint the whole part
- Parts that will require masking
- Noticeable seams on elbow and knee joints requiring them to be built before painting.
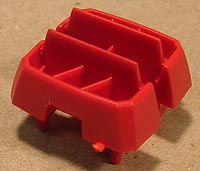
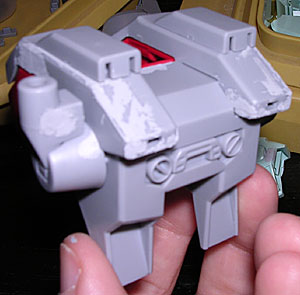
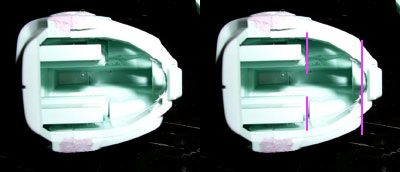
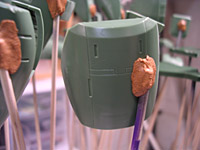
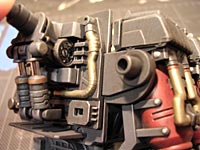
- Internal parts that must be built and painted due to seams on the external armor. See images below. Internals were painted, then armor was applied, seam fixed, then internals were masked and armor painted.


I can also avoid filling seams that will be hidden by armor or other parts after the kit is built by reading carefully.
Another recommended step is RESEARCH. That’s right… research.I can’t stress the value of looking things up for yourself enough. Nothing bugs people on a message board more than having to answer the same easy question for the 100th time. Go to Google and search for other sites where people might have built that same kit. You might find some useful advice by reading their build-ups. Research on your own should always be your first step before building.
Before painting, you should wash your parts. Occasionally there is mold-release left on the parts from the molding process. This residue can keep paint from sticking. I leave the parts on the sprue and use an old toothbrush and a bucket of soapy water. (water plus soft scrub or dish detergent) Give them all a light scrubbing. Rinse well and be careful not to lose parts.
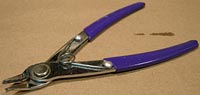
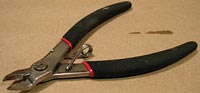
When cutting your parts from the sprue, it is important to avoid damaging the parts. I use a pair of wire cutters to remove them. You can get small good cutters are Radio Shack or Michaels. Cut close to the part, but not close enough to damage the part with the cutters.
Now that the part is removed you can remove more of the leftover sprue from the part. I’ll be referring to this leftover bit as a “nub”. Take a cheap razor box-cutter (which is available at dollar stores… you get several in a pack, the click and break type) and CAREFULLY shave most of the nub away. Don’t worry about getting all of it, just enough to make sanding easier later.

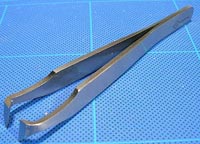
I have a new tool that I use instead of the razor method. It’s a pair of tweezer-like clippers I got from the tool-guy at Wonderfest. (okay, Jimmy got them for me from the tool-guy at WF, and I still owe him $$$ next time I see him…) These will cut very flush with the side of the part and remove most of the nub very cleanly.
Don’t worry if you cut into the kit. You can fix that later with some putty.
 Regardless of how close you cut the nub down, a little sanding is recommended to smooth out the area. Trust me, that little area will show up quite visibly after painting and gloss coating. The first step here is to make some sanding sticks. Sanding sticks will help you sand flat against the part and not round off edges. Here’s what you need:
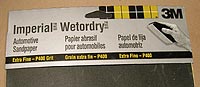
- 400 Grit Wet-Dry Sandpaper available at Wal-Mart (you can use whatever grade you want, I like the 400 for general sanding of parts, priming takes care of the scratches)
- Popsicle Sticks available at craft and dollar stores
- CA Glue
First cut the sandpaper into rectangles that are almost as long as the stick and 3 times as wide.

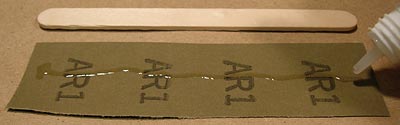
Next add a line of CA to the sandpaper, right down the middle length-wise. Don’t add glue to the stick as it’ll soak in and not stick to the sandpaper. Next add your stick right in the center. Do this to all the sticks you want to make.
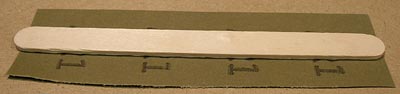
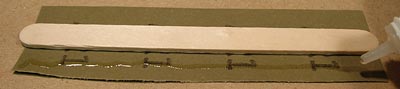
Then add a line of CA to one side of the back of the sandpaper and fold that over to the back of the stick. Repeat on the other side when dry.
![]()
![]()
And there you have it, cheap, easy sanding sticks. if done right you’ll have 2 wide sides and 2 short sides for getting into small areas. As your ssticks get older they’ll get smoother. Save them for light sanding and smoothing out rough sanded spots.
When your sticks are all dry, you’ll want to wet sand the nubs into oblivion so that they no longer appear. Dip the sticks into water and sand the nub. Keep dunking the stick to wash away the plastic grit accumulating in the paper. The water also helps keep dust down. Use an old toothbrush to brush away any sanding residue leftover.
I haven’t always done this, but I’ve been finding it helpful to pre-build the kits to see where seams might need to be fixed, mods needed to help the posability of the kit, or for testing scratch-build part fits. I’ll do this as I cut and sand parts from the sprues. With a MG kit, all parts are “snap-fit” meaning you have male/female pegs that hold the parts together without glue.
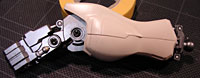
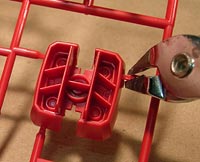
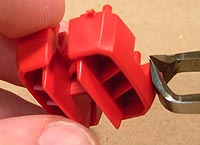
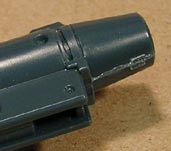
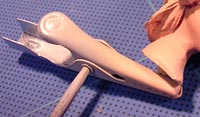
Some parts can be removed easy after snapped together, while others are near impossible. Cutting the tip of the peg however at an angle will help you remove the parts easily. See the picture below. Once they’re cut like that, you can remove them after re-building
to paint and when you go to do your final assembly just add a dab of glue to them before snapping to keep them in place. Thanks to Tetsujin for this tip.

Taking care of seams and flash
No matter what MG kit you get, there’s always gonna be some parts that have a seam right down the middle. Some MGs have lots of these, some have very little. The MG Ball Ver Ka only had 1 or 2 if I recall correctly. These are usually found on fuel tanks and guns but can be on arms, legs, heads and other misc. places too.
Gluing seams
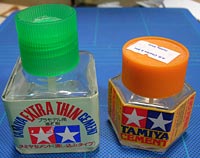
Gluing the seams is the first step to their removal. To glue the seams together, I use a plastic welding cement. I prefer Tamiya Cement and Tamiya Extra Thin Cement. These will actually melt the plastic together and give you a permanent bond. For a thick cement, apply to both halves of the seam and press together. For the thin, I just run it down the pre-built seam. Hold then together tightly and you’ll notice glue and melted plastic start to ooze out and form a line. This is a good thing. It will fill in gaps and help avoid having to putty later. Now set the part aside overnight and let the glue dry completely.
Sanding and Puttying
Now that the glue is dry you can sand the melted plastic in between the parts. Use the sanding sticks you made above and wet sand them until flush. If the part is rounded like a gun barrel or fuel tank, be careful when sanding no to flatten the roundness of the part.
Now that you’ve sanded inspect the part closely for any gaps or seam lines. If you see some apply some Tamiya Basic Putty (the gray stuff) to the area. When dry, sand smooth. If you don’t see any, they still might show up after priming. This is why priming is important for seamed parts. It lets you see before paint if there are any flaws in your seam removal. See below for image of putty applied to seams with large gaps.
One last step I’ve been doing for any seam is applying a thin line of Mr. Surfacer in the jar to it. It’s a primer and thin filler. Apply it to the seam and let it dry. When dry, lightly sand it away. You might notice some thin miles of the Mr. S along the seam where you thought you filled it. Mr. Surfacer is fantastic for that!
Flash
Flash refers to the thin line of plastic left over when the mold separated. You’ll notice this on a lot of internal and tube parts. Just lightly sand this away till smooth.

Modifying the head seam on Gundams to allow the face to be inserted after painting
I get asked this a lot. Basically on the Gundam and GM heads, you have two head-halves and the face parts that are built and put inbetween them before you put the halves together. You can build it like that and fix that seam, but it makes it more difficult when it comes to painting because you’ll have to mask the sensors, eyes and possibly the chin.
To combat this, simple mods are needed. First pre-build test-fit the head parts to see how they go together. You’re looking for what pegs hold the face parts in. Sometimes merely removing the male pegs is enough to slide the head in.
Next just put the two halves of the head together. Now build the face part and try sliding it into the head from underneath. What is blocking you? Once you see what’s blocking the face from going into the head cavity, you can start removing pegs. Remove a few and see how the head fits. Then take a dremmel tool or razor and carve out what might be blocking you on the inside of the head. Sometimes you might need to remove the forehead sensor and paint/add that separately. Don’t forget about the poly cap for the ead too. Make sure that fits too. You might need to glue it in later.
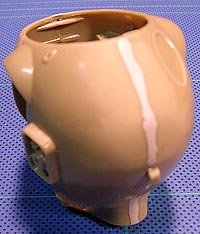
^ I had to dremel out the posts inside of this GM head so that I could slide in the lens innards later.
Once you have the face parts and poly cap able to be placed while the head halves are together, fix the seam on the head using the method above.
Modifications and scratch building
Sometimes you might want to make a new gun or backpack for your kit. You might want to add detail, damage or make the legs longer. Or maybe you messed up or broke a part and need to fix it. There’s many different ways to do all of this so I can’t go over it all here. Instead I’ll cover what I can and add links to pages in my site where I did some scratch building.
Added Details
You can get option parts from Wave and Kotobukiya such as minus molds, rivets, hex bolts, springs, etc… to add detail to your kit. HLJ is a great source of these. Search their site for Wave and Kotobukiya’s option sets.

Pin-Vise Holes and Indents
You might notice that people have added small holes to detail their kits. Small round holes can be made with a pin-vise. A pin-vise is basically like an xacto blade handle, only with rounded grips for holding very small drill bits. Mark your kit with a felt pen where you’d like to drill circles. This helps you line them up before drilling into your kit. Then lightly press and turn the pin-vise on your markings. Be careful not to bend and break the drill bit.

Rescribing Old or New Panel Lines
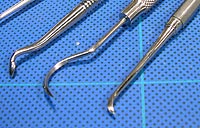
Occasionally when sanding away nubs or fixing seams, you might sand away or putty-up some panel lines as well. You can rescribe them using several tools. There are many scribing toos available from modeling tool companies. I have a Model Master Scriber. There are also scribing saws available from Hasegawa. I have a set and love them! I also use dental pics that someone picked up for me from the “tool-guy” at WonderFest. In a pinch, you can use the back of a xacto blade or needle as a scriber too.

Take your time and use light pressure and many passes. Too much pressure and you risk going out of the line and gouging your kit. You can fix mistakes and gouges with putty or Mr. Surfacer like you would with seams and gaps. Various thick tapes and foils can be used as a guide to keep your scribed lines straight. There are also scribing templates with various shapes available from various modeling companies. Google for them.
Ezechiel found this great tutorial on scribing and rescribing at HyperScale. Click here »
Links to Scratch and Mod Projects of Mine
Look through these and please read instead of asking questions first.
 »
» 
- Ka. Style Feet and Parachute Backpack
- Zeta + Forehead Cannon
- Modified Ingram Antenna
- Modified Griffon legs for easy painting
- Damaged Zaku Shield
- Damaged GM
Now that you have all of the parts sanded and ready to go it’s time to prep for paint. You don’t want to hold the parts with your bare hands while airbrushing since you risk fingerprints and messy hands. Instead I have several methods for holding parts for painting.
Skewers
These are basic bamboo skewers available at the grocery store for shish kabobs. You can insert these into the female plugs and gaps on the inside of your parts. These are what I use most for holding parts. They can be made thicker with tape and can be cut to fit various areas.
Sticky-Tack (Blu Tack)
This I use in conjunction with the skewers. In some cases the parts have no holes for the skewer. In these instances I can sometimes use sticky tack to hold the part to the skewer. Sticky tack is available at most office supply departments in department stores like Walmart and Target. Google Blu Tack for more info.
Double-stick tape
I occasionally use skewers or cardboard with duct tape wrapped backwards so that the sticky-side is out to hold small parts.
Alligator clips
You can get these cheap at Wal-Mart and Dollar Stores. They can be added to a skewer to grab and hold large parts for painting.
Once you have the parts on skewers, you can stick them into blocks of foam (glued to wood for support) to hold all the parts.
Now that the parts are skewered you can prime them. Is priming necessary? It really depends. Most of my Gundam kits are not primed. Priming helps the paint stick better and helps to avoid paint scratching later. It also keeps the plastic color from showing through. Some plastics and most resin require priming for the paint to stick. Primers come in spray cans and jars.
Spray Cans
I usually use spray cans of primer. Tamiya and Gunze Sanjyo (Mr. Surfacer) make great cans-o-primer. I prefer the Tamiya since it’s cheaper and levels nicely. It also tends to “suck” into the plastic and not fill panel lines. That is unless you use too much of it.
To use the cans, hold it 8-12 inches from the part and sweep back and forth over the part giving it a light mist. Keep the can and part moving so that you don’t build-up too much in one spot. This is best done in warmer temperatures.
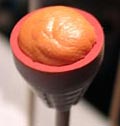
Mr. Surfacer in the Jar
You can airbrush Mr. Surfacer from the jar as well. However you must thin it with some Mr. Retarder first. This retards (slows)
the drying time of the primer. Otherwise it “spiderwebs” from your airbrush and dries in mid-air. What a mess. Clean up your AB with lacquer thinner.

Once your parts are skewered and primed (or not primed, it’s up to you) you can start painting. What kind of paint should you use? Model paint. I pretty much use Tamiya Acrylic exclusively and this with 91% Isopropyl (rubbing) alcohol. You can get the alcohol at WalMart for under a buck. Acrylics clean up with water, but not all of them thin nicely with Alcohol. I prefer airbrushing acrylics to enamels and lacquers due to the lack of toxic fumes and easy clean-up.

Whatever paint you use, make sure to wear a respirator and if possible make a spray booth to remove the fumes and dust.
Mixing Colors
Tamiya Acrylics and other model paints come in a wide variety of colors. Most of the time you can find what you need right from
the jar. Other time you might need a lighter or darker version of the color. Some people keep track of their exact paint formulas for mixing colors in case they run out. I just mix up a huge batch and save it for other kits. Most of my colors any more are the combination of new and previous mixed colors. As long as they’re stored air tight you should be able to keep them fresh for months. For more info on mixing colors I suggest Googling “color theory”.
Airbrushing with Tamiya Acrylics, Thinning paint, Cleaning the Airbrush
I did a great Flash tutorial that covers all of this. It is for Tamiya Acrylics only as that’s what I paint with. Click here for the tutorial »
Pre and Post-Shading
People also ask me about shading on the edges of the model. I do what is called “post-shading”. Basically I paint the part one solid color. Next I take that same color and darken it. Then finally I lightly spray that slightly darker color along the edges of parts and panel lines.
Pre-shading is when you paint the parts a darker color first then paint the centers with the lighter tone. There’s more explanation to it, but I don’t pre-shade enough to warrant my explaining how to do it.
Masking
Sometimes you’ll need to mask portions of a part off to achieve 2 or more colors. I use Tamiya tape or sticky-tack. Paint one color and let cure, mask and paint the next, repeat as needed. Carefully remove masking when done.
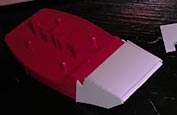
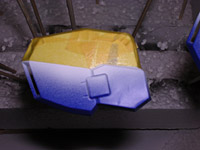
The Tamiya tape is low-tack meaning it’s not very sticky and doesn’t pull up paint. It’s thin and wraps around corners with ease. It even has a little bend to it when cut thinly. I use it for masking lines and camo. See below. White was painted first then masked off. Purple was painted next. When the masking was removes the line between the colors was nice and crisp.

Sticky-tack can be used for masking the insides of boosters and recessed areas such as minus molds and vents. See images below.


Another masking tip from Nico: You often have to mask areas to paint different colors on the same on piece. For exemple you have an ecuson on the shoulder or something really hard to mask. Just put masking tape on the area you want to mask. Then take a drawing pencil and gently pass by (don’t no if it’s correct to say pass by) on the panel lines. You will see the negative of your area. The panels are still clear and the rest in darkned by the pencil. Now take a Excacto or something with a fine and very sharp blade to cut the wasted tape and remove it using panels as a guide.
Hand brushing details
Occasionally you’ll need to hand paint some small details that would otherwise be annoying/impossible to mask. These include figures, small hoses, antenna, small mechanical bits, etc… When hand-painting these objects, I use the same thinning ratio 60:40
– 50:50 as I use for airbrushing and paint in several layers. Paint it once thinly, then when dry, add another coat, and so on until it’s got good coverage. See image below. The yellow was hand painted onto the antenna.

Painting eyes and sensors
I created an in-depth tutorial on this already. Click here to view the lenses tutorial »

Curing and drying
For Tamiya Acrylics, I usually let them dry and cure after airbrushing for at least 24 hours before handling and or masking over. Otherwise you risk damaging the paint coat and then you’ll have to repaint.
Stripping
If you’re not happy with the color and need to strip the paint off, you can soak the parts painted in Tamiya Acrylics in 91% Alcohol. This will eat the paint but not the plastic. Use an old toothbrush to scrub paint from crevasses. Chrome can be stripped before painting by soaking the chromed parts in Formula 409, an all-purpose cleaner and degreaser available in the US.
Gloss clear coat with Future Floor Acrylic
 My next step after painting is to seal everything with a good coat of Future Floor Acrylic. This will protect and seal the paint and give it a nice even coat for the next steps.
To apply it to your model, airbrush it on (unthinned) in light coats. I spray a thin layer, dry it with my airbrush, air-only,
then spray again. Check out my airbrush tutorial for more detailed info on the technique.
Next up is panel lines. These are usually filled in with a paint wash or with a pen. It symbolizes weathering and muck that has collected in those crevasses and gives the model more depth. Whether you use a pen or wash is up to you and the look you’re going
for.
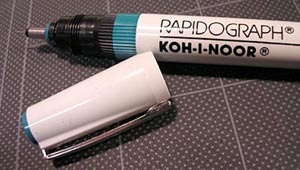
Pens
Using a pen will give you a clean solid line. While the most common color to use is black, other ink colors are available to mix and use. Black lines will give your kit a more dramatic effect and will make it look more anime-like. Other colors can be used for either style or to symbolize dirt.
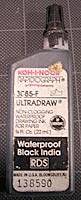
I use Koh-i-nor Rapidograph Technical pens. There are usually available at online or local art stores or at Michael’s. They’re refillable and come in many sizes. They can clog easy if not cleaned often and taken care of. You also should take care not to bend the tip. Little-no pressure is needed to draw lines with them. Click here for a small tutorial I did on faux washes with technical pens.
Washes
A wash is basically running thinned paint, pastels, or pigments into the panel lines and crevasses. Use a small brush and let the wash flow into the grooves then clean up any excess with an appropriate thinner. Make sure your thinner does not eat the undercoating of paint though. For Tamiya Acrylics, I use oil paints thinned with odorless mineral spirits. The mineral spirits normally don’t affect
the FFA or Tamiya. For more on washes, check out this article at Missing Lynx.
After the wash or inking of panel lines I seal them with another thin coat of FFA. See above. This gives a nice gloss coat that will help your application of decals.
Decals will give your kit yet another layer of depth and realism. Decals can be of unit numbers, team/personal symbols, maintenance marks and more. You can create your own or get a pre-made waterslide set. There are many fantastic pre-made waterslide sets available from Models4U. Like I said, these are the best Gundam decals in the biz! Bandai has also started making waterslide decals for their MGs which is great since their stickers are basically crap.
Waterslides
 This type of decal is the most used and best for modeling. If applied correctly you can get an almost painted on look. Be wary of thick waterslides as they can silver and look like stickers and ruin what would otherwise be a great kit.
Here is my step-by-step for applying a waterslide decal
- First make sure the surface you will be applying the decal to is nice and glossy. The glossier the better. A
flat surface will “silver” underneath the decal. - Next cut your decal from the sheet using a sharp xacto blade.
- Now hold onto and submerge the decal into warm water until it loosens from the backing.
- Wet the part of the kit where the decal will be applied.
- Now take the decal, still on the paper and still very wet, and slide it into position on your kit.
- Once positioned, take a small piece of paper towel and soak up a little of the excess water.
- Now apply MicroSol decal setting solution to the decal. Just use a brush and brush it over the whole decal. This will soften and melt the decal a bit so that it “sucks” onto the surface of the kit.
- Wait a minute and soak up the excess with a small piece of paper towel. Be careful not to more the decal.
- Now let it dry completely. You’ll see the decal wrinkle a little, but when completely dry it will be flat on the kit.
- If the surface you’re applying the decal to is rough textured (but still glossy) or you don’t feel like waiting, you can press the decal into the kit and smooth it on using a wet paper towel wrapped on your index finger. Press down and try not to move
the decal. - If the decal is over a panel line, wait until it dries completely then slice the decal along the panel line. Apply more MicroSol and let it sit till dry. The MicroSol will suck the decal into the line.
- Note: I’ll add images the next time I apply decals to a kit.
Here’s a great article by Pazu on using waterslide decals. Click here »
 Dry transfers
These are basically “rub-ons”. Again, you want to apply these onto a glossy surface.
- Cut the decal from the sheet using a sharp blade.
- Apply clear tape over the front of the decal and position it on your kit. The tape will hold the decal in place. The clear tape will allow you to see where you’re putting the decal.
- Then using a small blunt object like a dull pencil or a skewer, rub the decal onto the kit. You should be able to see the decal detaching from the clear sheet.
- Keeprubbing until your sure it’s down then rub some more.
- Remove the tape and clear sheet carefully.
 Ugh… stickers
Just throw these away and invest in some nice waterslides. They’re too much trouble to deal with. The look like crap applied to a model unless you REALLY know what you’re doing. I can’t get them to look right so don’t even ask me. Ha!
Now give your kit a flat coat of FFA. Click here to see how to make FFA flat. This will even everything out and might be your final step before assembly unless you want to weather. The flat coat will give the parts a nice surface for applying your weathering.

Instead of me writing how to weather a kit, allow me to point you to a site that has great tips for weathering your kit. Missing
Lynx Rarities World. It’s where I learned how to weather my MaK kits and should help you as well. If you have a specific question
on weathering, I recommend searching through Armorama. It’s a military modeling site chock full of great info.
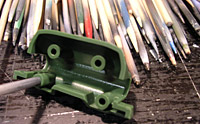
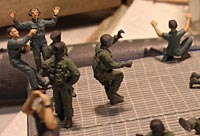
Make sure you weather to scale. Would a 60 foot tall robot have mud splashed 30 feet up to it’s crotch? Probably not. I like my Gundams clean and factory fresh with a little silver drybrushing on the internals. See Below.
Finishing clear coats in flat, satin, or gloss
After weathering you might want to give your kit one more coat of FFA to seal everything. Again, there’s more info on FFA here.
Now that your kit is all painted and weathered, you’re ready for final assembly. You might want to do this before weathering, but it can be done after as well. Go through the instructions again and start snapping everything together. If you cut the male pegs to prevent snap-fit add a dab of white glue on those first so that they hold. I like white glue for this (Elmer’s School Glue) as it dries flat and clear and can be soaked in water later to soften if I need to disassemble some parts.
My best advice here is to take your time (even though you’re excited and almost done). If you hurry you might build in the wrong order or scratch you paint. There’s nothing worse than having to fix a part you thought was done.
I can’t tell you how to pose your kit. That’s up to you. I just want to again pass on the “be careful not to scratch your paint” advice. Remember, this is a model kit, not a toy, and frequent reposing will loosen joints and scratch paint.
I like to make custom bases for my kits. It puts them into a scene and gives a sense of scale and “realism” to your 60 foot giant robot model kit. Even a plain finished wooden base can add a nice touch. Armorama has a lot of fantastic tutorials on diorama building which you can read through to learn how to make scenery on your base.
Having a sturdy base can also be used to support your kit in a flight or running pose. These are best considered before you paint as you’ll need to drill holes into the kit to insert brass or clear rod to hold the kit up. Be sure to drill the hole the exact size of your rod and use white glue to prevent the kit from spinning/flipping over on the rod.
So that’s that. Now you should be ready to start airbrush-painting and detailing a MG kit. Once you get comfortable with modeling you can start on more advanced techniques that are not in this tutorial such as camo patterns and cast iron textures.
I’d like to thank everyone that’s helped with this tutorial. Thanks Philgoodwin, Fulcy, Tetsujin, Nico, Ezechiel and everyone who posted info and answered my questions when I first started modeling!

![Maude [Cyborg Action-Doll] (Files Only)](https://fichtenfoo.net/blog/wp-content/uploads/2023/01/Maude-Promos-300x300.jpg)


