![]() |
Posts Tagged ‘Jute’ »
In Progress » Panzerkampfwandern 38t(x) » Sample Painting pt. 3 Plus Base »
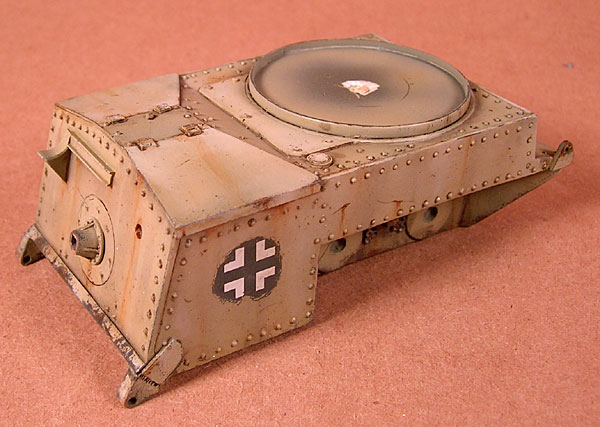
I skipped over a few steps with the photography, but I can describe them here. When I left off it was time for additional modulation, but this time with oils. Using 502 Abteilung oil paint I highlighted and darkened areas to give them more depth. The colors I used for this were Buff, Light Mud, Dark Mud and Starship Filth. I basically just hand-painted and blended the colors into the surface to lighten and darken it. I added some very faint rust-colored areas in a discoloration technique as well then set it in a hotbox for a few days to dry.
The “hotbox” is just an old paint of speaker-boxes made from wood with one side open enough to put a lightbulb in and raise the temp to speed up oil paint’s dry time. I have a 1/35 DAK fig in it now drying to go with this vignette.
After the modulation/discoloration had dried I wen back and added darker and more defined rust areas with the 502 oil’s Dark Rust and Shadow Brown colors. Then I used thinned Shadow Brown to do light pin washes on the rivets and panel lines. Then once more into the hotbox for some drying. After that it was all hit with a flat coat of FFA. Next up is pre-dusting with the airbrush and then pigment dusting.
I also started on a small display base for this build just for my own uses as I doubt it’ll make it to the box art. I started with a leftover wood box lid from a jewelery box who’s “box” had been used elsewhere for another dio… maybe the “Taco”. Anyway, I then built up some 3/16″ basswood walls and stained it. After the stain dried I sawed off some edges to create a few levels then filled the box with green floral foam for bulk. Plaster rocks were added then it was all filled in with a gravel, ballast, tallus, sand, white glue, and Celluclay mixture. This was worked in with a wet stiff brush and then more tallus/ballast was added to simulate rockfall fixed with white glue.
I wanted to simulate a Moroccan desert scene so with the help of some reference started choosing colors to paint the groundwork. After the Celluclay dried, I hand-brushed on several coats of cheap tan/chocolate mixed acrylics with a very slight hint of red based on my refs. I added several coats until all the rocks and groundwork was a uniform color. Next I darkened the base color with a darker tan/chocolate/red mix. Once that dried I applied a wash of Mig Productions “Dark Wash and let it dry as well. When dry I drybrushed the whole base with light tan to make the rocks pop more. Once done the whole thing was dusted with African Earth, Gulf War Sand, and Dry Mud pigments and doused with Pigment Fixer.
Plants are bundles of dark shaded jute fiber, drybrushed with white glue and dipped in earth colored fine turf.
In Progress » Shadow of the Minotaur » Grass is Always Greener »
Still adding grass as you can see. Been a little busy with a garage sale last weekend (thank goodness THAT’s over!!!!) so this has been slow going. You can see that I’m adding clumps of the Jute grass and teasing it around while the glue is still wet so that it doesn’t look like hair plugs. When the entire base is filled with grass I’ll apply the same flower/weed mixes as I did to the back of the beastie.
In Progress » Shadow of the Minotaur » Attack My Pretty! »
At this point the beastie is just about finished. A few touch-ups here and there and he’s complete. I still however need to make the Druid “pilot” and finish the base grass. First things first though…
Moss! Before applying the moss I first mixed up some of Mig Productions new Fantasy Pigments to create a moss color for a base coloring. Mixing together 50/50 Zombie Green and Graveyard Dirt gave me the color I wanted. I applied this with an old brush and then airbrushed on a thin coat of the pigment fixer to seal it.
After this I applied the moss Per’s way as shown in my last update. Basically you’re mixing Fine Turf, White Glue and water then eye-dropping and drybrushing (when dry) paint to tint.
Once the moss was done I began applying the grass using Jute twine as seen in my tutorial here. The only difference between that tutorial and this is that all of my Jute was dyed a deep green with thinned cheap acrylic paint. I also applied roots as seen in the Dagobah Diorama to some of the creature. I want to add more to his right hand side as I forgot about that.
It took about 4-5 hours of unsteady work to apply all of the grass. Most of the grass clumps were about .5″ long give or take. Randomness is best here. Longer grass was used near the edges so that I could drape and curl it up nicer and shorter was used in the “chariot”.
When the grass was dry I teased it up, trimmed any long out of place strands and masked all the stone in aluminum foil. I thought for a while about how to get nice little scale flowers without using REAL flowers that would fade/become brittle over time. Woodland Scenics makes a flower mix which comes on a card with 4 individually packed colors. Red, White, Yellow, and Orange. The Red, Yellow and Orange are just very fine turf. I had hoped the white was too, but it was basically their flake snow. I was annoyed at first as I wanted purple, pink and white clover (as I see EVERYWHERE this time of year) and figured the turf could be easily dyed. As it turns out though, the flake snow makes AWESOME flowers and weeds.
Just pour some of the WS snow into a cup and add a few drops of thinned acrylic paint and mix. After it dries you have colored flower flakes. Fantastic! Store leftovers in some small zipper bags for future use.
First I sprinkled green and yellow-grass turf onto the grass as well as some of the green flower mix. This was all to make the grass look more like thick leafy weeds. I misted on some thinned matte medium to stick the weeds on and then sprinkled on my flower mixes to simulate clover and wildflowers. Again, randomness is best.
In Progress » Dagobah Diorama » Water and Leaf/Ground Litter »
This week I’ve been working on the ground litter and finishing up the base water. The ripples on the large body of water are made by applying Liquitex Acrylic Gloss Gel Medium with my fingers to create the peaks and ripples. Finer ripples under the X-Wing were made with a piece of coarse car-sponge. The smaller pools need cleaned up a bit as they’ve got ground litter sprinkled on them I can’t clean that though till it dries.
The ground leaf litter is a combination of Woodland Scenics fine “soil” and “earth” tone turf and crusted basel and autumn oak leaves. I never thought I’d be able to use that WS turf stuff for anything as with most application I’ve seen it looks like bad railroad scenery. However I think I’ve got it looking pretty good thanks to some great builds at the MIG forums.
To apply the litter I first soaked the area with “wet water” which is just tap water with a few drops of dish soap. This lets the later glue app flow nicely. I first sprinkled the surface with the dark green soil tone followed up by the dead-leaf earth tone. Then over that I sprinkled a fine layer of the crushed leaves. Then I used an eye dropper to soak the area with a mixture of Future Floor acrylic, water and Prepared Matte Medium. A ratio of 1/3 of each liquid is fine. Once this dries the area still looks wet, but is set pretty solid.
Once I’m done with the ground clutter I’ll blow off the excess, clean off the water pools, then coat the water with a few more layers of Future to really gloss them up and seal them.
In Progress » Dagobah Diorama » Moss Done and Water Woes »
Just wanted to post up a few images of the progress so far. I’ve finished the muck-moss and have been pouring water the past few days. The resin water stinks BAD so it’s bee slow going since I can’t be in my workshop much with the chemical stench and loud vents on. With my final pour I had some bubble issues. So pissed, but I’m fixing them and should be able to salvage it and make a silk purse from this sows ear. I have quite a few solutions in mind, but so far, many layers of FFA are doing the trick. After some airbrushed much and ripples it should be perfect.
Screeshot from the DVD. The ripples should hide all!
In Progress » Dagobah Diorama » Spanish Moss and First Water Steps »
Progress has been slow, but that’s probably because I’ve been putting a few steps off until I figured them out. Now that I have it’s time to move forward to start finishing this up. First I gave the trees an additional spraying of very thin olive green then some clear gloss future to make it all look moist.
The first part I had issues with was creating a type of “Spanish Moss” growth from the trees and vines to really give it that swamp look. Also I figured that whatever I used for the spanish moss could also be used for the “seaweed” on the X-Wing. I got a lot of suggestions from forum members at Mig anf FFF and based on those I decided on the following solution using cotton balls and fine turf.
Basically pull some cotton from the ball and stretch/pull it into a long flat piece. Then add a few drops of whatever color cheap-acrylic paint. In this case I mixed up a pale green. Then using your finger, roll and dab the paint evenly over the cotton. A few drops will do. You want the cotton colored, but not soaked. In fact the dryer the better it’ll hold its stringy shape. Next take a few colors of fine turf from Woodland Scenics and sprinkle over it. Work in with your finger. Now just drape and shape over the branches. Secure with a drop or 2 of prepared matte medium then if that washes out some paint add a few more paint drops. Let dry and it’s done. You can pull and shape more when dry. I may still do that but overall I like the look. The spanish moss can also be applied on the roots and rocks for added “slime”. Also, here’s the completed R2-D2.
I also started prepping for the water pour. First I airbrushed the water pools with a brown-green swampy muck color. This will be the base and given enough muck in the water may or may not show through. Better safe than sorry though. My water pours will be thin and have varying degrees of paint mixed in to color the water. The final water won’t be this green I think. I also coated the paint and anywhere I plan to pour water with a coat of Future in order to seal the paint in and protect it from the water pour leaking out.
Once cured I added the heat-stretched acrylic rod pieces that will serve to suspend the X-Wing in the air. There are 5 main support pieces, but there will be many thin drip streams in the end so the X-Wing will appear to float with water dripping from it. Once all the water is poured then a layer of leaf litter will be applied to the bare ground.
In Progress » Dagobah Diorama » Semi-Final X-Wing Weathering »
Why semi-final? Well, because if it was just an X-Wing model without being submergeged in swamp-water and muck then I’d be able to call it done. I still need to add the “seaweed” and such to the surface and will probably add some greenish muck-colored streaks using the 502 Abteilung oil paints.
Between this and the last update I applied the discoloration with 502 Abteilung oil paints and turpenoid. I used blue, rust, brown, and several shades of muck-green. Once cured completely I applied scorck and soot marks using “Rocket Exhaust” pigment from the Mig Productions Fantasy Pigments line. Then a final thin flat coat of FFA was applied to seal that in before later applying the wet effects.
Here’s some pics. Click on them for larger views.
Completed » Falke Antigravity Raider »

The 1/20 Scale Falke from Hasegawa is completed. Overall a very fun build without any major problems. Parts fit was great and painting/weathering went smoothly. The base was fun as well. So nice to work with Celluclay at this scale rather than the large base for Dagobah. I used plaster rock molds from Woodland Scenics, gravel, dirt, and celluclay. I filled the bottom of the base with rocks and plaster for weight, but it wasn’t needed as the Falke is very light. To make the Falke look like it was flying very close to the ground on a ‘nap of the earth’ flight I made a tree trunk from wire and celluclay. Two wires stick up from the trunk to hold the Falke up. Then rotts were added to simulate the tree being broken by the Falke as it flies over it. This gives the illusion of flight. Jute was used for the grass.
Discussion on FichtenFoo Forums »
In Progress » Dagobah Diorama » Painting, Decaling and Weathering the X-Wing »
I’ve been working on painting the X-Wing for a few weeks now while working on other projects, but decided to save up images to make a decent-lengthed post about it. First I primed the X-Wing with Duplicolor Sandable Primer and then smoothed it out with some steel wool. This takes care of any scratches or primer texture. Then I applied dark gray along the panel lines as a pre-shade and followed up with a coat of VERY light gray.
Next I applied a gloss coat of Future Floor Acrylic and after letting that cure a few days I started applying the decals. The first decal I applied too much decal solvent too making it crinkle more than it should have. This eventually flattened back out but had a few “micro-crinkles”. I’ve since lightly sanded these flat and when I do the red discoloration/modulation will repair this error.
The rest of the decals went on without a hitch. Notmally I wouldn’t consider using decals instead of masking and painting for the red and yellow markings, but I didn’t think I could get as precise as these were. Besides at the point I’m at now they don’t look like decals anymore and when I’m done they should look painted on. After the decals I masked and painted the canopy with Tamiya XF Light Blue with a hint of German Gray. I have a little clean-up to do on the masking, but again, that’ll be fixed during the modulation/discoloration process. The interior of the canopy I airbrushed Tamiya Smoke into to tint it darker. This helps with the weathered window look I’ll need.
After the canopy was painted I airbrushed on a satin coat for Future Floor Acrylic and applied a few coats of Sin Industries filters to dirty-up the tones.
Once the filters dried it was time for the fun stuff which is the weathering and modulation. Modulation is the process of shading and highlighting for light effects as well as bringing out panel details. In this first image you can see the difference between the unweathered and weathered sides of the wings. To do this I applied slightly thinned 502 Abteilung oil paints around panels and inside of crevases. These were blended into the surface then buffed away with paper towel. This leaves the raised surfaces highlighted and dirties up the recesses. I think this is working far better than any wash I could had done. I used Dark Mud, Industrial Earth, Faded Gray, Shadow Brown and Black. I also added a little Dark Rust and Faded Navy Blue here and there on the thrusters.
After that I applied more dark or white oils on various panels to differentiate them from their neighbors. This adds more visual interest to the flat wings. After the earthy tones dry I’ll apply the modulation to the red and yellow parts. I don’t want to do these first and risk blending the red into the white parts and having a pink X-wing. I’ll also be applying more weathering later with discoloration, pigments and more. Here’s what it looks like right now. I still need to do the laser barrels and the rest of the X-wing from the cockpit forward. I want to let the rear dry first so that I can hold it without rubbing the oils away.
Also my client was concerned about the amount of space on the base for the X-Wing. I took these quick shots to show him. The figure is a random maintence guy from a 1/48 aircraft kit just as a stand-in for Luke.
In Progress » Dagobah Diorama » Roots from Jute »
Hooray! It’s working as I hoped it would! What is working you may or may not ask? The jute twine I used for the smallest dangling roots is what. In all of the images I have seen, the larger roots are covered in a lot of small vine-type roots and whatnot which really adds to the distinctiveness of Dagobah’s scenery. I wasn’t sure if the Jute Twine would work or not however and I really didn’t want to use natural materials that could rot/break in time. I use Jute for grass from time to time and am used to coloring and working with it… my concern was if I could get it to pull apart in long enough strands and blend into the trees convincingly. After taking my photos and checking them against the referenes (with the help of a little photoshop coloring) you can see I’m pretty close. Whew!
You can find a tutorial on using Jute Twine for making grass here on my blog. For the roots I colored the Jute with a very dark black-brown mixture then a slightly lighter version of that for some variety. I also didn’t need to brush it. Just twisting and teasing it out worked great.
After I finish adding the jute roots and cleaning up some cracks on the groundwork I filled with modeling paste I’ll put down a fine mix of crushed up leaves over the ground then maybe pour some muddy resin water.
|


Tired of expensive and slow web design services? Looking for quality design with a fast turnaround? Whether you need an all new design or updates to your existing site, I'll give you the same speed, professionalism, and attention to detail.


