


Your cart is currently empty!
In Progress » Russian KV-2
11.18.2005 » Concepts
/ Intro
It’s big, ugly, unweildy, and green.
The KV-2 is one of my favorite tanks just for
that reason. I love the boxy impracticality of
it. Like a big moving target. I had been toying
with the idea of modeling a tank for a while now
but wasn’t sure of quite which one to do. When
I saw this tank that someone had brought in promer
at an IPMS meeting I had to get one.
This is the Trumpeter 1/35 scale
KV-2. So far it’s going together smoothly and
seems like a well molded kit. Most of the reviews
I’ve read on it are positive as well. Here’s
a good one. As for colors, mods, etc… I’m
planning this to be mostly OOB with a replacement
aluminum barrel. There’s a barrel for the old
(and I hear bad) Tamiya kit that works here with
a little modification. What’s nice about it as
opposed to the stock barrel aside from a lack
of sanding is that the stock barrel lacks rifeling.
(sp?) Color-wise I’m unsure. Someone is bringing
a book to a show for me to look at Russian tank
schemes from that era. Here’s a pic of the lineart
from the manual. (not the actual and final intended
color)

11.23.2005 » Building
Here’s my first in-prog of my KV-2.
Not much to see yet. So far everything’s been
pretty straight forward and easy. Minimal flash
except for the “A” tree which seems
to have been modled slightly off so that there’s
a lip on most parts. Those parts require a little
extra effort, but are generally not too much trouble.
I decided to add a rough-cut texture to the side
panels and other panels that were lacking it.
This was done with either my scriber or the blunt
end of a razor blade. Looks good and I can’t wait
to see it primed. I’m planning on using the plastic
tracks over the vinyl as they’ll just look/function
better when done. The plastic track have a nice
sag built into them.
As for what I have left… I’m waiting
on my Aber aluminum barrel to arrive. I also need
to sand many injection marks from the tracks.
There’s some hatches, rungs, etc… that I need
to deal with as well. It’s about 1/2 – 2/3 way
through the construction phase I think.

11.30.2005 » Almost
done building
Here’s the latest in my KV-2 progress.
The building is all done and ready for paint except
for the aluminum barrel which I’m waiting on.
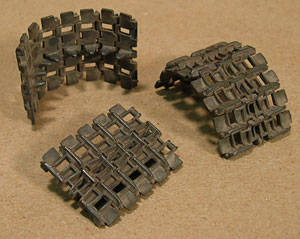
The individual track links with pre-built sections
were a huge pain in the ass. I managed to do them
after researching a bit at ArmoramA. I also decided
to add some stowage in addition to the storage
boxes. I’m not sure if it was ever carried this
way on the KV-2, but it looks cool so I’m doing
it. I placed a 1/35 scale fig next to the tank
for size reference. This thing was a monster!

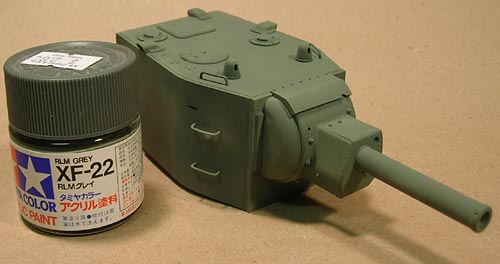
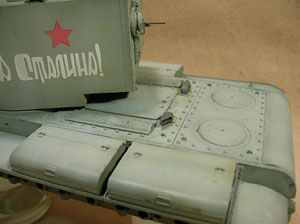
01.19.2006 » Painting
has begun
I’m waiting on some parts for my
Gp01 project so I’m back on the KV-2. I was waiting
on the Aber barrel which was the last thing that
needed built, but then got side tracked and set
it aside. The barrel was a snap to replace. You
just cut the inside part off the plastic barrel
and glue the aluminum barrel to it. Great fit!
So starting off, I primed everything
with Mr. Surfacer 1000 from the jar. If it was
warm out I would had used a can of dark-gray Duplicolor
primer and saved me the next step which was painting
the kit a dark color for preshading. I looked
through my stash of paint and found Tamiya RLM-Gray.
I bought it for something, but don’t recall ever
using it as the bottle was new. It’s a dark green-gray
and great for a base coat. I painted all the wheels,
turret, chassis, and bits with it. I wasn’t too
worried about an even coat as it’ll all get covered
with the next few lighter coats. The next step
for the green is a few more coats of lighter gray-greens
to give the tank a sun-bleached and faded/shaded
look. I’ll be using a dark gray next on the tracks,
cables, and stowage. Here’s a few pics of the
paint so far with the new barrel attached.


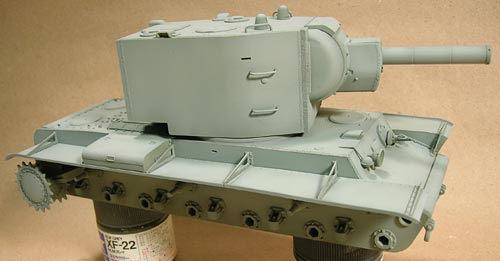
01.20.2006 » Painting
– Next Coat
So next up was a layer of a lighter
gray green sprayed on as highlights in the centers
of panels and objects. This left a faint bit of
the RLM Gray show through as a pre-shade. Doing
this gave the model a lot more depth than it had
with the first coat. This was my first kit that
I did a full-magor pre-shade with and I think
it turned out well. It’s time consuming, and IMO
not wonderful on Gundam kits, but for tanks it
really brings out the details. The color I used
on top was JA Gray mixed with Neutral Gray, White
and a little RLM Gray. This gives it the light
and sun-faded look I’m going for. It looks light
in the pics, but is a little darker in person
and will darken more with weathering and washes.
Next I’ll add the decals, a little more of the
light mix, then lightly airbrush the top flat
areas with a lighter color to add just a little
more sun-fading. I also sprayed the tracks with
a coat of German Gray tonight to start with, but
they’re not pictured. Here’s some pics:

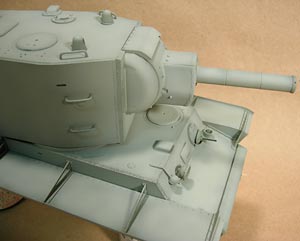
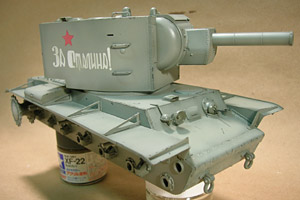
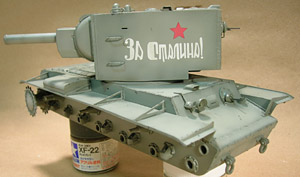
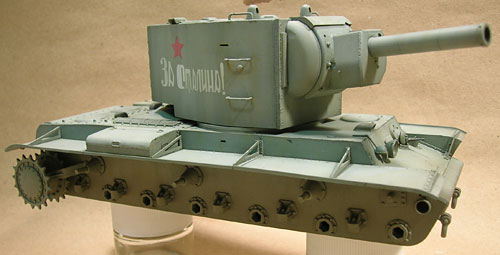
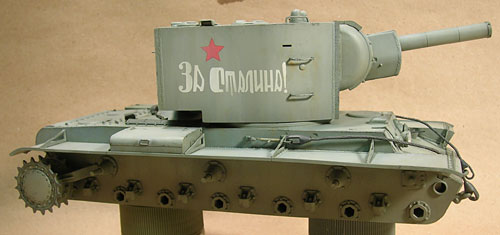
01.21.2006 » Decals,
Fades, and Clear-coating
Last night I gave the kit a coat
of Future Floor Acrylic (FFA) thinned with Tamiya
Thinner 50/50. When cured as long as I felt like
waiting which was around noon today, I applied
the waterslide decals that were supplied with
the kit. These consisted of a slogan, unit number
and red star for each side of the turret. The
decals went on pretty nicely with some Microsol
applied.
Then when the decaling was done
I used a medium-dark gray and the same light green
+ white and added some paint chips. This gave
me a layerd look which makes the chipping look
either faint to deep depending on the color. I
went sparing on the chips since I didn’t want
it to look over-done. After that I used the light
shading green and gave the decals an overcoat
to blend them into the tank color and covered
that with another coat of FFA. Pics below »

Next up I’ll give the kit a wash
using oils and mineral spirits, flat coat, then
airbrush dirt on the lower half.
01.21.2006 » More
progress…
Two in-progs in one day? Must be
on a roll! Anyway, I wanted to take some pics
of what I worked on this evening. First up is
the tracks. I started with painting the sections
of pre-assembled track-links with German Gray.
Next I clear coated them with FFA and gave them
a wash of MIG Standard Rust Pigment Powder thinned
with lots of water. I wanted them to have a little
rust, but not tons. Next I’ll give them a wash
of dirt-colored pigment powders. Here’s the first
pic:

Below you can see the pre-washed
and weathered wheels. They were painted the same
way as the rest, but were hand-painted with German
Grey around the outer edge where there’s be only
bare metal. I still need to metalize the gray
and weather these up a lot. I also painted the
stowage today. I’ve heard that the Soviets didn’t
load up their tanks like the Americans with piles
of equipment, but even so, I did see some external
stowage in photos and besides… I have lots of
1/35 stowage and I need somewhere to make use
of it! I painted all the stowage in German Gray
first. For the wooden boxes, I gave them a coat
of red-brown, then a post-shade of Buff sprayed
at a steep angle so that the buff didn’t settle
into the cracks leaving the red-brown show through
as a shading color. I then drybrushed the boxes
very lightly with Buff + White. The latches were
painted with German Gray before the drybrushing,
then highlighted with MIG Gunmetal Pigment Powder.
The bed rolls were painted in various shades of
buff and military greens much like the boxes then
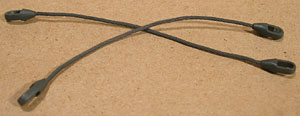
lightly drybrushed. Lastly is the fist step in
painting the tow cables which was painting them
in what else…? German Gray!


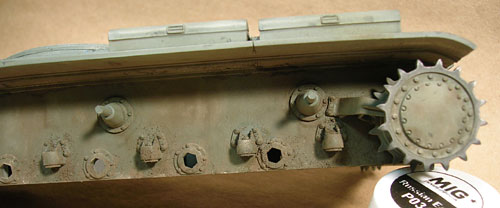
01.22.2006 » Weathering
and Washing Continued…
Next up on my list of things to
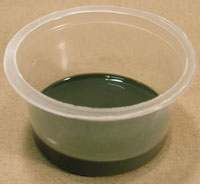
do was applying a wash to the tank. For the wash
I mixed up a gray-green slurry of oil paint and
oderless mineral spirits. Probably a 10:90 ratio
oil paint:thinner. I never measure. I applied
this with a wide brush to the kit in sections
and as it dried, wiped it off with wads of paper
towel in a downward motion to simulate streaking
from rain and dirt. Afterwards I applied a thin
coat of flat Future to seal the wash before the
next step which will be adding stains and more
streaking with oils and thinner. Pics:


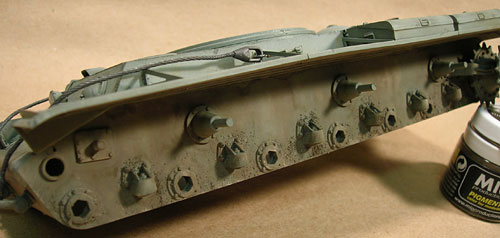
01.23.2006 » Weathering
and Washing Continued…
Todays progress is brought to you
by dirt. Dirt, in airbrush and now pigment form!
Anyway… first off I mixed up a dirt color to
airbrush onto the chassis, fenders and road wheels.
This consisted of Flat future with brown, german
gray and buff mixed in. The result was a semi-transparent
muck color. I sprayed this where I thought dist
and dirt would get kicked up and collected. Mostly
on the bottom, but a fait abount on the bottom
of the turret as well. It doesn’t look like much
of a change from in-prog pic to pic, but like
I said, it’s a gradual build-up of effects.

Continuing with the track-progress,
I gave the tracks a second wash. This time it
was MIG Europe Dust + Russian Earth mixed with
lots of water. This was brushed on heavily and
left to just dry on it’s own. Below is the result.
I think I want it a little lighter in color so
I may do a 3rd wash with some russian earth +
light dust. After that I’ll fix the pigment with
thinner then drybrush it with a metallic color
to bring out the wear. I haven’t decided on what
to use yet though metal-wise… MIG Gunmetal,
graphite, or silver rub-n-buff… I’ll have to
test it out.


01.23.2006 » New Technique…
This kit is forcing me to learn
new techiques that armor modelers often use. I
can’t wait to do my next MaK kit now to give these
a go! First off was a technique for making the
surface look worn and tarnished. Basically you
brush clean thinner onto an area, I did a panel
at a time, and then dab small dots of oils onto
the area randomly. These will begin to spread.
I used white, burnt sienna, and ultramarine blue.
Then you take the same clean thinner brush and
either brush/blend these up and down for rain
marks or swirled around for flat surfaces, tops
of turrets, etc…. The end resultis fantastic
and adds a lot of depth to the paint. I was nervous
about trying this, but will be using it again
for sure! When you’re done blending, except for
the burnt sienna, (the rusty color) it mostly
blends in and makes subtle color changes.

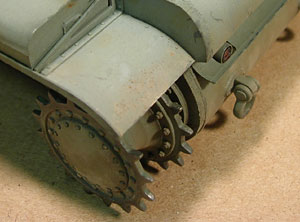
Next up is the tracks again. I mixed
up another MIG Pigment powder wash of Russian
Earth, Light Dust and Europe Dust. This was a
lighter wash than the last one as you can see
below.

After that dried, I rubbed the tracks
with my finger which was coated in MIG Pigment
Gunmetal Powder. Gave the tracks a nice metal
sheen on the wear-surfaces.
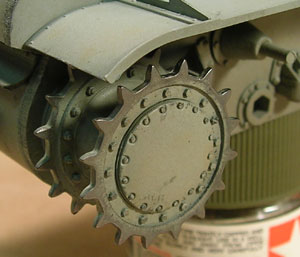
Lastly I took powdered graphite
and used my finger and paper towel to give wear
to some of the surfaces where I added chips and
where there would be wear and tear from friction
and useage. The main area I applied this to was
the drive sprockets in the rear. Since these would
be poking the tread-holes, the paint would be
gone and the metal worn to a shiney finish. I
also rubbed the road wheels with this powder to
give them a worn metal sheen.

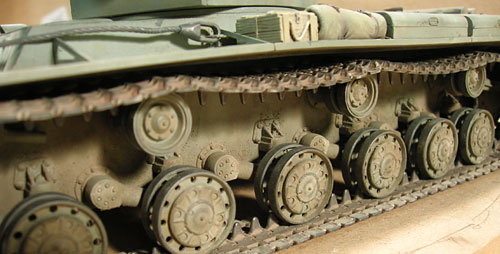
01.23.2006 » Dried
Mud
Time for some crusty mud on the
chassis! I needed to crud-up the chassis first
in order to have it weathered realistically before
putting the road wheels on. Otherwise it’d be
hard to get behind and weather properly. I used
3 MIG Pigment powders to do this in various combinations.
Russian Earth, Europe Dust, and Light Dust. First
I did the dusting and smudging using an old brush.
Once that was done I shook clumps of powder onto
the lower edges and then applied dabs of mineral
spirits to fix the pigment clumps into place.
Applying different shades of pigments gives it
a nice worn look. Here’s some pics.
01.24.2006 » Last
but not last…
The tank is almost done except for
one finishing touch which will be to tie the unditching
beams (logs) to the back of the tank. For my final
steps, I applied MIG pigments (same colors mentioned
above + black smoke and rust) with small and large
brushes. Instead of me describing how to use them,
I’ll direct you here to this great hot-to page:
http://www.missing-lynx.com/rare_world/rw05.htm
Next up is the base then final photos.
Here’s some no-final pics »


01.24.2006 » Display
Base
The tank is all done now and is
just awaiting it’s base before final photography.
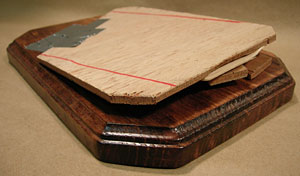
For the base I wanted to do a section of inclined
road that was slightly off-level to show off the
muddy underside more. I started with a scrap of
thin plywood which I cut to fit the wood finished
base. The red lines are so I know where not to
add rises to keep the tracks flat on the ground.
I stuffed the underside with the scraps I cut
off and popscicle sticks for support and then
some aluminum foil for bulk to keep me from using
too much celluclay. I applied the celluclay very
thin and flat then dusted it with crushed talus
which I’ll fix on better when it’s dry for texture.
When dry, I’ll prime, paint and weather. Here’s
some prog pics:

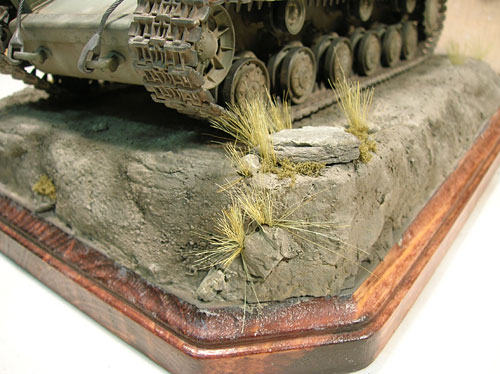
01.25.2006 » More
Display Base, Less In-Prog Images…
Oops… I got a little ahead of
myself and skipped a few steps in the photography
in-progress for the base. First I primed it today
with dark gray duplicolor primer (Walmart). I
applied the primer thick to help fix the crushed
talus. Then I airbrushed the base with Apple Barrel
(AB) Craft Acrylic, Country Gray (like a gray-buff
color), thinned with water. Then I mixed the leftover
with AB Black and Brown, getting a color very
close to my pigment color for the tank and sprayed
that on so the base had a mottled dark gray brown
color.
When dry, I then mixed up the leftover
pigment mix from weathering the tank with water
and airbrushed that all over the base. Airbrushing
the pigment worked BEAUTIFULLY! It gave the base
the earth-color I needed to match the tank and
helped me use less pigment than I would had otherwise.
It also dried very flat and virtually smudge-free.
When that dried, I took the dry lighter pigments
I applied to the tank and dabbed and brushed them
around the base to give more variation to the
dirt color.
After that I added some tall grass
and a few spots of turf. The final step will be
using a technique I found on Armorama to make
leaf litter from the many fall/dead leaves
that blew into my garage-way after I was done
raking. Here’s a few pics:

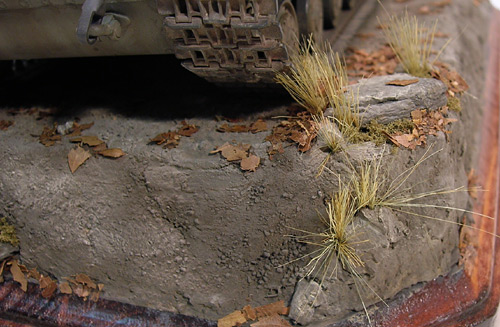
01.26.2006 » Lastly
Loads of Leaf Litter
And here’s the final in-prog before
uploading the final images. For the leaf litter,
I extra-dried out some oak and maple leave on
an old cookie sheet for about 1 hour on 200 degrees
farenheit. I then crushed them up with my fingers
(since my blender got smashed a few months back)
and sifted out the excessively large chinks. I
saved them though for future use. To apply them
to the base I merely brushed on small dabs or
wide swaths of white glue and sprinkled and pressed
the leaves down. When done I shook off the excess.
I added some to the tank as well since I know
my car always gets lots of leaves stuck in the
nooks and crannies in the fall. Last pic:

![Maude [Cyborg Action-Doll] (Files Only)](https://fichtenfoo.net/blog/wp-content/uploads/2023/01/Maude-Promos-300x300.jpg)


