


Your cart is currently empty!
In Progress » JGSDF Type 74 MBT
09.10.2006 » Concepts
/ Intro
 Armor
Armor
is a little addictive I’d say. Sure I love my
Gundam model kits, but AFVs are growing on me
more and more. My next venture into the real world
is the 1/35 JGSDF Type 74 Main Battle Tank from
Tamiya. I’ve had to for about a year now and have
finally decided to do it. I searched around for
any after-market (AM) sets such as photoetch (PE)
or resin upgrades. All I found was individual
tracks from ModelKasten. I have them on order
as I have no desire to deal with the vinyl tracks
that were supplied with the kit.
I’ve also decided to do a detailed
and well-documented build-up of this kit from
construction to weathering. I have a lot of detailed
Gundam builds, but nothing for armor subjects.
With Bandai’s new 1/35 Gundam line on the way
and the fact that most of the members at my forum
don’t usually model these subjects, I hope that
this will become a good resource for modelers
new to this scale.
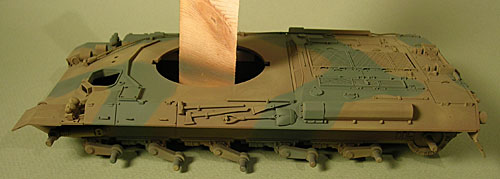
I’ll be painting this tank the same
camo scheme as my JGSDF LAV. This is an official
JGSDF camo pattern and I’ll probably use it later
on my Type 87 and Type 82 as well. The scheme
is a brown and green pattern. Tamiya makes both
colors which are great right out of the bottle.
The first step was of course research.
With some help, I got links to several sites full
of images of the Type 74. This will help me detail
some parts of the tank which are lacking and also
help me with colors and weathering.
09.10.2006 » Starting
Up
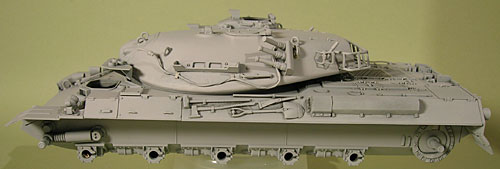
I read through the instructions
and started building following the steps in the
instructions. I started putting together some
of the larger elements such as the chassis and
the turret halves without glue just for photos
and fit. I really like the shape of this tank
design. It’s squat and has that rounded older
style turret that was rough cast. In fact the
turret has a great texture molded into it. I will
however have to sand a seam smooth and retexture
along that part.
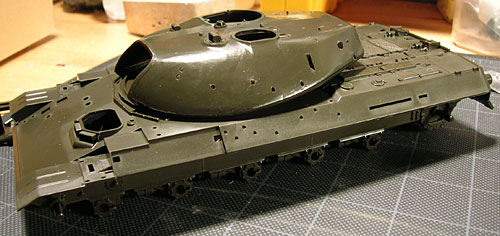

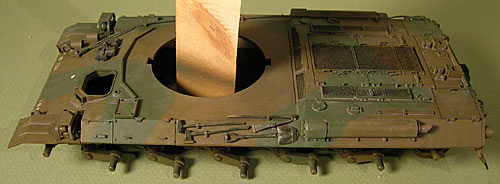
The first bad thing I noticed was
a sizable gap under the fenders, but above the
road-wheels. I’m not 100% sure what to do here.
I could leave it, but I’d rather not. But do I
fill the vertical gap or under the fenders? Or
maybe both? I have more research to do apparently.
There’s also slots and icons for batteries molded
inside the chassis. I guess this was also sold
as a motorized or RC version at some point. I
think it’s an older kit.

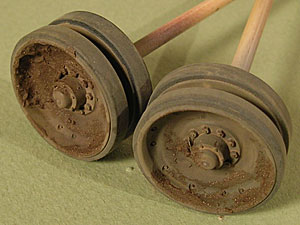
As with any kit, there’s the flash
(A) and the sprue nubs (B) to deal with. I had
flashbacks of the KV-2 and all the sanding I had
to do to the roadwheels and suspension arms flash,
but this kit wasn’t too bad. Good thing too with
20 road-wheel halves and 10 arms! I scraped the
flash off the arms with an exacto blade and then
sanded smooth. For the road-wheels, I filed down
the flash/nubs then sanded smooth. More in-prog
info soon…


09.11.2006 » Filler
and Grab Handles
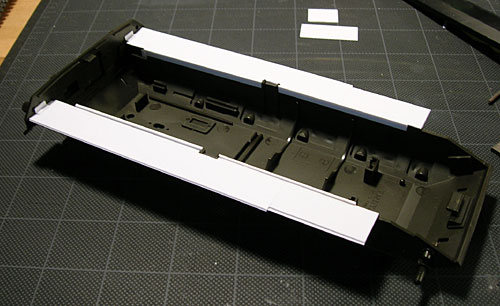
A modeler by the name of Alex gave
me the tips on filling in the HUGE gaps in the
underside of the Type 74. First I glued on strips
of styrene to the insides of the chassis. These
will help support the horizontal panels I cut
when glued into place.

I cut several rectangles from sheet
styrene to fit between the strips and the ends
of the fenders. These were glued into place filling
in the hole.

Then after that set-up I cut large
pieces of very thin styrene and glued them over
the glued rectangles. This large pieve fills it
completely and covers all the seams of the rectangles
nicely. I won’t even need any putty now. Very
easy and will make a huge difference when the
kit is all done. Thanks Alex!

Next I needed to do something about
all the “tabs” that represent grab-handles.
Almost every handle is a solid piece on this kit.
I took verious sharp tools and removed the tabs.
After sanding I drilled .024″ holes at the
ends of where the tabs were. Next I took .020
wire and made lots of new handles. These were
made the same size by placing tape on my needlenose
pliers so that I knew where to bend the wire each
time.


Then I took my tweezers and pushed
each bent piece of wire into its holes. Lastly
I added a few drops of liquid glue to secure them
into place.


09.12.2006 » Turret
and Tools
Today I did a bunch to the Type
74. First up I removed the plastic tow cable rather
than sand it and added one I made from wire. I
took 8 thin wires (4 looped) and tied them to
the end of my drill. I held the looped end on
a pencil and ran the drill to twist the wire.
I cut it to length and drilled holes into the
ends of the “hooks” to insert the new
cable into. They were then secured with super
glue. I cut the cable brackets too and filed out
the old plastic cable so that the new cable would
slide in. Again I secured it into place with super
glue. I also replaced the exhaust pipes with aluminum
tube since the kit supplied ones were not hollow.


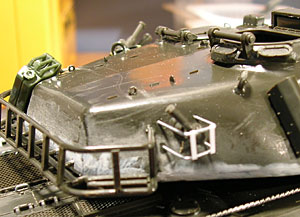
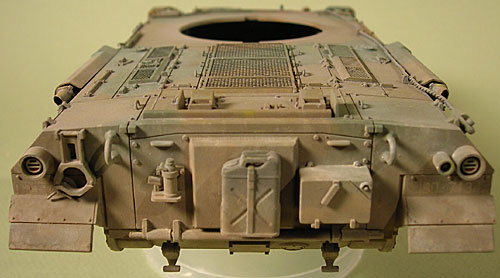
I also added the tools. These had
the normal faint flash. I removed it by scraping
it with a razor and with minor sanding of the
sprue nubs. They were then glued into place. I
add them now since the tools are generally painted
the same color as the tank. I may opt to adjust
their colors afterwards, but that’s no problem
to hand-paint. Also shown below is the top of
the turret with the periscopes. These have some
flash to take note of and clean-up.


Next up is the infrared sensor.
This comes in many pieces and has to be glued
together. You’ll have to take care of the many
seams afterwards. No gaps though so no worries.
I’ll paint it leaving the 2 front parts off to
insert the clear plastic “window” afterwards.
Also shown is the ammo case for the machine gun
and the 2 mounts for the smoke dischargers. These
both have pin-holes. You can fill these with a
drop of Mr. Surfacer or thinned putty and sand
later. The ammo case is hollow underneath. I filled
it with styrene and will sand flat later.


I glued the 2 halves of the turret
together making certain to place the lower portion
of the stowage rack inbetween before glueing.

When the glue dried I sanded the
seams down. I lost the texture and had a few hairline
gaps. I took care of this by brushing on Mr. Surfacer.
When cured I lightly sanded the edges where the
surfacer meet the plastic. This leave the middle
“rough” to help retain the rough cast
texture.


Lastly I glued on the top part of
the stowage rack. Be sure to remove the flash
on this and pretty much all parts. This went on
with a little difficulty as the upper bars did
not hit the holes on the turret. After some putty/glue
I rectified this. I also started attaching the
various parts to the turret such as racks and
D-rings.


09.13.2006 » Wired
Up
Today I started adding all the little
detailed bits to the turret. The smoke dischargers
went on fairly easily with no need for modifications.
The hatches went on with only a few hitches. The
left hatch had one of the hinge tabs too long
so I needed to trim it to fit it in level. That
hatch was glued down. The right hatch above the
periscopes will be displayed open since I’ll have
a figure in there. The inside of the hatch had
a few pinholes to fill with surfacer before attaching.
The IR sensor has some surfacer applied to fill
some tiny hairline gaps after initial sanding
of the seams. The base of the ammo box was puttied
after the styrene was cut flat and the antenna
bases had some pin marks too.


Next up is the headlights. In real
life there’s wires that come from the back of
them and end up below the lights into some holes.
I drilled little holes into the backs of the lights
and inserted wires. The back of the light gaurd
was missing a crossbar so I added them from strip
styrene. I need to add one on the outside edge
too still.


Finally there’s a prominant cable
that runs from the IR box to right behind the
left smoke discharger. This wasn’t included in
the kit for whatever reason. I used some wire
and stretched sprue to make the cable and tape
to make the tabs and such. The tape was super-glued
to the turret for extra hold. I love the way this
turret has all this stuff tacked all over it.
Very interesting looking.

09.16.2006 » Antenna
Gaurds
I was working on and finished these
antenna gaurds right before my wife went into
labor. They were made from bent wire inserted
into small drilled holes. Thin strips of styrene
were then glued onto the ends to finish the look.
Easy mod.

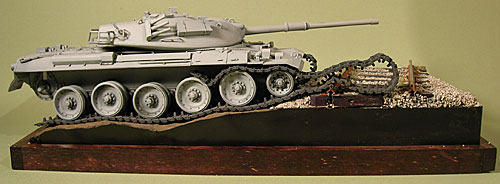
09.25.2006 » Suspension
One last part of construction is
the suspension to keep the tank level, but keep
the road wheels on the road. I cut all the tabs
in the suspension arms like instructed in the
insctructions. Then I placed a drop of glue into
each hole in the chassis where the arms will be
placed. I propped the tank up level and laid the
tracks down. Then I began placing the suspension
arms with the road wheels onto the chassis. When
the glue dried I removed the supports and viola!
I’ll place the tracks in better obviously when
it’s done.

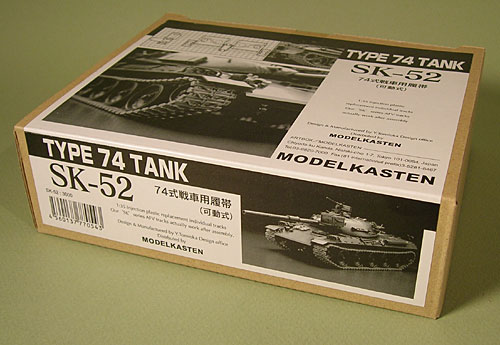
09.21.2006 » Modelkasten
Type 74 Tank Tracks
For this build I’ll be using the
Modelkasten injection plastic replacement tracks
for the Tamiya 1/35 Type 74 Tank. Product SK-52.
I chose to use these since the vinyl tracks that
come with the tank are just not good. They have
soft detail, are warped, and do not have that
natural sag that the Type 74 track displays. The
Modelkasten tracks are “workable” meaning
that they will bend and sag with their own pins
and such in a realistic fashion.
The tracks come in a nice cardboard
box with a black and white decal wrapped over
the top. Inside the box are around 90 small sprues
of the track plates (inside and outside pads),
hundreds of connecting shafts, 2 idler wheel axels,
and a “jig” for laying out the tracks
when building them.


The instructions come with both
english and japanese text and are well-printed
and easy to understand.


The first step is to cut the “inside
pad” sections from the sprues, sand the nubs,
and place them onto the jig. The jig holds 10
track sections so I’ve been doing this 5 sprues
at a time since each sprue contains 2 tracks.
Next cut out 10 of the connecting shafts and sand
their sprue nubs. Place them into the jig on top
of the inside pads.


Next we cut the outside pads from
the 5 sprues we cut the inside pads from. Sand
the nubs as usual. The next part took me a few
tries and different glues to get right. I decided
on the Testors liquid cement since it is thicker
than the Tamiya Extra thin, Thinner than the Tamiya
Cement and comes in the perfect applicator bottle
for this task. Grab an outside pad with some tweezers
by the outside tread. Apply one drop of glue to
each inside tab (see below) and apply over the
connecting shafts and inside pads. Press down
to set glue and repeat. Wait a few minutes to
remove the whole 10 track sections from the jig.

Now just continue making sections
of 10 tracks with 5 sprues and 10 connecting shafts
at a time. Place the prior sections of built track
at the ends of the jig to connect them into a
strand of 78 tracks.
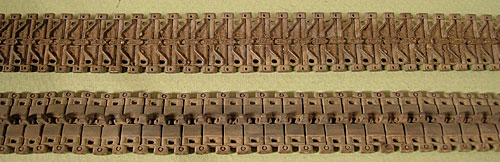
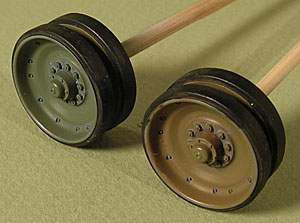
Below you can see some detail comparrison
shots of the Modelkasten (brown) versus the Tamiya
vinyl (black) tracks. Note the great bend the
Modelkasten tracks have.


09.22.2006 » One Side
Done
I managed to finish one whole side
(78 segments) of track so I snapped some images
to go over a few parts that may be of interest.
When I got to the end of the strand I realized
that I won’t want to connect the two ends together
just yet as that would make placing them onto
the tank later a pain. So I opted for a solution
that would leave 3 segments of track non-bendable.
This isn’t a bad solution though as I’ll made
sure this section is on the ground so that it
doesn’t need to bend. On one end I glued the inside
pads to the connecting shaft. On the other end
I glued the outside pads to the opposite connecting
shaft. This way I can glue them together in the
final assembly and they’ll be unnoticible. See
images below.


I also placed this section of track
onto the road-wheels and sprockets to see if there
was good sag. It’s perfect! My only concern is
that I might need to add one more segment to get
the sag after adjusting the suspension to lift
the back-end of the tank up on the base. I’ll
have to test that later. I’ll just make/paint/weather
an extra connecting shaft (for each side) with
inside and outside pads on opposite sides to lengthen
it by 1 if necessary. Better safe than sorry later.

09.23.2006 » All Done!
Whew… it was a lot of work at
approximately 30 minutes/10 segments, but the
tracks are all done. I even had plenty leftover
to make a section of spare track to replace that
supplied by the kit. Below you can see what was
leftover. That’ll go into the spares bin to use
as detail parts or sci-fi stuff. I’ll post the
painting and weathering of these on the JGSDF
Type 74 painting and weathering page.
![]()


10.03.2006 » Painting
and Weathering the Tracks
I was going to post this in the
painting and weathering page, but it seemed better
to keep all the tread info in one place.
First I primed the tracks in a Dark
Gray primer. You could prime them in light gray
as well and paint them dark gray later. Afterwards
I airbrushed them with a reddish brown color to
simulate the rust. Obviously this looks too rusty,
but it’s cool since it’ll be covered up later.
Be sure to bend the tracks to get inbetween them.
After the red-brown dried I airbrushed on a predust
shade of Tamiya Acrylics similar to my groundwork
dirt. I mixed this 50/50 with Flattened Future
to thin it. This simulates the dust the tracks
would collect.


After the predusting dried I applied
a thick wash of MIG European Earth on both the
front and back of the tracks. After that it was
time for some mud. I mixed equal parts of ground
talus (A), dry plaster of paris (B), MIG pigment
powder (C), and a little static grass thrown in
as well.

I combined these in an applesause
container then removed half for later. I made
too much dry mix, so by removing some I can use
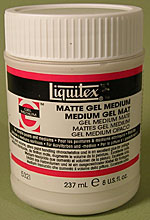
it later for another kit. I took my mixture and
mixed in a slightly larger volume of Liquitex
Acrylic Matt Gel Medium. This is the same as the
gloss gel medium I use for water, but dries flat
instead of glossy. I wanted it flat to simulate
drying mud. I stirred this up well with an old
brush until I got a nice muddy consistency. This
will dry about the same color as the mix. Pigments
usually dry lighter, but this in my tests did
not.


Using some old brushes I applied
the mud on the outside/ground-side of the tracks.
I worked it into the tracks with a stiff brush
then took my finger and wiped them flat so that
the edges of the track did not have mud… only
the crevases. When the mud had dried I took some
MIG Gunmetal and rubbed it between my thumb and
forefinger. I then rubbed it on the edges of the
tracks that would contact the ground and get worn.
I applied it onto the spokes and where the road
wheels would hit the tracks as well.


Below you can see the finished tracks.
Be certain to bend the tracks while the mud dries
so that they don’t dry in a solid unmovable lump!

09.12.2006 » Painting
and Weathering Concepts
![]() On
On
this page I will go into detail with the painting
and weathering steps for the Tamiya JGSDF Type
74 model kit. I’ll be using Tamiya Acrylics as
usual. Plus they have some JGSDF-specific colors
which will be great to use. I’ll use the standadr
JGSDF camo pattern as seen in the image to the
right. The weathering will be as if the tank has
traveled on back-roads and through fields in Japan.
Not sure if they will be muddy or dry fields yet.
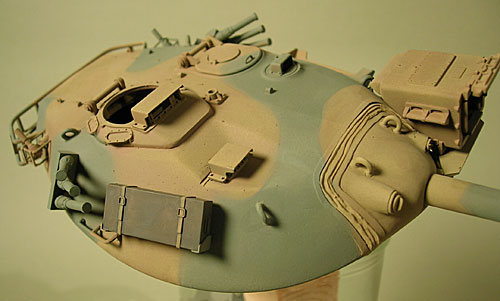
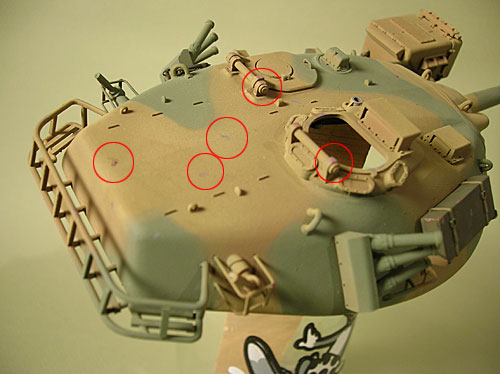
09.12.2006 » Priming
I decided to prime the barrel, turret,
and chassis of the tank today to see how everything
looks.Aside from priming to help the paint adhere
better and to provide a uniform base color for
all the paint to cover, it also helps check for
mistakes that don’t show up normally until aftyer
painting. There’s a few minor seams showing on
the turret halves and the barrel, but nothing
that isn’t easily fixed. Everything else is looking
great so far!


09.23.2006 » More
Priming
I primed the rest of the tank parts
except for the tracks which were not ready when
I primed. I’ll do them tomorrow. I primed most
of the parts and the figures with Tamiya Surface
Primer. Great stuff that goes on smooth and doesn’t
obscure the details. I also used Duplicolor Dark
Gray on a few parts such as the rifles for the
figures and the suspension arms since they won’t
be seen much being covered in mud and dirt. Why
waste the expensive primer?


To prime and paint I attach the
parts to skewers, sticky tack and skewers, or
popsicle sticks covered in duct-tape (sticky side
out).

09.25.2006 » Tank
Camo
The first thing to paint on the
tank is the main camo pattern. I’ll be using the
Brown/Green camo scheme. Tamiya makes specific
JGSDF colors for this. XF-72 and XF-73. First
I painted all the tank parts with the JGSDF Brown
color. Well… a close enough color as I don’t
have XF-72. I mixed Brown with Kahki instead which
is close to my reference colors. Before this I
used some scrap-wood and used double-stick foam
tape to make a handle inside the hull of the chassis
and the turret.

After that dried a few hours I used
some sticky-tack and masked off where the camo
stripes will be for the green. I filled in the
brown areas with tape to mask them. The sticky-tack
gives the camo a soft edge between colors for
a sprayed-on look.

After masking was done I sprayed
on the XF-73 green.

When dry I removed the masking carefully
and viola! Camo complete. Next-up.. painting tools
and equipment.
09.26.2006 » Details
After the camo, it’s all about painting
the tools and other details. For the turret I
painted the cloth cover between the gun and turret
with a lightened kahki color. I painted the box
with XF-74 JGSDF Olive Drab and the strap with
Kahki. The wire for the IR sensor was painted
in german gray.
The tow cable end was painted in
the JGSDF Green color and the cable later (not
shown painted) in a medium gray. The lights were
painted with silver Rub-n-Buff. The small lights
will later be painted over with Clear Orange.

The tools were painted in XF-74
JGSDF Olive Drab and will be paint-chipped and
weahtered later.

Speaking of paint chips… Of all
the Type 74s I saw images of, there was very little
in the way of chipping and/or rust. These tanks
are VERY well maintained so I only added a few
chips here and there on high-wear areas and a
few random from tools and such.
After all the little details were
painted and the chips were done, I gave the kit
a coat of Future Floor Acrylic thinned with Tamiya
Thinner. This seals in the acrylic and creates
a gloss base for the decals which will be next.

I wanted to call out the road wheels.
The JGSDF does not camo them, but instead paints
some green and some brown. I brushed on flat black
around the edges for the rubber. Almost pointless
though as these wheels will be pretty muddy when
this is all done!

09.28.2006 » Decals,
Filters, Chipping, and Wash
After the gloss coat had dried I
applied the decals. I followed the instructions
and added the decals for “The 2nd Company,
The First Cavalry Training Corp”. I used
these because I wanted something “general”
and wasn’t thrilled with the other unit marks.

After the decals, I applied a satin
coat of Future. When that cured I drybrushed
a little light gray acrylic on the edges of the
cloth on the turret. Then I applied my first filter
which was a mixture of Ultramarine Blue and White
oil paint thinned with oderless mineral spirits
(KleanStrip from Walmart).

When the first filter was dry I
applied a second of the same colors as the first.
The goal was to make the tones of both colors
slightly bluer and lighter. Below you can see
how it acted as a wash on the road wheels and
see what my filter looked like in the applesauce
tub. I love these tubs and use a lot of them.
Great as a disposable container for washes and
such and holding small parts before painting.


After the filters were dry I decided
to add the paint chips to the tools as well as
doing some “mapping” to the exhaust
pipes. The chipps to the wooden handles were done
by drybrushing Tamiya Buff to simulate chips along
the wood grain. After I used some light gray acrylics
then later red-brown to paint small colored areas
on the shovel and exhaust to give them a more
random colored/chipped/stained look before rusting.
This is known as “mapping” named after
texture mapping from 3D images apparently. I like
to think of it as painting islands and continents
or slightly different colors, like a “map”.
This can be used to simulate stains, repainted
areas, chips, etc…

After that detailing I applied a
wash of UM Blue + Burnt Sienna whick made a dark
gray-brown when mixed. This was thinned with oderless
mineral spirits and applied all over focusing
on panel lines and details. This will be my first
wash and is intended to highlight some details.
After this dries I’ll apply the
fading (dots of oils blended in with thinner)
and then the next wash of the dirt/dust color.
Below you can see the mapping on the exhausts.
Later pigments will be added to strengthen the
effect.
09.29.2006 » Fading
Today I applied the fading to the
model with oils and mineral spirits. This is an
effect that I think truely brings out the realism
in a surface. The way it adds subtle color changes
and tones really looks great.
The following 2 images are photoshopped
(and exaggerated)to show the process as I didn’t
have time to photograph them. It’s not a technique
that lends itself to photography time-wise. First
you apply clean mineral spirits to a section of
the tank. Then you apply dots of various oil colors
onto the clean thinner. I used Colbalt Blue, Yellow,
and White. Then you take a soft brush dampened
in clean spirits and blend it into the surface.
For sides and inclines go up and down to simulate
rain-marks/stains. For flat surfaces just swirl
them and blend them in.
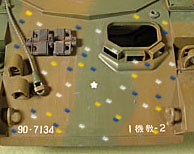

Here you can see how it looks on
the model. The staining is subtle and works really
well. Using the blues and whites also help to
alter the color to more of a blue which I wanted.
I used burnt sienna on my Russian KV-2 as well
as the white, yellow, and blue to simulate rustiness
blended in.


09.30.2006 » Two More
Washes
Today I added 2 more washes to layer
the weathering effects on the tank. First I applied
a brown wash which was similar to my dirt color
on the base. After that dried I applied the same
wash, but with more white oil paint mixed in.
This gave me a dusty look similar to many of the
images I’ve seen of the Type 74 on maneuvers.
Next up will either be predusting with an airbrush
or rain marks with water-thinned tamiya acrylics.
Not sure which yet.

« first 
« second

10.02.2006 » Rain
Marks and Pre-Dusting
The past couple days have been busy,
so not too much progress. First I applied some
rain marks to the vertical surfaces of the tank.
I mixed some Tamiya Buff and Brown with LOTS of
water and brushed streaks down the vertical and
sloped sides that would have them. As they dry,
the lightness of the marks show up. You won’t
see them when they’re wet if you’re doing it right.

Next I mixed up a shade of Tamiya
Acrylics similar to my groundwork dirt. I mixed
this 50/50 with Flattened Future and sprayed it
where dust would collect. That was a bit dark,
so I mixed in some white and resprayed. The multi-layed
effect looks great. THis was applied to the underside
of the chassis, the road wheels, the rear panel
and front of the tank and in other places.


When that dried I added more rain
marks and applied the tinted window glass which
I cut from clear blister-pack plastic and backed
with black acrylic.

And last for the progress, I started
on some of the mud and grime effects. Below you
can see the first of it which is some mud spatters
on the rear of the tank as seen in some of my
reference. I’ll be adding more of this later i
lighter shades. It was applied by fliching water-wet
pigments with a stiff nylon brush. The cheap Testors
kind.

10.03.2006 » Dust
and Mud
Next up in my layers and layers
of weathering is the mud and dust. First I applied
more dust and dried earth with Mig Pigments. I
used both dark and light to simulate not only
different types of dust, but to simulate that
some of the much is still moist.
After that it was time to make some
mud. I mixed equal parts of ground talus (A),
dry plaster of paris (B), MIG pigment powder (C),
and a little static grass thrown in as well.
I combined these in an applesause
container then removed half for later. I made
too much dry mix, so by removing some I can use
it later for another kit. I took my mixture and
mixed in a slightly larger volume of Liquitex
Acrylic Matt Gel Medium. This is the same as the
gloss gel medium I use for water, but dries flat
instead of glossy. I wanted it flat to simulate
drying mud. I stirred this up well with an old
brush until I got a nice muddy consistency. This
will dry about the same color as the mix. Pigments
usually dry lighter, but this in my tests did
not.
Using some old brushes I applied
the mud on the lower portions of the chassis where
the tank would have pushed through some wet mud
which later dried and crumbled off in spots. I’ll
add lighter dry pigments later to simulate the
dryer mud.

This mixture was also applied to
the wheels and drive sprockets.

When the mud had dried I took some
MIG Gunmetal and rubbed it between my thumb and
forefinger. I then rubbed it on the sprockets
(see above) as well as the machine gun for the
turret. The gun was first painted black. Rubbing
the metallic powder on it achieves a great look!

10.04.2006 » Drying
Mud
And finally for the weathering and
painting page we have progress shots of the drying
mud. This was basically achieved by dusting the
darker mud with lighter pigments. Looks great!
I also attached the tracks. Love the sag and it
looks great on the base. The tank itself is done
so final photos will be up soon… after the figs
are done!


09.12.2006 » Figure
Concepts
On this page I will go into detail
on constructing, painting, and weathering the
figures I’ll use with the JGSDF Type 74 model
kit by Tamiya. I’ll be scrapping the kit-supplied
figures as they’re… so-so. Instead I’ll be using
a combination of the newer JGSDF Iraq Humanitarian
Assistance Team figures for those on the ground
and JGSDF driver figures supplied with the Type
82 and Type 87 from Trumpeter. More on this later….
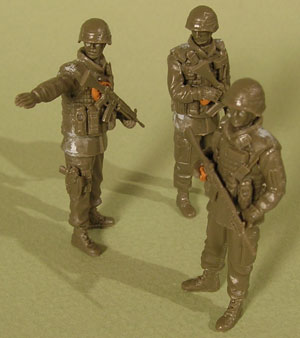
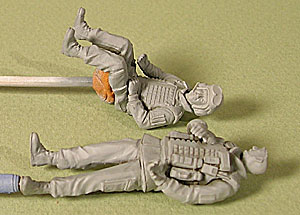
09.17.2006 » Figure
Construction
I started the figures yesterday
for this small vignette. I’ll be using 3 of the
standing figures from the JGSDF Iraq Humanitarian
Assistance Team. They’ll be standing on the railroad
tracks. The driver for the tank is not shown as
I’m still deciding what to do with it. I know
I won’t be using the figure that came with the
tank. I’ll be using a driver head from one of
the Trumpeter Type 82 or 87 model kits, but an
not sure if I’ll use the body of one of the trumpeter
kits or that of the JGSDF LAV driver. I’ll have
to see how each looks/fits together.
Here’s a shot of what I’ve done
with the standing figs so far. I’ve managed to
get most of the waving figure done, but I cannot
add the misc. bits to the other two figures until
I clean-up the putty and glue on the arms. On
a related note, I have a new background sheet
and place to take in-prog photos. The sheet of
paper matches this site quite nicely!

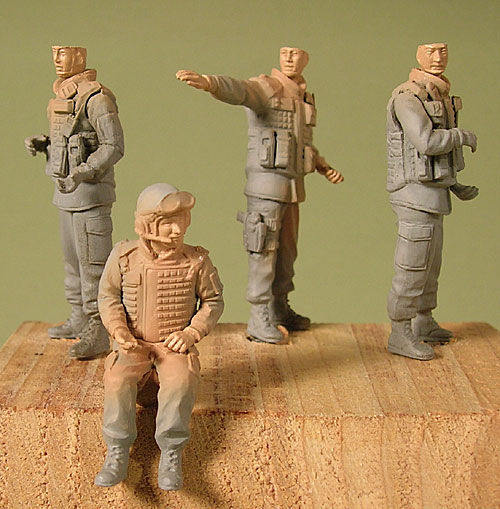
09.17.2006 » Stand
and Deliver
The standing figs are all done.
Now I just need to do the driver head and an arm
that will be slightly visible pushing open the
top turret. Painting the camo on these should
be a fun challenge.

09.23.2006 » Driver
and Primer
I picked up my Type 87 and 82 from
Fulcy today and was able to finish the last figure
by using one of the driver heads from the Trumpeter
kit. I needed a figure-head with the driver helmet
that didn’t suck like the old kit-supplied figure.
This went on easy enough with a little shaving
of the neck as it was REALLY long. I primed the
figures with Tamiya Surface Primer.

09.24.2006 » Face
it!
The first thing I needed to paint
was the faces. This is because I’m doing them
in oils and they take a while to dry. Starting
them now will give me the drying time to start
painting the tank. The following techniques are
a combination of my own and what I learned from
Craig Whitaker, another member of my local IPMS
and a great figure painter. He’s got some oil
painting tutorials on Armorama
so look them up!
The first step in my painting is
to apply a base coat of flesh. This was a mixture
of Tamiya Acrylics (flesh + brown + white) and
airbrushed on. Don’t worry about the exact color
as that’ll be fixed later. Just do a basic skin-tone.

Next up was hand-brushing a thin
layer of Future Floor Acrylic (FFA) onto the flesh
parts. This will seal in the basecoat and protect
it during the oil-painting process. Don’t worry
about the gloss as that will be covered later.

Once the FFA cures we can begin
with the oils. I mixed up some White and a little
Burnt Sienna on my pallet. (a lid covered in foil)
I added a touch of yellow to the flesh mix to
get a more Asian tone. Thanks again to Craig for
this simple mix!

Now that the color was mixed I brushed
it onto the flesh-painted parts very thinnly.
If this is applied to thick you’ll get brush strokes.
This is where the base-coat comes in handy as
it lets you apply a thin layer of oils without
the primer showing through. This thin coat of
oils will cover the gloss of the FFA and act as
a blending base for the highlights and shadows.
Next take a small brush and dab
small amounts of white oils where the highlights
would be. Bridge of the nose, upper cheaks, lower
lip, etc…

Now wipe that brush on a rag (no
thinner) and blend the white into the base color.
Don’t worry too much if your highlights are large
as we’ll blend them out later.

Now take pure Burnt Sienna and dab
it where the shadows would be. In the face creases,
eye sockets, under the brows and chin, under the
cheakbones, etc…

Now again we’ll wipe that brush
clean and use it to blend the Burnt Sienna into
the base color. At this point you can see where
things may beed some more blending to look better.
Do this as needed. After you’re done, set the
figures aside to dry. I set mine into a warm spot
under a lamp (careful not to melt them, just warmer
than room temp) and this will dry the oils quicker.
When these oils dry, we can go back and add more
white and burnt sienna to exaggerate the highlights.
Add a little pink to the lips as well.

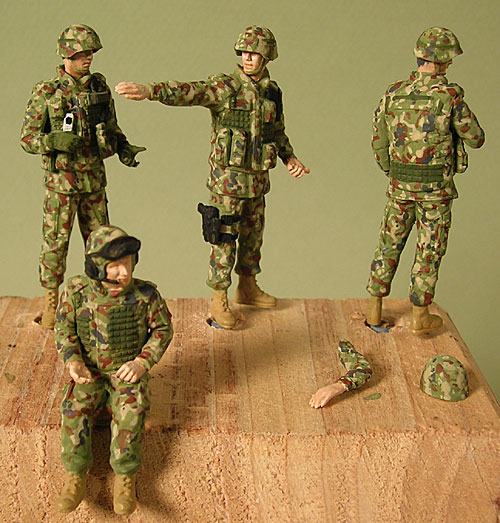
09.26.2006 » Camo
Next up for the figures is painting
the JGSDF camoflauge fatigues. There’s a great
little diagram on what colors to use to paint
the camo on the figure box, plus I looked up some
real life references online. After studying the
camo I decided to paint it in the following order:
First I used a 50:50 mix of Tamiya
Buff and Flat Green. I thinned this with water
and brushed on a thin layer. This went on thin
and you could see the primer and flesh tones beneath,
but this is good as multiple thin layers will
minimize brush strokes..

When that layer dried I painted
a second thin coat of the green/buff mix. This
covered the first and left a nice solid green
with very little base coats showing through. I
didn’t do a 3rd coat (but I would had if this
was a solid color fatigue) as the camo will cover
the rest.

Next I applied Tamiya Red Brown
thinned with water with a pointy brush. According
to the reference, this color is prevalant, but
still sparse.

Next I applied Tamiya Buff thinned
with water. This color was applied more than the
Red Brown and even covers some of the Red Brown
patches as shown in the reference. The Buff color
is only half-done in these images. After double-checking
the refs I need more small “dots” of
Buff.

I appled more small dots of the
Buff then I added the final camo color which is
sporadic dots of German Gray. After the gray dried
I used white glue to attach the helmets. Next
up is painting equipment, gloves, boots, straps,
etc…

09.27.2006 » Gear,
Wash, and Drybrush
After the camo was done I painted
the dose meters (white ipod looking thingies),
boots, vest webbing, gloves, straps, walkie talkies,
etc…
After all the details were painted,
I gave the figures a gloss coat of Future Floor
Acrylic to seal in the base painting. After the
clear coat I needed to decide on how to highlight
the figures to show all the webbing, gear, pockets,
etc… Oils probably wouldn’t work since they’re
not very translucent. I opted instead for watercolors.
I first used a wash of olive green on everything
but the dose meters, boots, and skin. For the
boots I used a wash of black + burnt sienna watercolors.

When the washes dried, I did something
I usually don’t do, but thought would work in
this case… Drybrushing. I needed to highlight
the various ridges and such on these figs since
the camo hid everything in it’s randomness. That’s
what camo does though! I used white tube watercolor
and drybrushed it onto everything but the skin.

Lastly I gave the figures a flat
coat of Future. I think they turned out pretty
good and are almost done. Next time I’ll probably
use a very light green instead of white as the
white makes the figures look glossy a bit even
though they’re flat. Maybe I can go back.

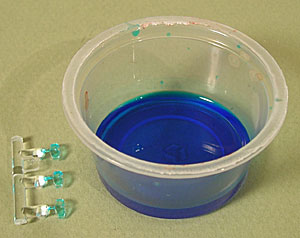
Below you can see the watercolors
I used. You can also see the dip I made for tinting
the goggles. The dip was made from Future + 2
drops of blue food coloring. Next I’ll attach
the goggles to the helmets and paint the rims
with semi-gloss black. I’ll also finish the rifles
and attach them. I’ll probably add some pigments
to the knees and boots as well.

09.12.2006 » Diorama
Concepts
On this page I will go into detail
on constructing, painting, and weathering the
display base for the JGSDF Type 74 model kit by
Tamiya. My plan is for the tank to be resting
on a slight back-road incline and on some railroad
tracks. There will be some brush and a few figures
as well. I got the railroad track idea from some
images I saw in an issue of Xtreme Military Modeler.
The way the tank tracks sag over the tracks is
a beautiful thing to behold.
09.12.2006 » Riding
the Rails
On the way back from preschool today
I stopped into the model railroad shop a few blocks
from my house. Usually I never step foot in these
as they don’t have much I ever need. This time
however they were the perfect source for a main
piece of this dio. Railroad tracks! They didn’t
have anything in a larger scale with only 2 rails
and the ties so I opted for what I think is an
HO scale length of track. I got 2 feet of it for
$5.00 which wasn’t too bad.
I need to do a fair amount of modifications
to it. Yes… I know… there’s 1/35 scale track
available. I’ve not heard good things about it
though and didn’t want to wait for it to be delivered.
First up I needed to take it apart and cut it
to the length I needed. I slid the wooden ties
off and used a razor-saw to cut the tracks. I
guestimated based on images of people walking
on railroad tracks the width I’d need. I decided
to use the existing ties in the center and use
the cut-off edges for the parts out-side of the
track.


Next I cut a thin piece of balsa
wood that fit into the shallow box I’ll be using
as a base. This will be the base for the tracks
so that I can add them to the base after painting.
I glued the widest pieces of “tie” in
the center and the short pieces ou the outside
with white glue. I can remove the metal track
parts for painting which is nice. When I place
it onto the base when done I’ll fill the gaps
and edges with those little gray rocks called
ballast. That’ll help blend it all in. Also since
the tank will be resting on the tracks, I’ll be
adding some wood or rusted metal dimond-plate
planks as a cheap railroad crossing. This would
keep the tank/normal traffic from damaging the
tracks in real life.


Below you can see the widened track
sitting inside of the base (although when done
the track will be sitting up on a slope an inch
higher) and the “scale fig”.

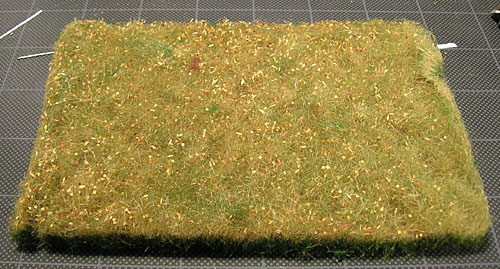
09.14.2006 » The Grassy
Knoll
I made some more progress on the
base today since I got my Silflor grass mat. The
weird thing is… I ordered it from Scenic Express
yesterday. I totally did not expect it to arrive
so soon. Express is right! Wow. Anyway, I got
the fall sample set which comes with 5 different
4×6 inch pieces. These will last me a very long
time I think so the $15.95 price tag wasn’t *too*
horrible. They’re very nice though and have a
realistic look. See an image I shot below.
I also started building up the
groundwork on the base. I first used floral foam
and put paper mache over it. Then I added celluclay
over that to get the bumpy base I want under the
grass. I didn’t add any on the “hill”
as that’s where the track section will be placed
and will be covered with ballast. (little gray
rocks) I added styrene around the edge of the
groundwork to section that off flatly. I’ll paint
that black later and also stain the wood.


09.16.2006 » More
Grass
I had some requests to show the
entire pieces of the Silflor grass I got from
Scenery
Express. Here’s all 5 pieces and the description
from the website…
Silflor® Autumn Sampler Pack 5 sheets
4″ x 6″ each as follows: SF71024 Autumn Short
2mm Lawn SF71124 Autumn Medium 5mm Lawn SF72024 Autumn High
Pasture 8mm Lawn SF72124 Autumn High Pasture W/Weeds 8mm
SF73024 Wild AutumnTone Moorland Silflor gives ground cover
a whole new meaning. Silflor’s unique beauty will add subtle
distinctions of texture, length and color to any landscape.
Grass heights are available in 2mm, 5mm & 8 mm lengths.
Choose from a variety of color including spring, early summer,
late summer, and autumn tones and our favorite, wild moorland
texture. A realistic natural scenery can be achieved by
incorporating various sizes of mat, textures, colors and
heights. Take care when mixing and matching colors. Adjacent
periods of the year must be utilized together. Yellow colors
prevail closer to road surfaces while further from the road,
ground surface is often greener. Fields rarely consist of
one type of grass. Some places are wetter, other dryer.
Some places tufts are longer, others shorter, Feel free
to add wild grasses, weeds and flowers for visible variations.


09.18.2006 » Track
Ballast
My tracks should be here in a day
or 2 so in the meantime I’m working on the base
as well as the figs. Today, since the celluclay
can shrink when it dries, I filled in the cracks
between the styrene sheet and the existing celuclay
with more celluclay. If that shrinks more, then
I’ll use something else for the next cracks. Wood
filler maybe. I also laid my track section down
and poured some ballast onto it. I just wanted
to see how it would look when done. When I do
this for the final, I’ll have to clean it off
the ties and fill in the edges on the ends of
the tracks. Adding a few weeds growing in the
ballast will be a nice touch too.

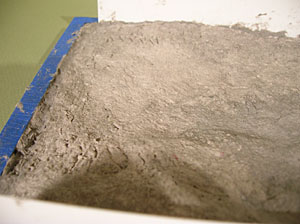
09.19.2006 » Dirt
The celluclay finally dried so I
was able to get a good bit of progress in on the
base. A few days ago I stained the base with a
dark Red Oak stain from Minwax. When dry the next
day I masked it off from the sides and clay with
blue painters tape. This afternoon I primed the
base in dark gray Duplicolor primer and when that
dried a bit I sprayed the flat sides with a flat
black spraypaint. After that dried for about a
half hour (dry to the touch) I removed the masking
tape and sprayed the whole base with a semi-gloss
clear-coat from a spray-can.

After this clear-coat dried I remasked
the wood and began painting the dirt with craft
acrylics. I mixed a color that was very similar
to Mig Pigments Russian Earth (P034). I painted
it on and left it to dry.


When the acrylics dried (about 20
minutes later) I took some Mig Russian Earth pigment
and placed it into a small container. I then dipped
a medium-sized brush into mineral spirits and
mixed a thick pasty slurry. I immediately brushed
this onto the base over the acrylics. I repeated
the dip, slurry, paint process till the entire
portion of the base I painted with acrylics was
covered. This went on very dark and shiney, but
when dry it lightens and makes a very nice matt
surface.


The plain Russian Earth base color
looked good, but I wanted to add some variation
in the tones of the earth to add to the realism.
To do this I dabbed on small amounts of dry pigments.
(Europe Dust P028 and Vietnam Earth P031) I then
worked/blended these into the base pigment with
a brush. This gave me a great overall color similar
to that seen in some JGSDF Type 74 training images
I was sent. See below for images. Next up is the
tracks and ballast.


09.20.2006 » Making
Tracks
More base progress today. First
I sprayed the tracks, metal plates (styrene rectangles)
and railroad spikes (straight pins) with dark
gray Duplicolor primer. (pictured below) I love
the spray tip of this primer as it produces a
vertical flat spray that keeps build-up to a minimum.
Afterwards I hand-brushed the tracks and such
with a rust-colored mix of Tamiya acrylics.


Meanwhile I used 5 minute epoxy
to attach the track ties to the groundwork. Then
I glued some sprigs of tall field grass in a few
spots next to the ties which will simulate weeds.
When everything dried I glued thetracks in then
the metal plates to the ties on both sides of
the tracks. When that ried I drilled small holes
in the plates with my pin-vice and into the ties.
I cut the sharp ends of the pins and glued them
into the holes. Lastly I poured on the ballast
and applied Future Floor Acrylic with an eye-dropper
to act as a glue to hold the ballast in place.
This larger ballast will be covered
later with a dry, smaller, crushed mixture of
ballasts. This will fill in the gaps and make
a finer looking and more in-scale look. This fine
ballast is mixed with powdered ballast cement.
When I apply water to it, it will glue everything
in place and hopefully be a strong pile of rocks.
I’ll also use pigment powders after this to rust-up
the tracks more. A last step will be to finely
sand the track-tops with fine steel wool to regain
their shine from use.

09.21.2006 » On The
Rocks
I’ve done a little more with the
track-bed. I applied my finer ballast/dry ballast
cement mix over the coarser stuff. Looks pretty
good. Adding some water mixed with white glue
really set the plie down firm. I added some rust
Mig Pigments to the tracks and later will apply
some dust to the rust to blend it in better. I
also sanded the top of the tracks down to the
natural metal to simulate the polishing wear of
frequent use. As a suggestion from BK I’ll darken
them up a bit with a little bit of oils and then
some powdered graphite. I’ll also vary the tones
of the individual ties with some oil washes. Below
is the latest image and a few reference shots
of train tracks. The first image is very close
to what I’ve been planning.


10.04.2006 » Greenery
I’ve added the Silflor grass to
the base as well as some shrubs. The grass went
on great, but it’s a little shiney so I had to
spray it with a little flat-Future. I didn’t apply
grass where the tracks are so that the tank sits
correctly on the ground.


![Maude [Cyborg Action-Doll] (Files Only)](https://fichtenfoo.net/blog/wp-content/uploads/2023/01/Maude-Promos-300x300.jpg)


