


Your cart is currently empty!
In Progress » The Legend of Bloodwind
05.09.05 » Story
He had once been an orphen. His family was attacked
by a group of bandits only days after arriving
on the colony planet known as Earth. Their bodies
torn to shreads, their home burned to the ground.
A traveling group of monks found him not long
after, alone in the middle of a canyon, covered
in blood and in shock. The monks took him in and
raised him. They taught him their ways of worship
and self-defense.
Ten years to the day the monks found
him he was in the Monesterys courtyard training
with his teacher. Suddenly the sound of laser
fire and explosions filled the air. A regiment
of SDR troops had mistakenly concluded that the
Monestery was a safe house for Mercs passing through
the region. The attack was swift and without warning.
Another explosion hit close and he was blown off
the courtyard, down a hill and into a ditch.
When he awoke he found the Monestery
and his foster family all gone. On that day he
swore to avenge the deaths of everyone he loved.
He took a vow of silence and joined the ranks
of the Mercenary forces. His reputation grew and
he left no enemy standing on the battlefield.
His comrads dubbed him Bloodwind after the silent
swiftness and ferocity of his assault.
05.09.05 » Concepts
and Variations
So since I started this whole FFForum
group-build thing, I’d better participate.
I figured that I’d do an SAFS for my first entry
and more if I have time. This first one is called
Bloodwind. The name was originally going to be
for a stealth GM, but I never got the ambition
to start the project. I had some kanji decals
printed though so I figured I’d make use of them
here and make up a story to match.
This kit is going to be pretty much
OOB with some added detail and a custom base.
I’m thinking grassy ruins this time. The pilot
hatch will be open and I’m going to modify the
pilot head to be shaved with monk-dots on his
forehead.
Below is my intended color scheme
and a bunch of other variation I messed with so
I thought I’d post them up. I usually do a bunch
of color schemes while deciding on a final, but
I never show them. Well, here’s part of what you’re
missing. LOL! Thanks to bhop for the improved
lineart illustrations.

Anyway, I started the kit today.
Should be a quick build. I’ll take pics tomorrow.
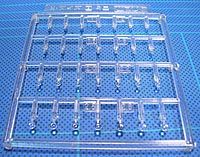
05.13.05 » Parts
The SAFS is pretty much cut-out
at this point. I’m actually farther along than
you see in these shots as all the parts have been
sanded and puttied/Mr. Surfacer. Currently I am
texturing the armor and making fabric-looking
joint covers from epoxy putty.
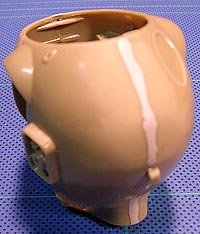
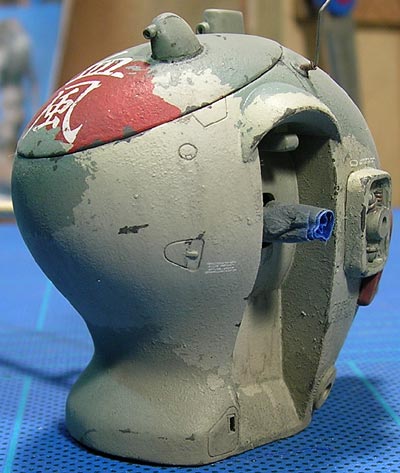
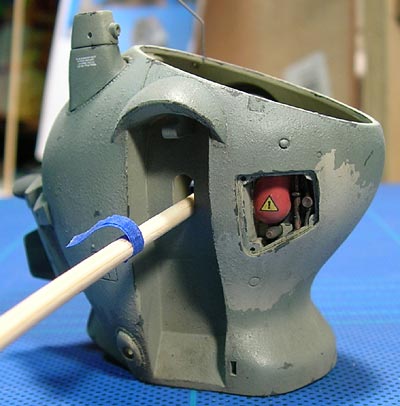
Here you can see the body. At this
point both halves were glued and sanded and a
line of Mr. Surfacer was applied to fill in any
hairline seems (which there were). At the bottom
front, you can see where I had to shim a gap with
some styrene. YOu can also see where I notched
out the female connectors for the front and rear
skirts with my dremmel to make them “snap-fit”.

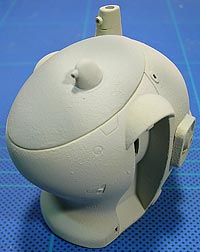
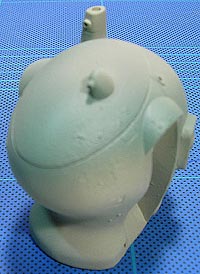
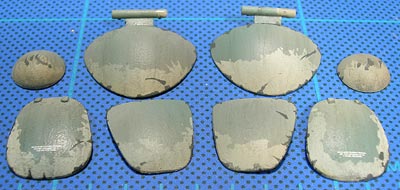
Here’s most of the armor skirts
and some other parts. Notice the “lip”
on the lid where the sensor meets the base. That
needs leveled out with putty.

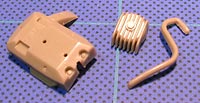
Here’s te arm parts. You can see
where I had to shim another gap with some scrap
styrene. I didn’t bother connecting the elbow
joints and such beforehand since I’m replacing
them all with cloth-looking epoxy putty.

The hand needs a little work. THere’s
a few pin-holes that were filled with Mr. Surfacer
and sanded and the sides of the finger joints
had no grooves. I grooved them with a razor saw
and Tritool. The head was connected to the sprues
at the ears so I need to sand off the poor ears
that were molded in and make new ones. Lastly
was some engine parts for the back of the suit.
These take some work to make fit properly.


Lastly, here’s a close-up of my
color scheme. I’m playing wth some ideas to achieve
this rough-edged look. I’ll either hand-brush
on the darker colors or use rough-torn tape to
mask to achieve the look.

05.16.05 » Ionic
or Corynthian, but not Doric
Magic sculpt rocks. Period. One
of the IPMS guys gave me a sample (thanks Steve!)
at the last meeting and I decided t try it out
on my joint covers. This stuff is a two-part epoxy
putty similar to Miliput, but it molds so much
nicer without all the stickiness that you get
with miluput. I was able to do most of my shaping
before it set-up as opposed to Miliput where you
shape it slightly then carve and hack at it and
hope for the best. The first shot is of my right
arms cloth sculpts. I still need to do a little
clean-up but I think it’s pretty good! The second
shot shows the wire between the left arm before
the Magic sculpt was applied.


 I
I
also got to work on my display base. I’m going
for greek column ruins in a field. I started off
with a finished base and added joint compound
mixed with fine crushed talus. Before it dried
I added a few rocks and the sculpted column.
The column was made from PVC, Joint
Compound and strips of styrene. I made a diagram
of how I built it in case anyone wants to build
their own.
A: 1 Inch PCV pipe
B: I cut strips of styrene appoximately
1/8″ square and glued them around the outside.
C: I put joint compound in a zip-lock
bag and cut the corner off. I squeezed it into
the grooved between the styrene strips. I then
used my finger to smooth it out and create the
concave channels.
D: You can see the general shape
of the channel.
E: When dry I sanded it down to
remove the excess joint compound from the styrene
and used a razor saw to cut the seams where the
column pieces would fit together.
F: I used a dremel bit to make the
nicks and weathered damage that would happen over
thousands of years and a few world wars.
Finally I added another glop of
joint compound to the top and pressed some sand
into it to creat the broken/weathered top. (see
below) I still need to paint and weather it and
maybe give it a marble grained texture using a
pencil. Hmmm… those “retail rendering”
classes I had in art achool are paying off!

Here’s the general pose of the kit
on the base. The arms are not properly posed yet
as I need to properly glue them to the kit after
painting. The ground will be weathered and drybrushed
more and will have tall grass added to it. I bought
some dead/harvest gold colored grass to mix in
with the green stuff I have left over from the
Griffon.

05.19.05 » Paint and
Base
I started painting the SAFS last
night. To achieve the rough-edged look I ended
up testing rubber cement as a mask and to my delight
and glee it worked out great! I got a very jagged
rough edge. The first shot shows the results on
a test piece. Ignore the colors as they’re not
the finals and only for testing purposes.
The second shot shows my first paint
coats. What I did was start with a slightly green
sand color. Over that I sprayed a grey-green in
a mottled pattern and over that I sprayed that
same green with some sky-gray mixed in. All paints
are Tamiya Acrylics. After that cures I’ll apply
the rubber cement and spray the darker colors.
Below my photos in my inspiration image for this
kit. I’m going for a rough look and if possible
will attempt to make it look water-colored like
the image.


Next up is the base which I completed
yesterday. The column was weathered with an oil-wash
of black + burnt sienna. The grass is “Woodland
Scenics” field grass. I used two shades;
light green and harvest gold to make the grass
have a more realistic end of summer, but not quite
ready for harvesting look to it. Glad I don’t
have to bail hay ever again! Bailing hay is itchy
and not all that fun. Well… watching the bailing
machine cut, wrap and toss the hay into the trailer
is fun, but aside from that… itchy.
Anyway… I made certain to make
the grass spread out where the foot would be.
Later I’ll wet the white glue and press down where
the previous footsteps were to make a “trail”.
This will add some nice realism to it.


05.19.05 » Paint Chip
Camo
I have a new favorite technique!
I will use this again! Basically I was trying
to figure out how I’d do the rough edged camo
for my SAFS. After talking with Mitchell about
liquid masks I found an article on simulating
paint chips using rubber cement. Rubber cement
is perfect for this sort of thing as it doesn’t
soak into the Tamiya Acrylic once cured and rubs
off easy with a ball of dried rubber cement or
a rubber cement ‘pik-up‘.
I took some picks so here’s a little
step-by step. I used Bestine Brand Rubber Cement
and Pik-up. More
info is here. I also used an old frayed paintbrush
for application.


First paint your kit it’s intended
base color. I used a light green/tan and mottled
it with my airbrush by adding darker colors to
it. Once the paint cures, apply the rubber cement
with the frayed paintbrush making sure to dab
it on the kit to get the rough edge.

After the rubber cement dried (under
5 minutes) I sprayed on my next shades. I used
a darker gray/tan/green first and sprayed it on
randomly and thin. Over that I sprayed the same
color mixed with 50% future several more times
with a little black, clear green, or clear blue
mixed in. This gave it a mottled and random look.

Finally I used my “pik-up”
(or a ball of dried rubber cement) to rub off
the cement from the kit. It rubbed off of my flat
paint with no trouble. Below is the final result.

Later I’ll paint the details, clear-coat,
decal, filter, wash, and weather. You could also
first paint your kit a dark gray and use little
bits of rubber cement to simulate paint chips.
05.20.05 » Blood Stripe
Last night I painted the red stripe
on the arm and hatch. I was gonna do one on the
back as well, but decided against it. I used the
same rubber cement technique as above, only I
added tape for the larger areas that I needed
to mask and only used the rubber cement to get
the edge I wanted.

05.23.05 » Chipping
and Decaling
Since my last update I’ve gotten
the paint chipping and decaling finished. I used
a small brush and thinned dark gray Tamiya Acrylics
to paint on the chips. I also used a 2B pencil
to do some of the smaller chipping and scratching
around greeblies and hard edges.
For applying the decals onto the
rough texture I found that instead of letting
them sit and dry while the microsol does it’s
work, that taking a damp paper towel on my finger
and pressing the decal into the texture worked
best to prevent silvering. I did this after the
microsol softened the decals somewhat and as a
final step. Don’t use your bare finger as the
decal will stick to your fingerprint grooves instead.

Below are pics of my chipped paint.
The pencil lines don’t show up that well yet due
to the glossiness or the graphite and the future
coat. They’ll show up better once it’s flat coated.


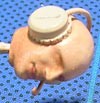
FInally, here’s pics of my pilot
head so far. However I had a bit of a disaster
this morning which is causing me to rethink the
whole head thing. I was putting the inside hatch
greeblies back onto the skewer and busted the
eyepieces off and lost them. But it’s fine I was
debating on using the head in this kit anyway
and making it a closed cockpit only piece. This
event decides for me. I will use the head on my
Heinrich though as I was gonna do another bald
head for that one anyway. Here’s some pics though
anyway. I was scratchbuilding the headset from
magic sculpt, minus molds and copper wire.

05.23.05 » Weathering
Since it was a rainy day I got a
lot done. First I gave the kit a wash. The wash
consisted of White, Black, Burnt Sienna, Yellow,
and Blue oils plus Klean Strip Odorless Mineral
Spirits. This gave me a dark mucky gray-green
wash. I brushed it liberally on the parts (one
part at a time) and while each part was drying
I used the same brush and lightly brushed down
to build up wash into oily rain marks.
After that was done and dry, I applied
a filter. Missing-Lynx says to basically use a
thinner wash for a filter, but I decided to use
Future Floor Acrylic + Tamiya Acrylics instead.
I mixed 1 airbrush cup (badger crescendo) full
of Future with 1 drop Yellow, 1 drop orange, and
one drop Field Gray (dark olive drab). This gave
me a very thin color. When I sprayed it on the
kit the result was barely visible but that’s what
a filter is. It slightly changed the overall color
to make it warmer without obscuring any of the
details thus blending all the tones together.
I think when I do a winter suit I’ll use a slightly
blue filter. Should be cool.
Next I gave the kit a flat coat
of Future. After that I mixed up a Flat Future
+ Mud color and sprayed that on the legs, lower
body & skirts, and the ends of the arms concentrating
on the feet. This is where dirt would collect
as it was kicked up by walking. Here’s the pics:
« before filter

« after filter

05.24.05 » Last but
not least
Lastly I did the sensor eyes. I
used Waves small H-eyes for this. They’re terrific
and I totally recommend them. They come in various
sizes and are convex enough to function like a
lens. Here’s a pic:

![Maude [Cyborg Action-Doll] (Files Only)](https://fichtenfoo.net/blog/wp-content/uploads/2023/01/Maude-Promos-300x300.jpg)


