


Your cart is currently empty!
In Progress » Tactical Armor Deployment
01.28.2006 » Concepts / Intro
Finally! Here’s another diorama project that
I have been planning for well over a year, but just haven’t
gotten around to. The excuse for this one is good though.
I really needed practice at armor and to become a better modeler
to pull it off. With the completion of my KV-2,
and while my mindset is with AFVs, I think it’s time to finally
start this one.
This diorama will consist of the Tamiya JGSDF
Light Armored Vehicle, Tamiya JGSDF Iraq Humanitarian Assistance
Team, Academy Mutt Jeep, and 2 Bandai Raiden Tactical Armor
Type 17’s from the anime ‘Gasaraki’. The setting will be the
Middle East and will depict a deployment of the TA’s based
on intel from a local security officer. The officer will be
driving the Mutt Jeep which (in my alternate universe imaginary
timeline) was part of some long-ago U.S. arms deals where
old surplus equipment was given to Middle Eastern countries/freedom-fighters/whatevers
in exchange for intelligence/etc… The Jeep has long since
been repainted and will have a worn desert feel. The JGSDF
equipment will be painted in desert camoflague in buff and
green as seen below.


« LAV not to scale with TA
I’ve been wanting to do a desert setting for
a while now and I think this is just the project to do it
with. I’ve got my desert MIG Pigments ready (Beach Sand and
Gulf War Sand) and am raring to go! I’ll be making little
modifications to the TAs to make them look more in-line with
the LAV. I’ll likely make a new weapon for one and also do
one with more armor as more of a “point-man”. The
knees in particular are screaming for more defensive armor.
They look like an RPG could take them right out. I might make
something like hockey-goalie shin-gaurds with reactive armor.
Maybe… It’ll be a try and see thing and only used if it
looks good.
Base-wise this won’t be an excessively large
dio. Only about 13-14″ x 8-10″. That gives me enough
room for the jeep, LAV, one sitting Raiden and one walking,
a wall, some refuse/rubble, figs, a palm tree, and a nice
amount of “white space” to boot. The ground-work
will be a sandy, dusty lot with small stones strewn about.
There will be rubble from the old wall and a fridge and other
“garbage” from a resin refuse set p-trax picked
up for me. The sitting TA will have the pilot climbing into
the mech from the rear hatch. I’ll have to heavily modify
a fig for that. The arab jeep driver will be the driver that
came with the jeep, but with a beard and head-wrap and a modified
pose.
01.30.2006 » M151A2 Mutt
I decided to start on the Mutt jeep first as
it needs the most work and will likely be dropped if I did
it last. It’s just so poorly molded with huge pin-marks, lots
of flash, and inaccurate as well. Normally as most of you
know, accurracy is not my thing, but then why be accurate
on a giant robot that doesn’t exist anyway? I made the mistake
of looking for photo reference of the jeep and found a lot
of things that I’m changing. Other things I’m removing or
scratch-building just because the original parts are so bad.
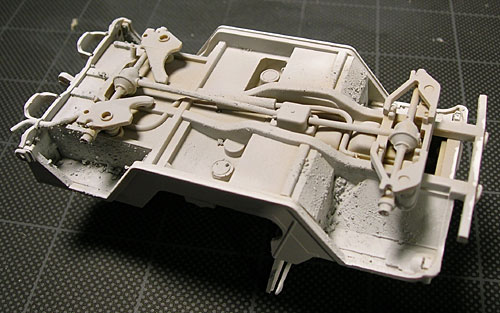
First off image-wise is the lower chassis with
the rear and side-walls glued on.

There’s gaps of course on the front fenders
which added shims of sheet styrene to to fill. I thinned the
hood underneath in order to make a dent. This will hopefully
help the kit to look more old and beaten. I also removed the
guide-tabs on the rear fender-tops that were for the antenna
brackets.

The tires are wreird in that the back-sides
are a seperate piece that you glue in and fill the seam on.
Personally, I’d rather have 2 halves for these than have a
weird spot to sand, but it’s not a huge deal. Although I say
that having not sanded them yet. I used an exacto to scrape
off the flash around the tires. I drilled out the molded-in
headlights on the Jeep and have since filled them with apoxy
sculpt to make concave surfaces. I’ll use clear Wave lenses
to make new headlamps.


A comparison shot of the Mutt to the JGSDF Light
Armored Vehicle. I can’t wait to start the LAV as you can
see, the body is molded so nicely and crisply. Unlike the
damn bad-molded Mutt.

Next up is a shot of the Mutt looking more jeep-like.
I’ve since replaced the brace-bar for the machine gun stand
with wire and made a new mount for the pole. I need to take
more pics as I’m a few days behind on in-progress images.

02.01.2006 » M151A2 Mutt Customized
I was looking through a box of M-10 tank parts
that I use for details and such for a set of headlights to
replace the Mutt kit ones with. The Mutt ones were horribly
molded so they needed replaced or a lot of work. I opted for
replacing them. While looking through those parts, I came
across the machine gun for the old WW2 tank and thought it
looked way cooler and more menacing than the one that came
with the jeep so I modified the stand and cleaned up the tank
machine gun to use instead. It’s bigger, beefier, and well…
cooler. I had some resin ammo boxes for it so I set those
in the back of the jeep along with a backpack. I made straps
for the jeep from lead-foil. (Thanks Bill and Barry!) I liked
the steering wheel for the tank better as well and replaced
the kit shovel with one from an M-8 Greyhoung that had the
mount staps molded on. Antenna was made from stretched sprue
and coiled wire. Aside from finishing the main headlights
on the front, this is about ready for primer. Here’s some
pics:


02.01.2006 » JGSDF Light Armored
Vehicle
Man… I am so glad that I built the Mutt jeep
first because it’s poor molding and part-fit is making me
appriciate just how wonderful the JGSDF LAV from Tamiya is.
I believe this kit came out on 2004 or so. I’ve had it for
about a year I think. Very nice crisp molding. REALLY nice
crisp molding. I’m impressed enough that I might pick up a
second one and build it later and I’m only about 1/2 way through
the first. Enough gushing… onto the pics:
First up is the body test-fitted to the pre-primed
die-cast chassis. That’s right… METAL! It’s nice and heavy
and seems to work rather well. Some of the suspension parts
will actually screw into the chassis. The body as you see
in the first pic is all molded in one piece. I’m not sure
what kind of crazy multi-part mold they used, but its vents
are hollow/see-through and the tow-rings are molded onto the
body. At least those ones, there’s more to come. It has a
nice non-slip texture molded into the body, but I’m not sure
how well it’ll show-up after priming and painting.

Next is a few shots of the beautiful suspension.
It was designed so well that I only had 8 tiny seams and some
flash to clean-up. It looks very nice and detailed as well.
It’s a shame that a lot of that will be hidden once the tires
and rest of the body are attached.


The tires are molded in a soft black vinyl.
They’re really nice and the metal chassis gives weight to
them. The wheels actually have metal pins that push into polycaps
in the suspension which is just awesome to me as a Gundam
modeler. The tires have a very small line of flash down the
center that I’ll try to sand off later. Real tires have some
flash, but this is out of scale and would be worn down after
use anyway.


The interior is very nice and will provide a
new challenge to me as I’m so used to painting everything
at once. I’ll have to build/paint/weather the interior first
them do the outside. Fun! The dash (not pictured) is very
nice and detailed and the seats just look beautiful to me.
The only problem there is minor injector marks on the back
which are easily sanded, puttied and sanded again.


02.08.2006 » Boxed up
The LAV is ready for primer and paint so is
being set aside for now while I work on the next parts of
this project. I wanted to make this base resemble a staging
and resupply area in the desert. To do that I went looking
for armor updates sets for stowage and whatnot. There’s a
lot of expensive stuff out there that looks good, but can
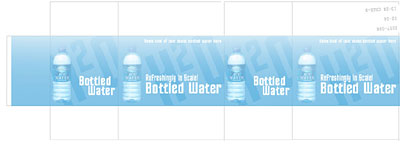
be made myself for cheap. One is cardboard boxes of MREs and
bottled water. In Illustrator I made a box template then added
the text and such based on reference images I found. The MRE
boxes are US, because I couldn’t find references for JGSDF
ones. The bottled water ones are of my own design based on
those I’ve seen.

I need to get some thin and smooth brown paper
for the MRE boxes. I used brown packing paper for the test
one and it’s too grainy in texture. See below.

Below are the templates I made for the boxes.
At some point I’ll make a PDF of these for everyone that’s
interested.

I have an old scrap of MDF board that I’m using
for the base. I’ll add a frame around it later to make it
look nice. I sketched on top of the board where I want everything
to be placed to get a rough idea of how everythink will fit.
The Ishtar is sitting where the sitting Raiden will be. The
arrow below the scribble to the left is where the walking
raiden will go. Behind the wall will be a palm tree and more
stowage/rubbish. You can also see a few crushed water bottle
boxes. One is flattened, the one behind the jeep has some
flattened clear-plastic heat-formed tubes I made to be smashed
water bottles.

To add to the piles of stuff I used an extra
wheel, oil drums, german tank ammo crates and a large wooden
equipment crate I made from styrene strips. I’ll be adding
more to the piles later such as tarps, ammo cases, and more.

Finally for this update I needed the driver
for the jeep. I found some pics of Afghan and Taliban fighters
and am modding a Tamiya German Tank Loding Crew fig to be
my arabic driver. One of the figs was bending down to pick
up a shell from one of the crates. I decided to use him and
modify him to be loading an MRE box into his jeep. Click
here for some figure reference from Armorama. I need to
modify his clothing a but to add the vest and long shirt thing.
Shouldn’t be any more difficult than the batman I modified
from a US soldier fig. I’ve already started the beard, mustache
and head-wrap.


02.09.2006 » Modified Color Schemes
This was talked about and figured out in the
forum, but I wanted to put it in my in-prog page as well.
I went searching for a JGSDF desert camo scheme and that search
was not easy. A few friends of mine in Japan had no idea and
no amount of searching came up with anything. Finally I found
an image of a JGSDF Type 82 with a brown/tan scheme so based
the next images off that.

I’ll be using the last scheme for the Raiden
and LAV as I found the one in the pic to be somewhat darker
than I’d like. Then BK gave me an idea to make some of the
leg parts on one Raiden green to suggest that they were recently
replaced and still had the factory paint-scheme. That scheme
is below and you can see the green on the lower left leg.
I think it adds a nice bit of visual interest.

08.29.2006 » Back to work…
Been a while, but I’m back on this project.
In order not to have it become an overwhelming project, I’m
taking it a little at a time. First I’m almost ready for weathering
the LAV. When that is done I’ll finish up the Jeep since it
just needs painted as well. Then I’ll do both the Raiden TAs
and finally the figures and diorama.
But first off the LAV. I primed it with dark
gray duplicolor then gave it a base coat of Tamiya Khaki,
followed with XF-73 JGSDF Dark Green. This is different from
what I planned above, but give yourself 6 months and ideas
will change. Not completely mind you, one of the TA will be
desert and the other will be painted in this same scheme just
to mix it up as if the JGSDF was brought in as a humanitarian
force, thus the non-desert color, but got dragged into a broader
conflict. This was some machines, the ones that were there
longer haven’t gotted the full desert scheme painted on them.
I hand-painted all the little details then gave
everything a gloss-coat of FFA to smooth the surface for the
decals. When all the decals and small bits ere painted I gave
all the armor a satin finish. Normally I’d do flat, but the
Mig FAQ book suggested satin so I figured I’d give it a whirl
and see how it works. I actually like the satin as it’s flat-ish,
but still has a “sheen” to it which helps with the
realism I think. Here’s a few pics, none with the satin yet
as that’s curing.


08.30.2006 » Satin and Filters
Today I added a few filters to my LAV today.
This was my first time trying the technique so it was hit
and miss. My first filter’s result was not much of a change.
I used a very thin sandy color. My second filter (yellow-orange)
done much later did better to filter the color, but the end
result was similar to that of a wash in places. I believe
the problem was that I left too much of the filter pool in
places. The good news is that it looks like a sandy wash which
weill happen next anyway so no worries.
Anyway here’s a few pics. The first 2 are of
the LAV with just the satin-coat. The last image is after
both filters were applied. Sadly they’re not showing up in
the images, but believe me, they look nice and add to the
look.


08.31.2006 » Lights and Mirrors
Today I added the lights and mirrors as well
as masked off/painted the amber lights on the front and front-sides.
This was done with a base of Alclad Aluminum covered with
Tamiya Clear Orange. The mirrors were painted with Alclad
Chrome and look fantastic!


09.01.2006 » Chip,
and Fade
Armor chips were added to this Light
Armored Vehicle using a mixture of Tamiya Flat
Black, Nato Brown, and Dark Gray while aluminum
chips were done with Rub-N-Buff. These were done
with a very small paintbrush and very carefully.
I didn’t add too many for verious reasons. The
vehicle would not be too old and would be well
maintained, plus there will be a lot of sand dust
covering the vehicle. I’m going to mask though
so that I’ll have some scrapes of the sand revealing
the base-coat. I also put the interior together
and dusted it with a Mig Pigment mixture of Beach
Sand, Gulf War Sand, and Light Dust. Here’s a
couple pics before the fade info…


09.01.2006 » Chip,
and Fade – Part 2
Next up on the Light Armored Vehicle
before I do a sand-colored wash was “fading/discoloring”.
This is a technique I learned from Xtreme Military
Modeling and from my FAQ book. It worked great
on my KV2, Mosquito, and Raptor so I used it here
as well. Basically you dab some oil-paints on
the surface, I used UM Blue, White, and Sand,
then blend them into the surface with clean thinner.
The result is fantastic and gives you a surface
with a nice worn look. Here’s some pics. Next
up will be a sand-colored wash followed by rain-marks
(yes, the desert gets some precip) airbrushing
sandy dust along the lower half and rear panels
of the vehicle.


09.01.2006 » Grit
and Wash
Before my wash, I added some finely
crushed talus on the underside of the Light Armored
Vehicle where mud and crap would get kicked up
and stuck. I applied it by first brushing on flattened
Future then pouring on the grit and brushing off
the large chunks. This will later be painted over
with a sand color.
For my wash I mixed up a sand color
from white, yellow and burnt sienna oils with
just a slight touch of blue to dull its brightness.
This was mixed with mineral spirits and washed
into crevases and all over. the end result looks
fantastic. As if dust collected around every bolt
and jutting object, but it also left splotches
of what looks like random dust all over. I’m thrilled
with the result. Next-up pre-dusting…


09.02.2006 » Pre-Disting
The next step was a predusting with
my airbrush and a sand-color I mixed from Tamiya
Buff, Desert sand, and white. This mixture was
thinned with Tamiya Thinner at a ratio of about
20:80 paint:thinner to get a very thin mist. Before
I could spray it on however I needed to mask off
a few things. I masked off the centers of the
windows as if they were wiped clean. I also masked
off the large insignia on the side and back doors.
This was common for JGSDF personel operating in
Iraq. I also masked the lights as if they needed
cleaned too to function properly. I also taped
the doors on from the inside so that I could remove
them afterwards and position them open or closed.
I then sprayed the dust mix randomly all over
the vehicle, but concentrating on where it would
build up the most such as the rear panels and
lower half of the vehicle. Next up is the Mig
Pigment dusting to add to the effects.


09.03.2006 » M151A
Mutt Time!
In case you don’t know, the LAV
is done! Click here
for pics »
The next vehicle for painting in
this diorama is the M151A Mutt… your basic and
classic Army Jeep. This one was sold in an arms
deal to a Middle Eastern country. Years later
and long after a new coat of paint it ended up
in the hands of some militia. Retrofits were made,
blah, blah, blah… basically I have a Jeep I
won in a raffle and this seems like a great place
to use it!
I built this the same time as my
LAV so all I had to do today was a few minor tweaks,
prime and paint it. Before painting, I decided
to try a new technique using the same grit for
under the wheel wells. This time I mixed the grit
with Mr. Surfacer and dabbed it around the wheel
wells. This turned out great! Afterwards I primed
everything and 6 hours later decided I couldn’t
wait any more and started painting.
I painted the main body of the Jeep
white with my airbrush. The underside was later
hand painted with dark gray. When the white dried
enough I mixed some black, brown, and gray and
started on the paint chips. I want this vehicle
to have a VERY worn, out of date, and poorly maintained
look so a lot of chips were in order. I first
painted chips onto the entire vehicle with a small
brush. Then I took a small ripped-off piece of
cheap spounge and dabbed the smaller finer scratches
and worn areas. Here’s the result. There’s a sharp
contrast, but after filters and weathering, they’ll
all blend in better. I absolutely love how they
turned out in the bed!


09.04.2006 » Painting
is done!
Almost of the painting and paint
chips and clear-coats for the Mutt are done. All
I have left are the clear-colors for the lights,
but need to do them after the filters, but before
the washes. Below you can see all the parts laid
out awaiting a plethora of filters tomorrow when
the satin coat dries. I tried to vary the colors
I used for the accessories to give it some more
realism and depth. I think I used 5 different
greens, 4 grays, etc… I especially like how
the wheels paint chips turned out.

09.05.2006 » Filters
Today I applied the Filters to the
Jeep. The first was a yellow-orange (pic 1) and
the second was a grey-orange color (pic 2). Again
I used oil paint thinned with lots of oderless
mineral spirits. The change to the color is subtle,
but it makes the tone look more desert-like. As
if a buff-color was very faded after years in
the sun. It also shows up better than the one
I did on my LAV. While I waited for the first
filter to dry, I started on the two 1/35 Gasaraki
Raiden kits. No pics of them yet as they’re just
a pile of parts.


09.06.2006 » Discoloration
and Base Layout
I applied the “discoloration”
to the Mutt. This was done as I did with the LAV,
buy applying dabs of oils and blending them with
clean thinner. The result of the filters and discoloration
are great and make the white jeep look very “deserted”.
Next up is the sandy wash, but this needs to sit
and dry for a while before that.

So while the Jeep dries I started
messing with the base layout and building the
TA Raidens. I placed the main items on the base
as I initially intended and noticed a problem.
The standing Tactical Armor obscures the LAV.
(image 1 & 2) I wasn’t sure how I felt about
that so I played with the layout a bit. I basically
just swapped the Jeep and LAV and 2 Raidens, but
this layout gives me more base room for figures
and puts the things I want to show off in the
front which is the sitting TA, figures, and LAV.
Plus the taller items end up in the back like
the palm and standing TA. This however REALLY
obscures the Jeep.(3 & 4) I like this layout,
but as I gather boxes and such for the supply
depot, I’ll have to play with it some more.
 1
1
 2
2
 3
3
 4
4
09.08.2006 » Filters
Last night I added my sand-colored
wash to the Mutt. This really brought out the
desert feel of the kit. Scroll up and compare
the image below to one of my first white ones
to see the difference the filters and washes made.
Next up is initial pigment powders for the rust
then predusting with the airbrush.

09.08.2006 » Rust
and Dust
Now for the final steps of this
piece which is the weathering with pigment powders.
First I added the rust pigments I did these first
since realistically they’d be covered by the layers
of dust. I applied them mostly with water then
dry-brushed them with a clean dry brush to fade
them out.


Then after the rust was applied,
I added a pre-dusting of the same sand-color-mix
used on the LAV with my airbrush. When that dried
I began applying the various dand colored pigments.
I still have some of the Jeep, the tires, gun,
and the extras to go, but here’s a pigment progress
shot:


![Maude [Cyborg Action-Doll] (Files Only)](https://fichtenfoo.net/blog/wp-content/uploads/2023/01/Maude-Promos-300x300.jpg)


