


Your cart is currently empty!
In Progress » Maintaining the Malevolent Creature
 07.13.04
» The Story…
The smell of oil and ozone fills the air as the support
crew of Unit 22 struggle to complete repairs in the dim light of
their bunker. Their megalithic charge looms overhead, a MS-06F Zaku
II. Most of the repairs have been completed except for the right
arm. In the opening artillery barrage, it took several hits, and
needs work before the giant can return to battle.
For the past seventy-two hours, their underground
base has been under siege, their giant doors, bombarded by artillery
fire. Deep within their excavated borrows they’ve so far been safe.
The doors have held, but unless they can get their last remaining
Zakus running, they’ve no hope of disabling the Federation Gun Tanks
and their supporting Mobile Suits.
07.13.04 » The Big Build
Okay, I think I’m insane. My next project is going
to be a Perfect Grade (1/60 scale) diorama. I’ll be using the PG
Zaku II MS-06F undergoing maintenance in an underground cave base.
Should be a lot of work, but a lot of fun as well.
The Zaku colors will be based off some aircraft camoflauge
that I found while doing some research for the Cloud 09. For the
main shield decal, I was inspired by a book on fairies, gnomes,
goblins and other creatures. The book is great and has TONS of drawings
and sketches. I drew this one with a twig axe with a Zaku Heat Hawk
inspired blade.
For the record, this won’t be an F2 conversion,
I just used the lineart since the PG manuals was already colored
in and Zakus have basically the same parts anyway.

I’m going to attempt some uber-detail painting on
the internals and so some added greebling to the outer armor. Minus
molds and maybe a scratch-built gun as well. I’m going to try and
light both the Heat Hawk and the Zaku Machine Gun lens. More on
that as I figure it out.
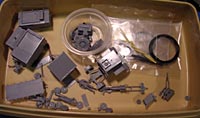
For the repair crew, I got a few Hasegawa Figure sets
in 1/72 scale. Now you’re thinking “Wait, I thought that this
was a 1/60 scale Zaku?” Well, putting the 1/72 Hasegawa figs
next to the Bandai 1/60 figs made me realize that there isn’t much
of a difference size-wise. I got these from Best 1 Hobby with some
of my winnings from the Dec 2004 Gundam Comp.

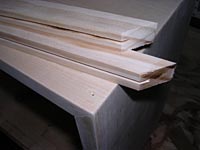
The cave will be constructed inside of a wooden box
which I have already constructed. The inside size of the box is
12.5 inches wide by 13.5 inches tall. I’ll most likely be making
the cave structure from celluclay or joint compound or both. The
box will have a hinged wood and plexi door on the front and back
to keep out dust and allow for viewing from both sides. I’m going
to also attemt to mount it on my wall in an empty spot to save myself
shelf space.

For girders, walkways and railings, I found a few
train accessories cheap at a local hobby store. I got 4 sprues of
fencing for about $5-6 and 5 sprues of “box girders” used
as railway bridge option parts for around $12.


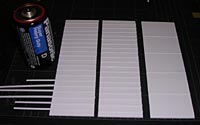
To light the cave, I’ll be constructing several “stadium”
style light arrays with white LEDs. The LEDs will be laid out 5×3.
Not sure of the power supply yet, but I may have to go with C or
D size batteries since I’ll be using 34 + LEDs. See below for the
array concept drawing.

07.13.04 » Cutting and Sanding
My least favorite part and unfortunately this kit
will require a lot of it. I started the cutting of the PG yesterday.
For 2 hours of cutting/sanding, I’d say I got pretty far. The head
and the shoulder internals are all cut/sanded. So far it seems like
it was placed better into the sprues than the Ex-S. A lot of the
flash-marks are hidden in one way or another which is great. Plus
I haven’t had a part with more than 3 sprue attachment points yet.
I swear some of the smallest parts on the Ex-S had like 4 parts
to sand, all in the most obvious of places.
07.14.04 » Two Arms! Two Arms!
Two arms… so far. Just need to do the shoulders.
Next up is the legs.

Also, here’s a shot of the 1/60 Zaku Pilot (green)
next to the 1/72 Hasegawa Pilot (gray). The Zaku pilot is only slightly
bigger so it won’t make much of a difference in the dio.

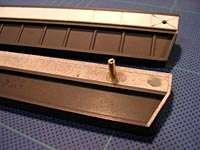
07.17.04 » Freight Boxes
So far on the Zaku, I’ve gotten to the leg internals.
Next is the feet internals, then the leg/feet armor. I was getting
a little tired of sanding so I thought I’d take a break and temporarily
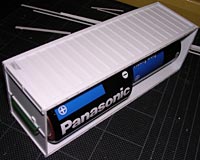
move onto a scratch-building project. I’ve been trying to decide
where I would put some batteries. With 30+ LEDs I’m going to need
a long supply of power, so I decided to use D-cell batteries. To
have a place to put the D-cells I made a “freight” box.
The type you see on ships crossing the Pacific. I made a smaller
freight box to hide the switches under. I’ll me making several more
of these to place around the repair bay.
Here’s some pictures:

07.18.04 » Cranes and Controls
Since this is a maintenance bay for a rather large
giant robot, I thought it’d make sense to have a crane to maneuver
the large robot pieces into position for repair and installation.
At first I was going to build a series of girders
with tracks along them suspended from the ceiling. The track would
have a “crane car” that would hang and move about. Well,
after some thought I realized that it wouldn’t be a very efficient
system for moving cargo into anyplace on the floor or above. The
long boom style crane however would be perfect since it can swivel
360 degrees AND move its cables up and down the boom enabling it
to place parts/cargo anywhere in that 360 space. Here’s a pic of
what I’m planning:

While nothing on it will actually move and the cables
will be static, I still want it to look somewhat realistic. The
large box on the back would be for ballast. The cables on top of
the “box girders” will be for supporting the crane. The
crane will be hooked up to the ceiling where it will be able to
rotate 360 degrees.
Now this crane would need a place to be controlled
from. I’ll be building a small box with a glass windowed front to
be the control room. There would be no room on the actual crane
for this. The rooom will be built into the cave wall. A set of stairs
will lead up to a platform where one could enter this room. The
room will be lit and I may use some blue LEDs to simulate the computor
monitors. The stairs and platform will have railings, but I didn’t
put them in the sketch. There will also be a cat-walk suspented
from this platform to get to the pilot hatch on the mech. Here’s
a pic without the catwalk since I’ll have to decide what to do with
that after I do some measurements.

08.01.04 » Changes both good and bad…
So I’ve decided the lighting arrays just are not gonna
look right. Instead, I’ll be going with a “warehouse”
style of lighting where I put lights at intervals along the ceiling
girders.That should work fine.
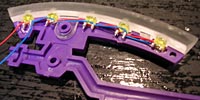
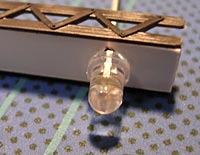
I managed to light up the heat hawk EXACTLY how I
wanted to so that the light will just light the blade edge. Unfortunately,
sometime after I glued and sanded the axe halves together the lights
decided to not work anymore. I managed to pop out the blade and
check the LEDs and they were fine. Somewhere in my wiring, there
must have been a snapped piece. Long story short, I salvaged a few
of the yellow LEDs and the blade will no longer be lit. Ah well…
better luck next time.
I’m not concerned though as it was a side project
and wasn’t even going to be lit in the diorama anyway. Here’s some
pics though of how it looked before the disaster.

I’ve got the whole Zaku cut and sanded. Now I’m just
adding greebles like minus molds and d-rings. Here’s a few shots
of the shoulder.


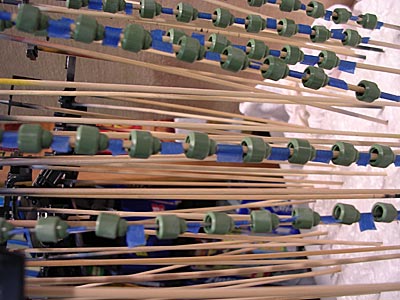
I figured out a way to paint many of the beads at
once, but still keep them separated. For those that fit on skewers,
I separated them with folds of tape. For those too small for the
skewers, I used wire to do the same tape trick. This will make painting
them much easier and quicker.
I’m still toying with different options for the crane
system as well. For now though I’m going to focus on the Zaku internals,
then the armor, then I’ll move onto the dio.
08.04.04 » Let there be paint!
I’ve had a cold since Wednesday. Blah! I’m starting
to get over it though so I decided to paint. I was putting it off
due to not wanting to get my respirator all snotty and infected.
While I was waiting, I started building the Hasegawa Aerospace equipment.

Anyway, as usual, I started with the boosters. I made
a dull “brick-red” color for those. I got a dual use out
of the color since it looked great for my larger freight container.
I also painted the tips of all the pistons yellow-orange. I may
go back and add black stripes to make them “warning”-ish,
or a may leave them orange. Haven’t decided yet.
Here’s some pics »

08.08.04 » Metallics & More
So to paint my Zakus boosters, I used the same technique
that I used on my Cloud 09. First I painted the insides with a red.
Next I put sticky-tack inside of the boosters to mask the red from
the outside colors. I then painted the boosters with a mixture of
Tamiya Coppor and Bronze. Lastly, using a “max” technique
I painted the outsides with a mixture of Gunmetal and silver. I
sprayed the gunmetal thinner near the edges so that the coppor-bronze
would show through a bit. THis gives the metal a “burned”
sorta look.
I did the same thing for the gun, only I used straight
Gunmetal with no silver mixed in.
For the bullets that will go inside the machine gun
cannister, I used Tamiya “Titanium Gold” with nothing
added except thinner. It has a nice pale brass color to it and is
very shiny. I have also gotten my two primary internal tones painted.
One is a medium gray, the other is a darker medium gray + gunmetal
+ metallic gray. The color is awesome!
Here’s some pics »


08.09.04 » Internals
I started detailing the internals today. I’m hand-brushing
most of the pipes and rivets, but the pipes on the backpack halves
were airbrushed. You can see how the backpack “tanks”
are the same rusty red as the boosters and freight box. I think
the variety of tones there will look great when the backpack cover
is displayed open.
After I am done with the painting, I’ll be putting
down a coat of Future and then doing a chalk wash for mechanical
grime. After that will come a very light drybrushing of silver.
I’ll be doing a few more weathering techniques as well, but we’ll
save those for another update.
In the PG Zaku manual, there’s a picture of 2 Zakus
test-fighting. One has red stripes on its elbows. I love how that
looks so I did it to this kit.
Pics »


08.12.04 » Wash Behind Your Gears
Wash time. I have sprayed all of my internal parts
witha gloss coat of Future and have let them cure for a few days.
Now I’m washing on pastels. It’s a mixture of water, ground up black
pastels and a drop of dish soap. I brush it onto the part then set
it in front of a fan to dry. When dry, I take a not very damp paper
towel piece and lightly wipe off the excess. After I finish all
of these parts, I’ll give them a flat coat of Future.
Here’s some pics.


08.15.04 » Drybrushing and Building
After the parts were chalk-washed I gave them a thin
coat of flat Future to seal in the grime. Next I used silver Rub-n-Buff
to drybrush all the internals to give them a worn metal look. The
first image shows the washed part with and without the drybrushing.
After that I gave the parts another coat of flat Future and began
to build. I’ve only gotten up to finishing the legs so far.


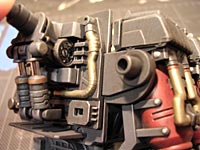
08.16.04 » Red Eye
So the Zakus internals are finished. I’ll be taking
good shots of them soon before I start working on the armor, so
keep an eye out for them. The Red LED that came with the kit is
really really bright. I may add a resistor to dim it a bit. The
second shot is with no lights on except the Zakus eye-light. The
other two are of the internals of the upper torso.


08.18.04 » Good Internal Pictures!!!
I took good pictures of the internals today.
Click Here!
I still need to do the dusy weathering and the rust,
but will be waiting till I get the armor to that point so I can
do it all at once.
08.18.04 » Good Internal
Pictures!!!
I took good pictures of the internals today.
Click Here!
I still need to do the dusy weathering and the rust,
but will be waiting till I get the armor to that point so I can
do it all at once.
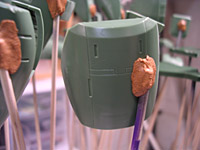
08.21.04 » The Old Grind…
I want this Zaku to look as if it’s been in active
service for years. To do this I’ll be denting and damaging the external
armor in places where it would have more contact with itself, the
ground, or other MS in combat. I have a second shield thanks to
Vengeful 1 so it has been damaged and will be replaced with a relatively
new and undamaged shield in the diorama. The damaged shield contains
strips of styrene in the hollow area to give the illusion of a multi-layered
armor.
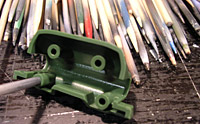
To do the damage, I’m used my dremel. After all the
damage was done, I placed the parts onto skewers. I included a pic
of how I put parts onto the skewers since people have actually asked
me that.
I am painting the insides of the armor first and will
be using the same technique as I did for the internals. The only
difference will be the addition of rust. Since a lot of the externals
don’t have “holes” I have had to use stickytack to hold
the parts to the skewers.


08.24.04 » Axe About Weathering the
Armor Interiors
For the external armor, my first step was to paint
the insides the same metallic gray as the internals. Then, the same
black chalk wash. After that though I did another chalk wash using
several shades of pastels mixed with water to make rust. Instead
of removing the excess with a damp paper towel, I used a stiff-bristled,
yet soft brush.
I applied it in areas where water may seep in an
start the rust process. I figure that these parts will be rustier
than the internals since the internals would be well-oiled and maintained.
After I put a very thin flat coat of Future on the
rust to keep it from dusting away and frem getting fingerprilted
or pulled up by tape, I’ll do a very slight drybrushing with the
Run-n-Buff. I tested the flat coat on the rust earlier. If I put
it on too thick, it darkens the pastels. However if I lightly spray
it, it leaves them relatively as-is, but protected from the drybrushing
and masking tape.
I also have a shot of the painted, damages, but unweathered
heat-hawk axe.


08.25.04 » Long Live Tamiya Extra Thin
Cement!
And their basic putty too. I’m just about ready to
start painting the camo on the exterior of the armor. First though,
I need to deal with a nasty little seam. The two halves of the leg
armor have a seam which just looks bad. A few of the other seams
like this I scribed out to be panel lines and they look fine. The
leg seam however…
Now that the internals are 95% done (still needs a
little rust) I can put the two halves together. I snepped them on
and ran Tamiya Extra Thin (E.T.) cement down the crack.
I waited a bit and squeezed to that the melted halves and plastic
squished together. After it dried, I sanded them down. There was
a few hairline cracks in the seam so I put some Tamiya Basic Putty
on my putty pallete with a drop of the E.T. Cement. THis thinned
down the putty so that I could apply it into the cracks easier and
I didn’t have to “glop” it on and risk messing up my internals
painting. I’ll sand the putty tomorrow after I’m sure it’s fully
cured.
I also began “building” the armor. This
will make it easier to line up my camo and instead of having to
mask a ton of insides, I’ll only have to mask the little bits of
the joints that are exposed. Here’s some pics »


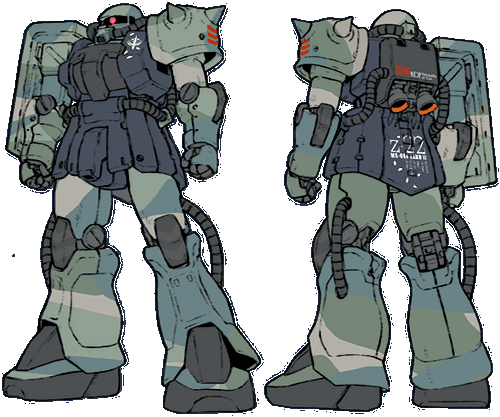
Also, here’s a pic that I found somewhere online (no
clue where) about a year ago that inspired my camo scheme. My final
camo will be closer to this than the lineart which I’ve changed
slightly, but haven’t re-posted yet.

08.26.04 » Altered Beast
I altered the color scheme image a bit to show what
the final piece will look like after my tweaks and changes. Mostly
just lightening the camo for scale, camoing the elbow disks, the
red elbows, and fixing the darks/body to what I’m painting now.
Altered Scheme »
Old Scheme »
08.27.04 » Camo Painting – Part 1
I’ve put together the arms and legs and masked off
the internals. I used masking paper and tamiya tape for this. After
that was all masked, I painted my first color which was my light
green. I went with the light green first because it’s easier to
paint darker on lighter as opposed to lighter on darker. (see first
pic)
After the light green had a bit to cure (about 24
hours) I masked off what I wanted to keep light green and then painted
the next color which was the light tan-gray. It’s as light as the
green so it really didn’t matter which one I painted first. I’ll
be leaving the tape on the parts and masking off the tan when it’s
dry enough. Probably tomorrow morning. I removed the tape from the
one arm piece that will only be tan and light green. (see second
pic)
Next I’ll be painting my blue-green color then finally
the olive drab. When that’s all done, I’ll remove all the tape revealing
the camo pattern.


08.30.04 » Camo Painting – Part 2
The camo is all done. After removing a ton of masking
tape I found that it turned out very nicely except for a few spots
that needed touched up. Those were easy enough to fix however.
The first pic is how I used small strips of tape to
outline my camo scheme. You can see the brown paper used to mask
off large areas which saved me a lot of tape. The second is of a
few un-futured parts and the last is the finished leg camo with
Future.


Next up in order is »
- Decals
- Gloss Future
- Panel lines, base paint on nicks and
dents, minus molds - Flat Future
- Weathering
- Flat Future
08.31.04 » Decals
I’ve been adding my usual plethora of decals to this
kit. One major difference is the size of the decals. The shield’s
is about 3.5 inches tall. In the pic below, you can see a few of
the parts which are already done. These are the only parts which
will have the flower petals on them. It’s good to have a theme,
but bad to overdo it. I also chipped some of the decals purposely
to simulate the markings paint peeling or being chipped. Again,
I have to watch that I don’t overdo it.

09.07.04 » Weathering
It’s been a while since my last update. Since then
I’ve gotten a lot done on the externals. I’ve still got a little
bit more to do, but the Zaku will be done soon.
Here’s what I’ve done since the last update:
- Finished placing all the decals
- Added another gloss coat of Future over
only the decals - Used oil-paint thinned with Testors thinner
to do a panel-line wash. The color I mixed resembled a grey-brown
muck which shows up light on the dark parts and dark on the lights.
After the paint set-up a bit (5 minutes) I used clean paper-towel
bits and wiped away the excess. - Gave all parts a flat-coat of Future
- Painted all the chipped and dented damaged
areas with the same metallic gray used for the internals - Used a thin black chalk wash inside of
the damaged areas and brushed it out with a stiff brush when dry. - Used ‘burnt sienna” oil paint and
a small brush and streaked the rust-stains on in places that looked
like water would pool and run from. - Gave all damaged areas a slight
dry-brushing with Rub-n-buff.
And that’s it. Whew! Next I’ll add another flat-coat
of Future which should take the shine away from the Rub-n-buff and
seal in the oils. I may add a little shine back with a slight drybrushing
here and there. After that, I’ll have to add the dirt and dust.
Here’s some pics »


09.10.04 » The Zaku
is Done!
I took good pictures of the finished Zaku today.
Click here for the full-sized images!


Now I have to finish the work on the diorama.
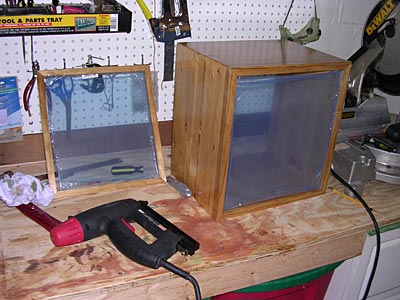
09.17.04 » Cabinet
The cabinet that will hold the dio cave is almost
done. I just need to find some nice hinges for the 2 doors and make
the front door knob. The doorknob will be a 1/144 Heat Hawk axe
made to look metallic. Here’s a pic of the box so far. The blue
is the clear film that protects the plexiglass.
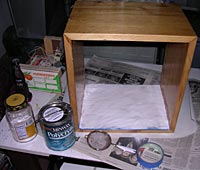
09.23.04 » Pavement
Tonight I got a chance to start work on the floor
of the repair bay. I’m using a techinque I found on the Testors
website for making “tarmak”. I used the same technique
for the pavement in my SWAT Ingram project. You first put down a
coat of acryllic matt medium, then while it’s still wet, add baking
soda on tap. When dry, you sand it down and carve in the lines.
Instead of matt medium, I used polyacryllic finish. When it’s all
dry, I’ll do the sanding.
09.24.04 » More Pavement
Okay, so the polycrylic + baking soda dried. Next
I brushed off the excess and put it back into my baking soda jar
for future use. Then I lightly sanded the floor. Next I masked off
more of the box and sprayed it with a dark gray primer. When that
dried, I sprayed down light gray primer. Finally, I used a t-square
and triangle and my scriber and scored the breaks and cracks in
the concrete.
Next, I need to weather and paint lines/numbers on
the pavement. I’m going to wait till the rock walls are done though.


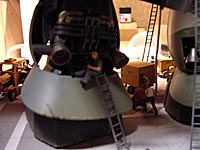
09.25.04 » The Vault
I mixed up some celluclay this afternoon and created
my cave/vault walls. Basically these repair vaults were excavated
as part of the larger underground complex using large mining machines.
Their floors were then smoothed out and filled with concrete to
smooth them out for vehicle and foot traffic. In many Gundam series
there are hollowed out asteroids and such used as bases so the technology
exists in the GUndam universe for this sort of thing. In the real
world however, I don’t know if one could excavate a vault this large.
The first pic is of the PG Zaku standing inside of
the box. I did this so I knew how high to add the control room.
The blue box in pic 2 is where the windowed control room will be.
I’ll pop that box out later when things dry.
Having learned a few things from my last celluclay
experience, I first added “anchors” to hold the celluclay
in place as it dries. I used a crappy staple-gun which never puts
the staple completely in the wood and added staples all over the
inside of the box. These will serve to hold everything in place.
Hopefully.
The celluclay was applied very thin. Nowhere is more
than 1 cm thick. This will allow it to dry faster and give me the
needed room for the dio. After the clay was added, I took several
clay tools and added the grooves to simulate where the machines
dug out the cave.
The final pic is of the box drying in front of my
dehumidifier. The warm air blowing out the front has already done
a good bit of drying in the past 4 hours.


09.27.04 » Rock On!
The celluclay dried incredibly fast.
Probably due to how thin I applied it. Yesterday
I was able to spray the dried clay black and then
later drybrush the rock face with acrylics. Now
that that’s done, I can start scratch-building
the crane and other dio accessories. You can see
in the pic where the control room will go once
it is built. After all of my accessories are built,
I’ll weather the floor and rock walls some more
with rust, oil, and water seeping through the
bedrock.

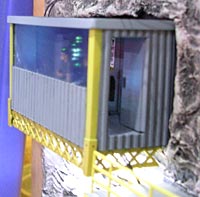
09.27.04 » Control
Room
I started the control room this
evening. This will eventually be glued into the
empty box in the rock wall. First though, it needs
constructed, painted and lit-up. The floor is
a cut piece of a Home Depot paint stirrer. Various
pieces of sheet styrene will make up the walls.
I’ll use a clear piece to do the window. Below
the window will be a control panel with a few
lit monitors.
The big ancient computer-looking
thing along the side wall is a radio from a Tamiya
M-8 Greyhound which a buddy gave me many parts
of to use as greebles. The chairs are also parts
from that M-8. I don’t know what they were supposed
to be, but they were screaming to be chairs. I
used rod styrene and a couple minus molds for
the chair support. I used my pin-vise to drill
little holes in the “computer” for light
to shine through.
I still need to construct the ceiling,
back and other wall (which will both have doors)
and control panel. I need to purchase some grooved
styrene sheet to make the outer walls of the room
look “paneled”.

09.28.04 » Bridge Crane
I’ve been having trouble deciding
how best to build the bridge crane. It needs to
fit with a 1.5 inch clearance yet look strong
enough to hold parts of the Zaku. Having searched
Yahoo Images for bridge crane pics and thinking
about what I can use styrene-wise to make construction
easier, and keeping in mind what I already have,
I came up with the following illustration. I’ll
add more info as I build it, but it’s made from
I beams, H beams and box girders. It’ll also use
various extra parts I have and other styrene for
details.

09.29.04 » Side Supports
I went to the hobby store today
and bought all the styrene I’ll need to finish
this project. Later, I started working on the
side supports for the crane. I started with a
14″ long Plastruct I-beam (gray) which was
1/4″ wide and 1/2″ tall. I used my razor
saw to cut the angles. The white support pieces
inside the “I” are 1/8 inch wide half-round
strip styrene. On top of the “I” is
1/4″ square tubing and on top of that is
a 1/4″ wide channel piece.
Next I’ll close up the ends and
add the panels to the sides. I may add holes for
lighting as well.

10.03.04 » Finished
Side Supports/In-Prog Control Room
I finished the side supports for
the crane today. Since my last progress report,
I added the styrene to the sides of the supports,
sanded, primed, added the panels to the sides
of the supports, drilled holes for red LEDs, added
brass pins, and drilled holes into cave walls
to hold support pins. It was a pain, but using
a t-square, pen-sized level, tape, and thread,
I was able to get the supports very level and
even.
I finished making the major part
of the control booth. I’ll be leaving the roof
un-attached until everything is complete so that
I can easily access the interior of the booth
for painting and setting up of the figures/equipment.
I used a “metal siding” sheet of styrene
which comes pre-grooved like you see. Much easier/cleaner
than adding strips of styrene to a plain sheet
like I did for the freight containers.
Next I need to make the doors for
the booth, prime the side supports and booth,
and build the bridge part of the crane.


10.05.04 » Crane
‘Trolley’ and Catwalk Supports
First off, I finished the major
work on the crane. Al that’s left to do is trim
the bridge a bit more, paint and glue it all together.
The “trolley” is made from sheet styrene
and various scrap. I wrapped thread around the
large spool and will be painting it the cable
color later. In the bridge, you can see the trolley
on its runners. I didn’t bother adding wheels
since they’d not be seen ever anyway.
The platform for the catwalks is
made from sheet styrene and various HO (i think)
train accessories (Stairs, girders, and railings)
I still need to construct the catwalks and add
the railings. The supports for the platforms are
styrene H-columns.
![]()


10.06.04 » Propaganda
I had this idea last night to make
small Zeon propaganda posters and have them hanging
in the control room and in the bay area. These
will only be about 1/2 inch tall when done. Here’s
what I came up with:


10.06.04 » Riding
the Rails
I got a chance to start the railings
and finish the main catwalk this evening. I had
the perfect pin-vice bit size to make placing
the railings on easier. Now the posts pop into
the pin-vice holes so I will not need a lot of
glue.
I need to adjust the main catwalk
a bit because the left side is a little high.
Here’s some pics of it all together
so far.


Click here
for a larger image of the second picture.
10.11.04 » Big update
full of small things…
I haven’t updated in a little bit
and as usual, as a result, I have a lot of pics
to post.
First off, my HO scale stairs set
also came with many ladders. There are 7 ladders
in that pic which means I from the 4 sprues, there
are 28 ladders total. I won’t be using all of
those, but it’s nice to know I have the option.
Also in the first pic you can see the conduits
running up the side of the wall. They’re not really
bent, but I think my camer lens did that.
The next pic is the hook I made
for the crane. Nevermind the angled edges, this
piece is only about 3/16″ tall. When looking
at it not zoomed in upon, you don’t notice those.
The next two images show how my
ceiling light fixtures will look. Obviously they’ll
need some paint.
The final 6 images are of the 1/72
scale Hasegawa figure/equipment sets I purchased.
I got a weapons loading set this weekend which
has a nifty little tractor to pull the other equipment
around with. The flat cart in the pic will be
converted into a scissor-lift (accordian lift)
in the down position. I haven’t added the wheels
to any of the pieces yet since adding them after
will make painting easier.


10.17.04 » Figures
and Such
Everything that needs buildin’ is
built. Yay! This weekend I primed everything including
the figures and began painting the figs as well.
I though that painting 20 figs would take a while,
but it’s going very quickly.
First I primed them all with Dark
Gray Duplicolor Primer. Next I handbrushed the
blue or green clothes. After that I painted the
various flesh tones and did the washes to bring
out the details. And the last thing I’ve done
is paint the hair (5-6 hair colors), white shirts,
and a few miscelaneous things. I have more things
to paint on the figs such as belts and undershirts
then I’ll give those parts a wash to bring out
the highlights.


10.20.04 » Go for the
Gold!
I’m almost done painting everything.
I only need to airbrush the ladders and do some
hand-painted detail work here and there. Here’s
a few shots of painted parts awaiting their Future,
weathering and decals.


10.27.04 » Painting
done, now onto finishing
Everything’s painted and ready to
be assembled. What I’m doing now is the final
weathering and wiring. Meanwhile, I’m begining
to fix parts of the dio into position permanently.
Here’s some pics.


10.28.04 » Wiring
it up
I worked on the wiring last night
and again this evening. It turned out great and
everything lit up without a hitch. I haven’t added
the light covers yet, so you’re seeing raw white
LEDs. You can see the lights on the wall unit
in the control booth and the final pic was taken
in complete darkness with all the lights turned
off. My camera must had did some compensation
for the low light because while the lighting is
bright enough in person, it’s not nearly as bright
as it looks in that pic.


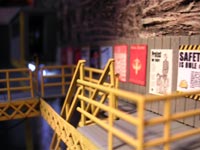

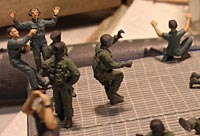
10.29.04 » Details
Details…
Whew! I didn’t think it’f take this
long to put all the fugs and such in place, but
it’s coming along. I’m taking extra time because
once they’re glued into position, that’s it. I
also have to make sure that I don’t put anything
in the way of the Zaku since it’ll have to be
removed when I transport it. Anyway, here’s a
shot from earlier when I was temporarily positioning
things. Since then, I’ve moved a lot around, but
it’s progressing.
By the way, I love this first shot
even though it’s a bit blurry. I’ll have to take
a final shot like this. The light and shadow on
the head rocks!


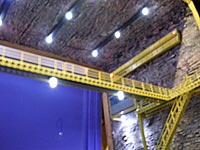
10.31.04 » Preview!
I’m excited and psyched, so I thought
I’d share. Here’s the test images I took about
1/2 hour ago. Basically, I turned off every light
in the basement and turned on the dio’s lights.
The only lighting in these images come from the
dio themselves and the pics have not been adjusted
in any way except for resizing and the watermark.
For the final shots, I’ll be putting
black paper over the back door so that it does
not show up. I won’t be able to take them till
tomorrow noght however as I need to cut the paper,
find my tri-pod (the camera (with timer set) was
sitting on stacked boxes for these shots) and
iron a rather large piece of black material I
forgot I had, but found when decorating for Halloween
for a backdrop.


![Maude [Cyborg Action-Doll] (Files Only)](https://fichtenfoo.net/blog/wp-content/uploads/2023/01/Maude-Promos-300x300.jpg)


