


Your cart is currently empty!
In Progress » Dampfrich
08.22.08 » Sources & Concepts
I wanted to design my own suit for a “Design
Your Own Suit” group build over at the Maschinen
Kreuger forums. I’ve also been on a steampunk kick so I decided
to combine both into a single build. This is a fully scratchbuilt
“what if?” suit based very lightly on the Heinrich.
MaK in the 1800s. (Ma. K. zbv 1800?) In fact it really doesn’t
resemble it at all except for them both having front windows.
I wanted this suit to be a fully enclosed and
armored suit based on antique diving suits and steam boilers.
It’ll have a large boiler on the back as wel as a plethora
of piping, valves, knobs and rivets.
I did a lot of research when starting this.
The bulk of it consisted of doing Google image searches on
steampunk, steam engine, steam boiler, antique diving helmet,
and more. So much great stuff in my searches that I’ve been
inspired to make several more steampunk builds in the near
future.
08.18.08 » Initial Scratchbuilding
I wanted the front to have that diving helmet
look, but also have a larger view port similar to the Heinrich
or Gustav. The cock-looking object next to it is the boiler
for the backpack. The larger ball-portion will be hollowed
out and be filled with coal. I’ll make a vented door for it
first.
I also want to have him holding a bronze cannon,
possibly steam-powered, similar to the center one here. Ideally
I can find someone to lathe the basic shape for me (rings,
ball-end and taper) and I’ll add the floral designs. Otherwise
I’ll have to look around for something similar in size and
shape for my needs. I want it to be about 5″ long total
and have a ball-end like the other 2 in this
image.
The base will likely be cobblestone with a gaslight.

08.18.08 » More Scratchbuilding
Here’s the start of the powerplant on its back.
I’ll be adding some watch gears and some of those old-fashioned
electrical capacitors on the back near the top. Plus lots
of piping, rivets, and knobs.


08.18.08 » Even More Scratchbuilding
Here’s the latest on the Dampfrich. I made my
grab/roll-bar around the top from brass rod and styrene. The
steam whistle is made from miscellaneous parts. And I hollowed
out the large sphere a bit for the door and to add coal later.
I started on the shoulders and arms. The thinner tube inbetween
the shoulder and mid-upper arm will be covered in Aves later
to make that a leather joint cover. Oh, and I finished the
hinge for the top hatch.
For the finish I’m planning to be mostly copper
for the main body with brass, bronze and iron accents. There
will probably be some wood in there as well and definitely
some leather. The interior will have a nice leather (with
buttons) chair-back and the rest of the interior will be flocked
in red to simulate that classy red velvet of the time period.
And with all of that, a “nicely worn and used patina”
as was used to describe steampunk on one of the sites I researched.


08.20.08 » Even More Scratchbuilding
Here’s the latest! Mostly I’ve just worked on
the front window detail and door. I made a mold for my Wave
hex-bolts since I felt like I was buying way too many of them
lately. I used those on the interior of the door and on the
outside I used the same diameter slices of hexagonal rod from
plastruct. That stuff is great for bolt-heads… just slice
and glue. I also did a few strips around the body which will
later have more bolt-heads or rivets. Screws on the door were
made from heat-mushroomed sprue and the groove cut with a
scribing saw.
I also found some cannons at the LHS in a set
of civil war soldiers. This came with a single cannon, but
2 barrels which will leave me with another for future ideas.
The wheels and cannon-mount will also co into the spares box
for future oddities.


08.21.08 » Feeling Riveted
Here’s yesterdays progress. I started a periscope
on the hatch along with a breathing tube/air hole. I also
added bolted bracings around the exterior. The bolts are hexagonal
rod from plastruct sliced thin. I made a mount for the steam
whistle as well. I also too a shot of the window glass pieces
cut from package plastic. Oh, and I started the front armor
skirt too.


08.22.08 » Standing Tall
At this point I’ve finished the very basic shapes
for the legs, but enough to stand him up! Yesterday I made
the basic shapes from styrene. Today I stuch them to some
duct tape so seal-up one end of the hollow shapes then filled
them with white resin. This makes them easier to add pins
to for posing and whatnot.

Shown here the suit is standing on its own.
The feet are solid boxes right now, but later I’ll carve and
file them into more of a foot shape. You can see the penciled
lines where I’ll be cutting. I’ve also finished the front
and rear skirts and mounts.


A few people asked about my bolt molds. Since
I’ll be using a LOT of Wave option bolts I decided to make
a simple 1-piece mold in order to make as many as I’ll ever
need. Glue the bolts to a piece of styrene then place into
the bottom of a cup. Apply mold release then pout your mold
mixture into the cup over the styrene and bolts. Remove the
mold when cured and pour leftover resin into the top an time
you have some. Then slice them off the form and you’re done!

08.27.08 » Just about done…
This week I’ve been adding a plethora of rivet
detail and finishing up the other additions to make it steamworthy.
First up on the backpack is where I’ll be placing some watch
gears as detail. You can also see the wood being used as the
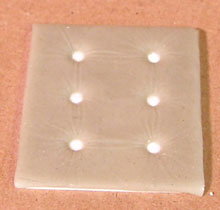
electrical insulating mount. After is the seat-back. I rolled
out some Aves Apoxie Sculpt then applied it to a square of
styrene. Next I brushed it with water and put a piece of plastic
wrap over it spread flat. The back of a needle file tool was
used to push in the plastic where the buttons will be creating
the wrinkles in what will eventually look like leather. Remove
the plastic and let cure!

And lastly here is the final suit. Not pictured
is the electrical cables valve knobs, pilot, and there’s “ugly
toob” instead of thicker spring for now. Need to pick
that up still. I also need to add a cast texture to the cannon
and lower boiler. After that it’s on to priming and painting!


08.30.08 » Pilot, Color and Paint
First up is a shot of the pilot I sculpted.
I think the cap and goggles and big mustache sets off the
steampunk mood. “there’s no beard like a nineteenth century
beard”

Nextly is the rough color scheme. I took one
of the above images and filtered it to look like lineart.
THen I colored it and added a few more filters to give it
this look. Basically it’ll be leather, copper, brass, iron,
and bronze. All od which will have a nice tarnished look.

Since I’ll want to keep track of what I did
for future reference, and of course to let everyone else know,
here’s how I’m painting this beastie. First everything got
a coat of Alclad II Jet Exhaust. For the copper parts I sprayed
on in the center of panels and such Alclad II Copper. For
the Brass, I was on my own since AFAIK Alclad still doesn’t
make a brass paint. For mine I mixed a touch of Alclad II
Jet Exhaust and Copperwith Pale Gold and Magnesium. Probably
70:30 Gold to Magnesium then a small amount of the J.E. and
Copper. This makes a very dull brass color. I could make it
more yellow-brass by adding some more gold and copper to the
mix. Basically mix to taste. This too was sprayed like the
copper over the Jet Exhaust base.


09.01.08 » Paint and Gears
Next up with the painting I used various mixes
of Rub-n-Buff thinned with mineral spirits to discolor the
metallic surface. Silver and Gold were miced to lighten all
the brass bolts and discolor the brass and “Autumn Gold”
which is really like copper was used to lighten and discolor
the copper bolts and surface. Also shown is the various valve
wheels that I’ll be using. They were painted in brass then
dabbed with red acrylics to give them a rough painted and
chipped look. ALso shown are the boiler and secondary steam
tank. Silver Rub-N-Buff, thinned with mineral spirits was
used to simulate solder on the pipe joints. Silver RnB was
also used to lighten the bolt heads on the steel portions.


Next is the body with a satin coat of Future
Floor Acrylic. This seals the metal paint, evens the sheen
and creats some tooth for the later oil-paint weathering steps.
Also shown is the built-watch-part gear sections of the backpack
and electrical system. You can also see more silver solder
detail painted on the copper piping around the waist.

09.03.08 » Weathering and Flocking
Prep
The poast few days I worked on weathering this
contraption. First I applied a filter of dark yellow from
the 502 Abteilung line of oil paint. When cured I applied
my discoloration which consisted of 502 Abteilung Industrial
Earth, Navy Blue, and Dark Yellow. Lastly after the discoloration
had a chance to dry I applied pin-washes of thinned Black
and Industrial Earth oil paint. These were also streaked to
make greasy/sooty rail marks. Next up is pigment powders.
Here is a larger shot of the back as requested.


In the next two shots you can see that I painted
the interior (badly) with a marron mix of acrylics. This is
just a back-coat for the marroon flocking which will be applied
over it. I wanted to make sure that there was a back coat
in case there was thin spots in the flock coverage that would
show through. I managed to mix-up a nice match. The flocking
will look like the interior has a maroon felt coating. Very
luxurious and I think it will fit in with the look of the
period. More on
application of flocking can be found here. I also used
it in Vorflugkontrolle.


09.04.08 » Building and Flocking
Yesterday I flocked the interior and constructed
the rest of the painted backpack. The flocking is being particularly
difficult to photograph however due to the dark color. Next
up is to finish painting the leather parts and the figure
and weather with pigment powders. Oh, and the new front window
glass is from a watch-face. (part of a large amount of watch
parts I purchased on eBay) Worked out well!


09.07.08 » Final Update
Here’s the final update. In the first image,
you can see the flocking better and the seat back inserted.
In the last 3 images you can see the painted pilot and the
leather padding around his torso. As is usual with MaK-type
suits, the pilot would never fit in without being deformed
some how. Note the extremely short waist of the pilot!


![Maude [Cyborg Action-Doll] (Files Only)](https://fichtenfoo.net/blog/wp-content/uploads/2023/01/Maude-Promos-300x300.jpg)


