


Your cart is currently empty!
Completed » Maintaining the Malevolent Creature

The Story »
The smell of oil and ozone fills
the air as the support crew of Unit 22 struggle
to complete repairs in the dim light and dank,
stale air of their bunker. Their megalithic charge
looms overhead, an MS-06F Zaku II. Most of the
repairs have been completed except for the right
arm. In the opening artillery barrage, it took
several hits, and needs work before the giant
can return to battle.
For the past seventy-two hours,
their underground base has been under siege, their
giant doors, bombarded by artillery fire. Deep
within their excavated borrows they’ve safely
held out, awaiting reinforcements which may never
come. The doors have held, but unless they can
get their last remaining Zakus running, they’ve
no hope of disabling the Federation Gun Tanks
and their supporting Mobile Suits.
Planning The Diorama »
This whole thing started in October
2003 when friend had asked if I wanted to buy
an extra Perfect Grade Zaku which he had three
of. The price was decent enough, so I decided
to take it off his hands. I had several other
projects in the works so I put off working on
the kit. In the meantime however, I started planning
what I wanted to do with this rather large kit.
From the start, I wanted to do something
grand. I’m not likely to do a lot of big expensive
kits like this, so I decided to make it worth
my while. I also wanted to do something where
I could display the nifty internals. Since I wasn’t
aware of any Perfect Grade dioramas, I decided
that I was going to construct one.
My first idea was to make an outdoor
dio with some repair crew working on the kit in
a fall setting. I found the Hasegawa figure and
equipment sets on Best1Hobby’s web site and decided
to get them with some prior contest winnings.
I was going to have the figures coming from a
cave door in the side of a hill and the Zaku would
be kneeling outside the door with it’s panels
open. I later used this bay door idea on my
Abandon Base diorama.
The Zaku was going to have a fall
camo scheme with browns, burgundy’s and olives.
Since it was fall at the time, I collected leaves
and branches which I was going to use for the
ground. I had two concerns though, the space to
fit a large outdoor diorama, and the consequences
of dusting the ground cover since I hadn’t planned
on enclosing it in a clear box.
At this time, I worked up my decal
designs. I wanted an outdoors theme and was online
searching for reference materials for camo schemes.
I remembered a book of fairies I had and flipped
through the pages remembering the images of leaves
and goblins. After looking through the book, I
sketched up a fairy/goblin that I would use on
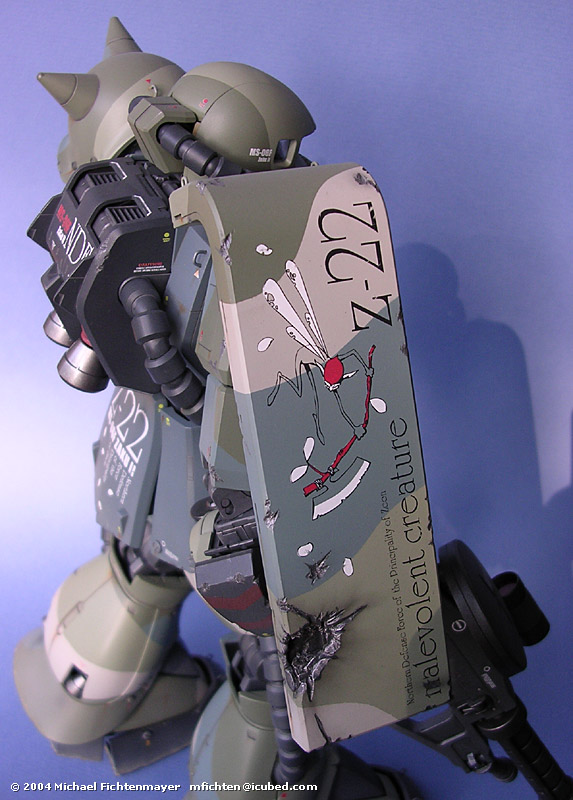
the shield. I gave it a spring blossom twig version
of the standard Zaku Heat Hawk axe that came with
the kit. After I redrew my sketch in Illustrator,
I worked up markings to match the feel of the
emblem. I added more petals on some of the other
markings to tie the whole look together. I ended
up calling this design the Malevolent Creature.
Since I had the time, I began to
rethink my outside diorama idea. I still wanted
to go with a maintenance theme, but needed a better
setting. After much rethinking, I decided to do
a cave setting. A large wooden box was needed
for this idea. I measured my shelves and made
the box deep enough to not hang over the edge
too much when done. To combat dust, I decided
to make two wood-framed plexiglas doors for each
open side of the diorama.
When doing this, I thought about
my lack of shelf space and how I had a large open
spot of wall in my office/display area. Because
of this I made the back door set inside the box,
while the front door framed the outside. I did
this so that the box would support the dio and
not a weak hinged back door.
Initially, my idea was to have the
back of the cave be some big rock doors opening
under a waterfall. After I made the box and saw
how much room I didn’t have, I changed plans again
and went with an excavated underground maintenance
bay setting.
I had decided to light the bay after
realizing how easy and fun wiring LEDs could be
with my Abandon Base
diorama. Ebay is a great place for large amounts
of LEDs for cheap. I got 50 bright white LEDs
for about seven dollars. I also knew that I’d
want to take this diorama when completed to some
of the local model shows. This meant that I’d
need a long lasting power source and a place to
house it. After consulting my friend Zog, I decided
to go with 2 D-cell batteries. THese will supposedly
give me 10-18 hours of power based on the number
of LEDs I used, however I haven’t tested this
yet.
To house the batteries, I scratch-built
a large freight container. I constructed a smaller
one to house the on/off switch. Later, I realized
that I could had purchased similar-sized containers
and just painted them, but scratch-building them
was fun and as always I learned some new techniques.
A growing concern of mine before
I began construction was how I would build the
catwalks, stairs, ladders, platforms, and the
bridge crane. As luck would have it, I soon found
HO scale train accessories that were perfect for
what I needed. I purchased a box girder kit, a
stairs and ladders kit, and 2 sets of fence kits
since I needed a lot of the metal pole type. After
finding these, construction became less of a worry.
The last thing I designed was a
series of “propaganda posters” for the
Principality of Zeons struggle against the elite
of the Earth. I used images of various characters
from the Gundam universe and laid the posters
ont in Photoshop. They were then printed on a
high-quality matt finish photo paper.
Constructing the Diorama
»
When I had started this project,
I began building everything at once. The amount
of various items which needed built, constructed,
wired, and painted was overwhelming. I decided
that I needed to take this project one step at
a time. I divided the project into three sections.
First, I would build/paint the internal
skeleton of the Zaku. There were hundreds of parts
for this and they needed to be completely finished
before I could move onto the second part which
was painting and detailing the outer armor. Normally,
I do very clean mechas without any weathering.
This one however had to have a realistic worn
feel to it. I had researched a lot of armor modeling
web sites and found several techniques using dry
brushing, pastel washes, and oil washes that worked
out wonderfully.
After the internal skeleton was
completed, I took some photos of it. I did this
because it would be the last time I was all of
it exposed ever again. Because of the way the
kit was molded, I needed to glue on the external
armor in several places to remove seam lines.
This meant I could no longer remove the outer
armor. I masked off the internals and removed
the seams. Then I greebled the outside with minus-molds
and d-rings made from floral wire.
I painted the externals in a similar
scheme to a fighter plane which I saw images of
online. After the camo was painted, I applied
2 coats of Future floor acrylic and then applied
my decals. When that was done, I applied another
gloss coat of Future and applied my oil wash and
rust streaks. Over that I applied a coat of Future
flattened with Tamiya Flat Base.
Next I airbrushed a layer of thin
dirt/dust onto the armor. This was a mixture of
Tamiya Acrylics and flattened Future to make it
somewhat transparent. The tops of the armor got
more dust as I figured that the cave maintenance
bay would be a dusty place. After that I used
a pastel wash and applied the dried dirt to the
feet.
Now that the Zaku was completed,
I took pictures of it completed. I wouldn’t see
it completely covered again once it was placed
into the diorama.
My last step was to construct the
diorama. I had stained and finished the box prior
to starting the Zaku so all I needed to do was
construct everything. First was the cave and floor.
The floor was made from sprinkling a layer of
baking soda over some matt medium and allowing
it to dry. After, it was sanded flat, primed and
painted, the grooves and cracks were scribed into
it using a Testors scriber tool.
The walls were constructed using
Celluclay. The clay was applied thin, then grooved
out using some clay tools. The walls were sprayed
with black flat Krylon spray paint. After that
dried, I used a cheap 2 inch nylon paintbrush
which I cut in half and dry brushed the rock with
cheap acrylic paint. I started with dark gray-brown
and with each layer I went a few steps lighter.
This gave the walls more depth.
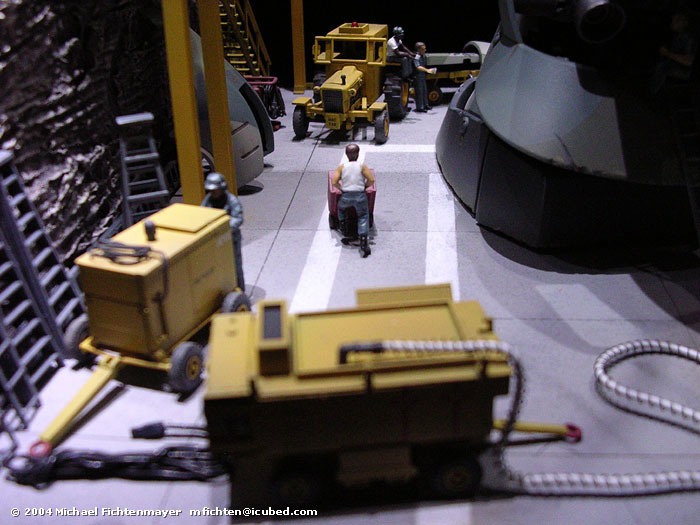
Next up was constructing the crane,
catwalks and control booth. I used sheets, rods,
strips, and tubes of styrene and the railroad
accessories to build everything. Since the setting
was a dark cave, I painted it in common gold construction
colors so that they would be more visible in the
dim surroundings.
The Hasegawa aircraft support crew
and equipment sets were a blessing. They worked
out perfectly for this dio. I got a large variety
of figures that I built into a number of poses.
I was able to make them all a little different
as well. Different skin and hair colors as well
as different uniform colors. Blue overalls/fatigues
for the workers and olive drabs for the soldiers
and pilots.
When all of the equipment and bay
pieces were done, I used the same weathering techniques
on them. All of the equipment, the crane, the
walks and stairs were given an oil-wash and then
sprayed with a layer of my dust mixture.
The wiring was the trickiest part
of all. I had to make some of it hidden and I
had to make the exposed wiring look like it belonged
there. The wires start from the large red freight
box and run up one of the pipes. They then go
behind the left crane support when they light
up the 2 red LEDs.
Black wire was then strung to since
it simulated electrical wire between the light
support girders on the ceiling. The wire then
runs to the right crane supports red LEDs, then
to the control booth where it powers LEDs for
the computer console and the two monitors. From
there it travels to the lights below the control
booth and under the main catwalk.
The light covers were made from
aluminum tubing which was left bare on the inside
to reflect more light and painted on the outside
to match the support girders.
After everything was built, I began
putting it all together. I figured I could have
it done in an afternoon, but placing everything
was a longer task than I had anticipated. This
was mostly due to my wanting everything to look
perfect. Once I glued something down, it had to
stay or else I’d have more sanding and repainting
to do.
After everything was positioned,
I began to use CA glue to put everything in place
permanently. The white tubes running from the
pipes to the Zakus back needed to be glued to
the floor to have a realistic look. The wires
for the lights were shaped to look like they were
draped between the girders. The figures and equipment
were also put into position. I also glued my propaganda
posters to the fences against the cave walls.
Finally, I added the hinged doors
and was able to photograph the finished piece.
I’m very pleased with how it turned out and consider
it to be my best piece yet.


![Maude [Cyborg Action-Doll] (Files Only)](https://fichtenfoo.net/blog/wp-content/uploads/2023/01/Maude-Promos-300x300.jpg)


